
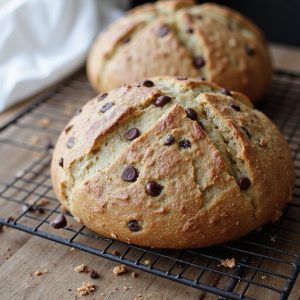
There’s something about tearing into a still-warm loaf of chocolate chip sourdough that feels like pure comfort.
Picture a burnished, crackly crust, marbled with pockets of melted chocolate, and a tender, tangy crumb that smells like a bakery and a dessert shop rolled into one.
This is a cozy, feel-good bake—part everyday bread, part sweet treat—perfect for relaxed weekends or whenever you’ve got a few unhurried hours to let the dough work its magic.
It’s ideal for sweet-tooth fans, brunch lovers, beginners keen to try “fancy” sourdough, and anyone who bakes to unwind.
I still remember a stormy Sunday when this loaf turned a grey afternoon into an impromptu family brunch, slices disappearing under soft butter and flaky salt. It shines at slow Sunday suppers, casual gatherings, and those late-night chocolate cravings. Ready to bring this loaf to life in your own kitchen?
Why You’ll Love It
- Delivers a perfectly tangy, subtly sweet chocolate-studded crumb
- Balances dessert indulgence with the complexity of real sourdough fermentation
- Feels special yet uses simple, familiar sourdough techniques and tools
- Stays moist and tender, ideal for toasting or snacking all week
- Impresses guests as a bakery-style loaf from your home kitchen
Ingredients
- 100 g active sourdough starter — 100% hydration and very bubbly
- 325 g water — room temperature for easier mixing
- 450 g bread flour — higher protein for better structure
- 50 g whole wheat flour — adds flavor and color
- 9 g fine sea salt — evenly seasons the dough
- 120 g semisweet chocolate chips — 50–60% cocoa so they hold shape
- 15 g unsalted butter, melted and cooled (optional) — for a softer, richer crumb
- 10 g granulated sugar (optional) — makes the loaf slightly sweeter
- 5 g neutral oil (optional) — for lightly greasing the bowl
Step-by-Step Method
Mix the Starter and Water
Whisk the active sourdough starter and room-temperature water in a large bowl until mostly dissolved.
Break up any thick bits with the whisk or your fingers, creating an even, milky mixture.
This guarantees the natural yeast is well distributed, helping the dough ferment evenly and rise properly later.
Combine the Flours
Add the bread flour and whole wheat flour directly to the starter mixture.
Stir with a wooden spoon or spatula until no dry flour remains.
Scrape down the sides of the bowl as needed.
Form a rough, shaggy dough rather than a smooth one.
Don’t knead yet; just guarantees all flour is hydrated.
Rest for Autolyse
Cover the bowl with a towel or plastic wrap.
Let the dough rest at room temperature for 30–45 minutes.
Allow the flour to fully hydrate during this time.
Let the gluten begin to develop naturally.
Improve dough extensibility and flavor.
Avoid disturbing or shaping during this rest; simply let it sit.
Add Salt, Sugar, and Butter
Sprinkle the fine sea salt and optional sugar evenly over the dough.
Pour in the melted, cooled butter if using.
Pinch the dough between your fingers to incorporate.
Fold the dough over itself several times to distribute everything well.
Continue until no visible streaks of butter or patches of salt remain.
Begin Bulk Fermentation
Cover the bowl again and leave it at room temperature for 3–4 hours.
Start the bulk fermentation phase, where the dough rises and develops structure.
Plan to perform stretch-and-folds every 30 minutes for the first 2 hours.
Allow the natural yeast to produce gas and flavor as the dough slowly inflates.
Perform First Stretch-and-Fold
Wet your hands lightly to prevent sticking.
Lift one edge of the dough, stretch it gently upward, and fold it over the center.
Rotate the bowl and repeat on all sides.
Build strength without kneading aggressively.
After this first set, the dough should already feel smoother and more cohesive than before.
Add First Portion of Chocolate Chips
Sprinkle about one-third of the chocolate chips evenly over the dough’s surface.
Gently fold the dough over itself to trap the chips inside.
Avoid tearing or aggressively mixing, which could smear the chocolate.
Aim for even distribution while keeping the dough structure intact.
Cover again and let it rest until the next fold.
Continue Stretch-and-Folds with Chocolate
Every 30 minutes for the next 1–2 sets, repeat the stretch-and-fold process.
Add the remaining chocolate chips in two portions during these folds.
Sprinkle them over the dough before folding.
Distribute the chocolate throughout the loaf without overhandling.
Stop adding chips once they’re fairly evenly spread in the dough.
Finish Bulk Fermentation
After the final set of folds, leave the dough undisturbed.
Let it continue fermenting at room temperature until it has risen by about 50%.
Check that it feels airy, puffy, and slightly jiggly when you shake the bowl.
Avoid overproofing; the dough should still feel strong and not overly collapsed or sticky.
Pre-Shape the Dough
Lightly flour your work surface.
Gently turn the dough out of the bowl using a dough scraper.
Avoid deflating it too much.
Tuck the edges under to form a loose round.
Let it rest uncovered for 10–15 minutes.
Allow the gluten to relax, making the final shaping easier and the surface smoother.
Shape into a Tight Loaf
Dust your hands lightly with flour if needed.
Shape the dough into a tight round or oval by folding edges toward the center.
Create surface tension by gently pulling the dough against the counter.
Rotate and repeat until the loaf holds its form.
Aim for a smooth, taut surface without tearing the dough.
Prepare the Proofing Basket
Lightly flour your proofing basket or line a medium bowl with a clean kitchen towel.
Dust generously with flour to prevent sticking, especially around the sides.
Place the shaped dough seam side up in the basket or bowl.
Adjust it so it sits centered.
Cover with a towel or plastic wrap to protect from drying.
Cold Proof Overnight
Transfer the covered basket or bowl to the refrigerator.
Let the dough cold proof for 8–12 hours.
Slow the fermentation to develop deeper flavor and better crust.
Firm the dough, making scoring easier later.
Avoid moving or jostling the dough too much during this time so it keeps its structure.
Preheat the Oven and Dutch Oven
About 45–60 minutes before baking, place your Dutch oven with its lid into your oven.
Preheat to 475°F (245°C).
Guaranteethe pot is thoroughly heated to help with oven spring.
Allow enough time for the entire oven and cookware to reach temperature.
Keep the lid on while preheating.
Transfer and Score the Dough
Remove the dough from the refrigerator.
Cut a piece of parchment paper larger than the loaf.
Gently invert the dough onto the parchment, seam side down.
Use a sharp knife or lame to score the top with one or more confident slashes.
Create expansion paths so the loaf can rise nicely during baking.
Bake with Steam in Dutch Oven
Carefully lift the parchment with the dough and place it into the preheated Dutch oven.
Cover with the hot lid.
Return it to the oven and bake covered for 20 minutes.
Trap steam inside to encourage a strong oven spring and shiny crust.
Maintain the temperature at 475°F (245°C) during this covered phase.
Finish Baking Uncovered
After 20 minutes, remove the lid carefully to avoid steam burns.
Reduce the oven temperature to 450°F (230°C).
Continue baking uncovered for 15–20 minutes.
Watch for a deep golden-brown crust and fully melted but not burned chocolate.
Check that the loaf feels light and sounds hollow when tapped on the bottom.
Cool the Bread Completely
Remove the loaf from the Dutch oven and place it on a cooling rack.
Let it cool for at least 1 hour before slicing.
Allow the crumb to set and the chocolate to firm slightly.
Prevent gummy slices and smeared chocolate by resisting the urge to cut too early.
Slice once fully cooled and enjoy.
Ingredient Swaps
- Use all-purpose flour instead of bread flour if needed; reduce water by 10–15 g if the dough feels too loose.
- Swap whole wheat flour with spelt, rye (up to 30 g), or more bread flour if those are unavailable.
- For dairy-free, omit butter or replace it 1:1 with a neutral oil or coconut oil; use dairy-free chocolate chips.
- For less sweetness, skip the sugar and/or reduce chocolate chips to 80–100 g; for a richer dessert loaf, increase chocolate to 150 g.
- If you don’t have a sourdough starter, this recipe won’t directly convert to commercial yeast without rebalancing; use a dedicated yeasted chocolate chip bread recipe instead.
You Must Know
– Avoid • If chips keep burning or leaking out: Keep most chocolate toward the center of the dough as you fold, and make sure any chips on the surface are lightly covered with dough; overly exposed bits during the final 15–20 minutes of uncovered time can scorch and taste bitter.
Serving Tips
- Serve slightly warm with a pat of salted butter or mascarpone.
- Pair slices with fresh berries and a dusting of powdered sugar for brunch.
- Toast leftovers and top with almond butter and a drizzle of honey.
- Make dessert “grilled cheese” with brie or cream cheese between thin slices.
- Plate with a scoop of vanilla ice cream and a sprinkle of sea salt.
Storage & Make-Ahead
Chocolate chip sourdough keeps in the fridge for up to 5 days, well wrapped to prevent drying and odor absorption.
For make-ahead, bake, cool completely, then freeze the whole loaf or slices, tightly wrapped, for up to 2 months.
Thaw at room temperature, then refresh in a low oven.
Reheating
Reheat slices in a 300°F (150°C) oven for 8–10 minutes, or briefly in a covered skillet on low.
Microwave 10–15 seconds, wrapped in a slightly damp towel, to avoid drying.
Chocolate Chip Bread Traditions
On chilly weekends, I always think of chocolate-studded loaves as the cozy cousins of both dessert and breakfast bread, blurring the line between the two in the best way.
When I was growing up, “fancy bread” meant anything with chocolate, saved for birthdays or snow days. Now, I love how this tradition has softened into something more everyday, yet still special.
In my kitchen, I slice chocolate chip sourdough thick and serve it warm, almost like a shared ritual. Some families pass cinnamon rolls around the table; we pass this loaf, wedges of melting chocolate streaking the crumb.
I’ve started gifting it instead of cookies—wrapped in parchment, still faintly warm—inviting friends into this small, chocolate-scented tradition.
Final Thoughts
Give this chocolate chip sourdough a try and see how it transforms your usual loaf into something a bit more special.
Don’t be afraid to tweak the sweetness, chocolate amount, or add-ins so it fits your own perfect idea of dessert bread.
Frequently Asked Questions
Can I Make This Chocolate Chip Sourdough Completely Vegan?
Yes, you can. I’d simply skip the butter, use vegan chocolate chips, and lightly oil the bowl. You’ll still smell that tangy, warm loaf, just like when I first baked it for my vegan sister.
How Do Altitude Changes Affect Proofing and Baking This Bread?
Altitude speeds fermentation and drying, so I’d shorten bulk and final proof, watch for faster puffiness, add a bit more water, and bake slightly cooler, longer—I learned this after one loaf ballooned, then collapsed dramatically.
Is This Recipe Suitable for Bread Machines or Stand Mixers?
It’s better for a stand mixer than a bread machine; I’d mix and knead with the mixer, then still proof and bake by hand—you’ll feel the dough change, smell the fermentation, and control the crust.
How Can I Adapt This Loaf for Gluten-Sensitive Eaters?
I’d switch to a trusted gluten‑free sourdough starter and blend, increase hydration, and add psyllium husk. When I bake this way for my gluten‑sensitive friend, the loaf smells nutty, slices tender, and feels gentle.
What Are Common Mistakes That Cause Dense or Gummy Chocolate Chip Sourdough?
I usually see dense, gummy loaves from under-proofing, weak starter, slicing warm, or too-wet dough. I’d watch for puffy, airy dough, bake fully, cool completely, and add chocolate late so it doesn’t smear.
Chocolate Chip Sourdough Bread
Equipment
- 1 large mixing bowl
- 1 Medium bowl
- 1 digital kitchen scale (optional but recommended)
- 1 Dough scraper
- 1 wooden spoon or silicone spatula
- 1 proofing basket or 1 medium bowl lined with a clean kitchen towel
- 1 Dutch oven with lid or 1 heavy oven-safe pot with lid
- 1 sheet of parchment paper
- 1 sharp knife or lame for scoring
- 1 Cooling rack
Ingredients
- 100 gram active sourdough starter 100% hydration
- 325 gram water room temperature
- 450 gram bread flour
- 50 gram whole wheat flour
- 9 gram fine sea salt
- 120 gram semisweet chocolate chips
- 15 gram unsalted butter optional, for softer crumb; melted and cooled
- 10 gram granulated sugar optional, for a slightly sweeter loaf
- 5 gram neutral oil optional; for greasing bowl
Instructions
- In a large mixing bowl, whisk together the active sourdough starter and water until mostly dissolved.
- Add bread flour and whole wheat flour to the bowl and mix with a spoon or hands until no dry flour remains and a shaggy dough forms.
- Cover the bowl and let the dough rest (autolyse) for 30–45 minutes at room temperature.
- Sprinkle salt and sugar (if using) over the dough, then add melted and cooled butter (if using) and mix by pinching and folding until fully incorporated.
- Begin bulk fermentation by covering the bowl and leaving it at room temperature for 3–4 hours, performing 3–4 sets of stretch-and-folds every 30 minutes during the first 2 hours.
- After the first set of stretch-and-folds, gently sprinkle in a third of the chocolate chips, folding them into the dough without tearing it.
- Add the remaining chocolate chips over the next 1–2 sets of stretch-and-folds, distributing them as evenly as possible.
- After the final set of folds, allow the dough to rest undisturbed until it has risen by about 50% and feels airy and puffy.
- Lightly flour your work surface, gently turn out the dough, and let it rest for 10–15 minutes to relax.
- Shape the dough into a tight round or oval loaf by folding the edges toward the center and then tension-pulling it against the counter.
- Lightly flour the proofing basket or towel-lined bowl and place the shaped dough seam side up inside.
- Cover the dough and place it in the refrigerator for an overnight cold proof of 8–12 hours.
- About 45–60 minutes before baking, place the Dutch oven with its lid into the oven and preheat to 475°F (245°C).
- Remove the chilled dough from the refrigerator, place it seam side down on a piece of parchment paper, and quickly score the top with a sharp knife or lame.
- Carefully transfer the dough on the parchment into the preheated Dutch oven, cover with the lid, and place it back in the oven.
- Bake covered for 20 minutes, then remove the lid, reduce the temperature to 450°F (230°C), and bake for an additional 15–20 minutes until deep golden brown.
- Remove the loaf from the Dutch oven and place it on a cooling rack.
- Let the bread cool completely for at least 1 hour before slicing to allow the crumb to set and the chocolate to firm slightly.
Notes

Cynthia Weatherford is a seasoned chef and culinary enthusiast who serves as the Recipe creator of Somonday. With decades of experience in the kitchen and a passion for exploring diverse cuisines, Cynthia brings a blend of creativity and technique to every dish. Known for transforming simple ingredients into show-stopping meals, Cynthia believes that cooking is an art form anyone can master. Dedicated to inspiring home cooks, Cynthia shares approachable recipes, pro tips, and culinary wisdom to make every meal memorable.


