
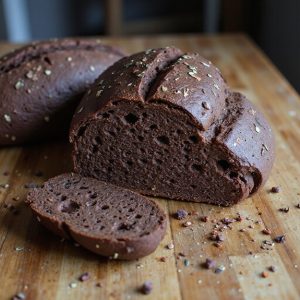
There’s something about the first slice of chocolate espresso sourdough that stops you in your tracks.
Imagine a burnished, crackly crust giving way to a tender, mocha‑colored crumb, freckled with melted chocolate and perfumed with deep espresso and tangy sourdough.
This is a cozy, slow-crafted loaf—perfect for leisurely weekends rather than rushed weeknights—but most of the time is hands-off, letting the dough quietly transform on your counter.
It’s ideal for comfort seekers, brunch hosts, serious coffee lovers, and anyone who likes their desserts just sweet enough.
I first baked this loaf after a long, gray week, when regular toast felt too plain. One warm slice, with butter sinking into the chocolate pockets, turned an ordinary Sunday afternoon into a small celebration.
This bread shines at lazy Sunday breakfasts, as a special treat for guests, or sliced for late-night cravings. Ready to bring this loaf to life?
Why You’ll Love It
- Delivers bold flavor: deep cocoa, real espresso, and tangy sourdough.
- Elevates dessert bread with melted dark chocolate pockets in every slice.
- Balances indulgence and wholesomeness using natural starter and whole wheat.
- Fits your schedule with flexible overnight proof and minimal hands-on time.
- Impresses guests as a showstopping loaf for brunch or gifts.
Ingredients
- 120 g active sourdough starter — 100% hydration, very bubbly
- 350 g water — room temperature for easier mixing
- 30 g espresso — strongly brewed and cooled
- 450 g bread flour — high-protein for better structure
- 50 g whole wheat flour — adds flavor and color
- 30 g unsweetened cocoa powder — good-quality, Dutch-process if possible
- 9 g fine sea salt — evenly seasons the dough
- 40 g granulated sugar — adjust up or down for sweetness
- 60 g dark chocolate chips or chunks — 60–70% cacao melts nicely
- 30 g unsalted butter — softened; or neutral oil for a dairy-free option
- 20 g honey or maple syrup — adds moisture and complexity
- 15 g milk or cream (optional) — room temperature; softens the crumb
Step-by-Step Method
Mix Starter, Water & Espresso
Whisk the active sourdough starter, room-temperature water, and cooled espresso in a large mixing bowl. Stir until the starter dissolves and the liquid looks milky and uniform.
This guarantees even fermentation and flavor distribution. Scrape down the sides of the bowl so everything is combined before adding any dry ingredients.
Combine Flours & Cocoa
Add the bread flour, whole wheat flour, and cocoa powder directly into the liquid mixture.
Mix with a wooden spoon or your hands until no dry pockets remain. Aim for a shaggy, slightly sticky dough. Don’t knead at this stage. Scrape the bowl sides to gather all loose bits into one rough mass.
Rest for Autolyse
Cover the bowl with a damp towel or reusable cover. Let the dough rest for 30–45 minutes at room temperature. During this time, the flour hydrates and gluten formation begins naturally.
The dough will feel smoother and more elastic after resting, making later mixing and folding much easier and gentler.
Incorporate Salt, Sugar & Fats
Sprinkle salt, granulated sugar, and honey over the rested dough. Add the softened butter in small pieces. Use your hands to squeeze, pinch, and fold the dough until everything is fully incorporated. Work gently but thoroughly.
The dough may feel slippery at first, then gradually become more cohesive and smooth.
Perform First Stretch-and-Folds
With damp hands, grab one edge of the dough, stretch it upward without tearing, then fold it over the center. Rotate the bowl and repeat 4–6 times around. This strengthens the gluten without kneading.
Once finished, tuck the dough into a rough ball. Cover the bowl again to keep the surface from drying out.
Rest Between Fold Rounds
Let the dough rest for 30 minutes at room temperature after the first folds. Keep it covered. This pause allows the gluten to relax and fermentation to begin.
When you return, the dough should look slightly puffier and feel more elastic. Use this rhythm of brief work followed by rest for gentle structure building.
Add Chocolate & Continue Folds
During the second fold round, sprinkle chocolate chips or chunks evenly over the dough surface. Gently fold and stretch as before, encapsulating the chocolate without tearing.
Perform 2–3 total additional fold rounds, spaced 30 minutes apart. Stop when the dough feels smoother, more elastic, and holds its shape better between folds.
Bulk Ferment Until Puffy
After the final fold, cover the bowl and leave the dough to bulk ferment at room temperature. Allow 4–6 hours, depending on warmth. Look for the dough to increase by about 50–100 percent, appear airy, and jiggle slightly when the bowl is shaken.
Avoid over-fermenting so the dough remains strong for shaping.
Pre-Shape the Dough
Lightly flour your work surface. Gently turn the dough out using a dough scraper, trying not to deflate it completely. Use a bench scraper to tuck and rotate the dough into a loose round.
Focus on organizing it into a cohesive shape, not tightening it fully. Let it rest before final shaping for better handling.
Bench Rest to Relax Gluten
Leave the pre-shaped round uncovered on the counter for 15–20 minutes. This bench rest allows the gluten to relax, making final shaping smoother and easier.
The dough should slightly spread but still hold some height. Avoid adding extra flour unless absolutely necessary; a light dusting is usually enough to prevent sticking.
Shape Into Boule or Batard
Using your hands and bench scraper, gently stretch, fold, and roll the dough into a tight boule or batard. Create surface tension by pulling the dough toward you on the counter, sealing the bottom seam.
Work carefully to avoid tearing the skin. A well-shaped loaf will rise higher and bake with better structure.
Prepare & Fill Proofing Basket
Dust a proofing basket or towel-lined bowl generously with flour, focusing on the sides and bottom. Carefully place the shaped dough seam-side up in the basket. Adjust it so the shape is centered and even.
Lightly cover with a towel or plastic wrap to prevent drying during the long cold proof in the refrigerator.
Cold Proof Overnight
Refrigerate the covered basket for 8–12 hours. This cold proof slows fermentation and deepens flavor while firming the dough for easier scoring.
The loaf will rise modestly and feel slightly firmer when chilled. Bake directly from the refrigerator, as the cold dough handles and scores better without additional warming.
Preheat Dutch Oven & Oven
About 45 minutes before baking, place the Dutch oven with its lid into your oven. Preheat to 475°F (245°C). Allow enough time for both the oven and Dutch oven to heat thoroughly.
This intense heat creates strong initial oven spring and helps form a crisp, well-developed crust on the sourdough loaf.
Transfer & Score the Dough
Carefully remove the hot Dutch oven from the oven and set it on a heat-safe surface. Gently invert the chilled dough onto parchment or directly into the pot, now seam-side down. Using a sharp knife or lame, score the top with a decisive slash.
This directs expansion and prevents uncontrolled cracking during baking.
Steam-Bake with Lid On
Cover the Dutch oven with its lid and place it back in the hot oven. Bake at 475°F (245°C) for 20 minutes. The closed environment traps steam from the dough, allowing maximum oven spring and helping the crust remain flexible while the loaf expands.
Avoid opening the oven during this initial phase.
Finish Baking Uncovered
After 20 minutes, remove the lid and reduce the temperature to 430°F (220°C). Continue baking for 18–22 minutes. Watch for a deeply browned, nearly dark chocolate-colored crust.
The loaf should sound hollow when tapped on the bottom. If needed, add a few more minutes for extra color and crispness.
Cool Completely Before Slicing
Transfer the baked loaf to a cooling rack immediately. Let it cool at least 1–2 hours before slicing. This rest allows the crumb to set and excess moisture to escape, preventing a gummy interior.
Resist cutting too early. Once fully cool, slice with a sharp serrated knife and serve as desired.
Ingredient Swaps
- Use all-purpose flour instead of bread flour if needed; reduce water by 10–20 g if the dough feels too loose.
- Replace butter with neutral oil or coconut oil for a dairy-free version; swap milk/cream for extra water or plant milk.
- Substitute brewed espresso with strong coffee or 1–2 teaspoons instant espresso powder dissolved in the water.
- Use brown sugar, coconut sugar, or maple syrup in place of granulated sugar/honey; note that liquid sweeteners may make the dough slightly stickier.
- Any 60–80% dark chocolate bar, chips, or chunks work; in a pinch, use milk chocolate for a sweeter, less intense loaf.
You Must Know
– Doneness • If your loaf looks done but you’re unsure inside
Use an instant-read thermometer and aim for 205–210°F (96–99°C) in the center; the crust should be deep mahogany with a matte, not shiny, look and the bottom should sound hollow when tapped.
– Troubleshoot • If the crumb is dense or gummy after cooling
Extend bulk fermentation next time until the dough is visibly jiggly, domed, and roughly doubled (often 5–7 hours in a cool kitchen); under-proofing is the main cause of tight, sticky interiors in enriched cocoa doughs.
– Avoid • If the dough feels very stiff after adding cocoa and butter
Lightly dampen your hands and give 1–2 extra rounds of folds during early fermentation; cocoa and sugar tighten gluten, so a bit more handling plus moisture helps achieve a smooth, stretchy windowpane instead of a tearing dough.
– Flavor Boost • For a more intense mocha profile
Increase espresso to 45–50 g and reduce water by the same amount, or bump cocoa to 35–40 g while adding 5–10 g extra water; this keeps total hydration similar while deepening chocolate and coffee notes.
– Scale • When doubling or halving the recipe
Change all ingredients by the same percentage, but keep an eye on timing: larger doughs often need 30–60 minutes more for bulk fermentation, while smaller ones can be ready 30 minutes sooner—always rely on the “puffy and airy” look rather than the clock.
Serving Tips
- Serve warm slices with mascarpone, a drizzle of honey, and flaky sea salt.
- Pair with vanilla ice cream and fresh berries for a plated dessert.
- Toast and spread with salted butter and orange marmalade for breakfast.
- Make indulgent French toast, topped with whipped cream and espresso syrup.
- Serve alongside strong coffee or port wine as an after-dinner treat.
Storage & Make-Ahead
Chocolate espresso sourdough keeps in the fridge for 5–7 days, well wrapped to prevent drying.
For make-ahead, slice once fully cool, then freeze slices (or the whole loaf) tightly wrapped for up to 2 months.
Reheat from frozen in a moderate oven or toaster until warmed through.
Reheating
Reheat slices gently.
Wrap in foil and warm in a 300°F (150°C) oven.
Briefly microwave, covered with a damp towel.
Or toast in a covered skillet over low heat until just warmed.
Espresso Bread in Cafés
Most mornings, I imagine this chocolate espresso sourdough tucked on a café counter, its dark, glossy crust catching the light beside a row of croissants and steaming lattes.
I can almost hear the crackle as the barista slices through, releasing a breath of cocoa, tangy starter, and warm espresso.
In my mind, you’re there too, hands wrapped around a cappuccino, watching ribbons of steam curl over your cup while a thick slice lands on a small ceramic plate.
The crumb’s tender, marbled with melted chocolate pockets, perfect for dragging through a puddle of foam or a sheen of salted butter.
It’s not just coffee and bread anymore—it’s a little ritual, a pause, a corner-table kind of comfort.
Final Thoughts
Give this chocolate espresso sourdough a try and see how the cocoa, coffee, and tangy starter come together in every slice.
Once you’ve baked it once, have fun tweaking the sweetness, chocolate amount, or espresso strength to make it your own.
Frequently Asked Questions
Can I Make This Recipe Completely Vegan Without Compromising Texture?
Yes, you can. I’d swap butter for neutral oil, honey for maple, and milk for oat or soy. The loaf still rises tall, crumb tender, crust crackling, espresso and cocoa scent wrapping your kitchen.
How Does Altitude Affect Fermentation and Baking Times for This Loaf?
Altitude speeds fermentation and shortens baking. I’d watch your dough, not the clock: it’ll puff faster, feel airy sooner, and brown quicker. I’d proof cooler, bake slightly hotter, and trust the fragrant, hollow‑sounding loaf.
What Are Some Creative Uses for Leftover or Stale Slices?
You can turn leftover slices into espresso-soaked French toast, chocolatey bread pudding, or crisp biscotti-like rusks. I’d cube, toast, and layer them with whipped cream and berries for a trifle that tastes like café dessert.
Can I Convert This Into a Sandwich Loaf or Pull-Apart Bread?
Yes, you can. I’d enrich the dough with extra butter, shape it into a tight loaf or rolled balls, nestle them in a pan, then bake until the kitchen smells like warm cocoa and coffee.
How Should I Adjust Fermentation in Very Hot or Very Cold Kitchens?
I watch your dough, not the clock. In heat, I shorten bulk, use cooler water, proof in the fridge. In cold, I extend rests, use warmer water, and tuck the bowl somewhere cozy.
Chocolate Espresso Sourdough Bread
Equipment
- 1 digital kitchen scale
- 2 medium mixing bowls
- 1 large mixing bowl
- 1 Dough scraper
- 1 Wooden spoon or spatula
- 1 bench scraper
- 1 proofing basket (or 1 medium bowl lined with a towel)
- 1 Dutch oven with lid
- 1 sharp knife or bread lame
- 1 Cooling rack
- 1 small saucepan (optional, for melting chocolate)
Ingredients
- 120 gram active sourdough starter 100% hydration
- 350 gram water room temperature
- 30 gram strong brewed espresso cooled
- 450 gram bread flour
- 50 gram whole wheat flour
- 30 gram unsweetened cocoa powder
- 9 gram fine sea salt
- 40 gram granulated sugar
- 60 gram dark chocolate chips or chunks
- 30 gram unsalted butter or neutral oil; softened
- 20 gram honey or maple syrup
- 15 gram milk or cream optional, for softer crumb; room temperature
Instructions
- In a large mixing bowl, whisk together the active sourdough starter, water, and cooled espresso until mostly dissolved.
- Add bread flour, whole wheat flour, and cocoa powder to the bowl and mix with a spoon or hands until no dry flour remains and a shaggy dough forms.
- Cover the bowl and let the dough rest (autolyse) for 30–45 minutes at room temperature.
- Sprinkle salt, sugar, and honey over the dough, then add softened butter and gently squeeze and fold the dough until the additions are fully incorporated.
- Perform the first set of stretch-and-folds by grabbing one side of the dough, stretching it up, and folding it over itself 4–6 times around the bowl.
- Cover and let the dough rest for 30 minutes at room temperature.
- Repeat stretch-and-folds every 30 minutes for 2–3 more rounds, adding chocolate chips during the second round by gently folding them into the dough.
- After the final fold, cover the bowl and allow the dough to bulk ferment at room temperature until roughly doubled and puffy, about 4–6 hours depending on room temperature.
- Lightly flour your work surface, gently turn the dough out, and use a bench scraper to pre-shape it into a loose round.
- Let the dough rest uncovered on the counter for 15–20 minutes to relax.
- Shape the dough into a tight boule or batard by gently stretching and rolling, creating surface tension without tearing.
- Dust the proofing basket or towel-lined bowl with flour, then place the dough seam-side up into the basket.
- Cover and refrigerate for an overnight cold proof of 8–12 hours.
- About 45 minutes before baking, place the Dutch oven with its lid into the oven and preheat to 475°F (245°C).
- Carefully remove the hot Dutch oven, gently invert the dough onto a piece of parchment or directly into the pot, so it is seam-side down.
- Score the top of the dough with a sharp knife or lame to allow controlled expansion.
- Cover the Dutch oven with the lid and bake for 20 minutes at 475°F (245°C).
- Remove the lid, reduce the temperature to 430°F (220°C), and continue baking for 18–22 minutes, until the crust is deeply browned and the loaf sounds hollow when tapped.
- Transfer the bread to a cooling rack and let it cool completely for at least 1–2 hours before slicing.
Notes

Cynthia Weatherford is a seasoned chef and culinary enthusiast who serves as the Recipe creator of Somonday. With decades of experience in the kitchen and a passion for exploring diverse cuisines, Cynthia brings a blend of creativity and technique to every dish. Known for transforming simple ingredients into show-stopping meals, Cynthia believes that cooking is an art form anyone can master. Dedicated to inspiring home cooks, Cynthia shares approachable recipes, pro tips, and culinary wisdom to make every meal memorable.


