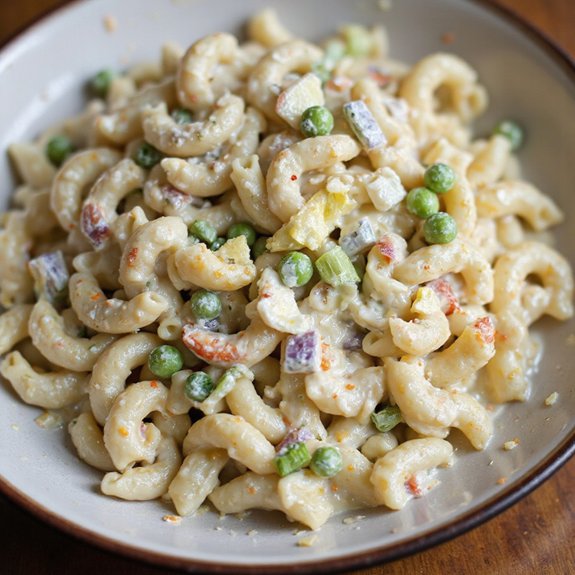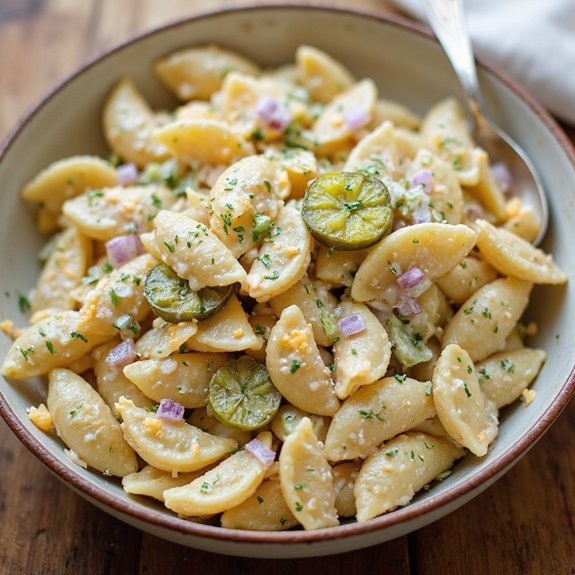
Picture a bowl of creamy, tangy dill pickle pasta salad, with its vibrant green flecks of fresh dill and the delightful crunch of diced dill pickles.
The smoothness of the mayonnaise and sour cream dressing coats each pasta shell, while the sharpness of cheddar cheese and the bite of red onion add layers of flavor and texture.
This salad is a tribute to comfort food that offers a nostalgic twist on traditional pasta salads. It matters because it evokes memories of family gatherings and summer picnics, where every bite brings joy and satisfaction.
Once, during a hectic week, this dish was a lifesaver for my family. With little time to prepare dinner, this quick and simple recipe came together effortlessly, providing a delicious meal that everyone loved.
It’s perfect for busy weeknights or laid-back Sunday suppers. Ready? Let’s cook this delightful and rejuvenating dill pickle pasta salad!
Why You’ll Love It
- Delivers bold flavor with tangy dill pickles and creamy dressing.
- Uses pantry staples for a quick and easy side dish.
- Provides a revitalizing and satisfying option for summer gatherings.
- Offers versatility with customizable ingredients to suit personal tastes.
- Prepares conveniently with minimal cooking and simple steps.
Ingredients
- 8 ounces pasta shells — cook until al dente for best texture
- 1 cup dill pickles chopped — opt for crunchy pickles for added texture
- 1/2 cup cheddar cheese diced — sharp cheddar adds a richer flavor
- 1/4 cup red onion chopped — provides a subtle sweetness
- 1/2 cup mayonnaise — choose full-fat for creamier dressing
- 1/4 cup sour cream — use full-fat for a richer taste
- 2 tablespoons pickle juice — adjust for desired tanginess
- 1 tablespoon fresh dill chopped — enhances the salad’s freshness
- 1 teaspoon garlic powder — provides a mild garlic flavor
- 1/4 teaspoon salt — season to taste
- 1/4 teaspoon black pepper — freshly ground for best flavor
Step-by-Step Method
Cook the Pasta
Boil a large pot of water and cook the pasta shells according to package instructions until al dente.
Drain the pasta using a colander and rinse it under cold water to stop the cooking process and cool it down. Ensuring the pasta is cool will help maintain the salad’s texture and prevent the dressing from becoming overly absorbed.
Prepare the Dressing
In a large mixing bowl, whisk together mayonnaise, sour cream, pickle juice, garlic powder, salt, and black pepper.
Whisk until the mixture is smooth and well combined. This creamy dressing serves as the flavorful base for the salad, balancing the tanginess of the pickles with a rich, creamy texture.
Combine Salad Ingredients
Add the cooled pasta, chopped dill pickles, diced cheddar cheese, and chopped red onion to the bowl with the dressing.
Gently toss the ingredients together until everything is well coated in the dressing. Be careful not to over-mix, as you want to maintain the integrity of the pasta and other components.
Add Fresh Dill
Stir in the fresh dill, distributing it evenly throughout the salad.
The dill adds a pop of brightness and enhances the overall flavor profile. Fresh dill is recommended for its vibrant taste, but dried dill can be used in a pinch, keeping in mind that the flavor will be slightly different.
Refrigerate the Salad
Cover the mixing bowl and refrigerate the salad for at least 30 minutes.
Allowing the salad to rest in the refrigerator helps the flavors meld together, creating a more cohesive and flavorful dish. This resting time also gives the salad an invigorating chill, perfect for serving.
Serve and Enjoy
Once the salad has rested, give it a gentle toss to invigorate the ingredients.
Serve it chilled as a side dish or a light main course. Enjoy the delightful combination of creamy, tangy, and crunchy elements. Feel free to customize with additional veggies or proteins to suit your taste.
Ingredient Swaps
- For a lighter version, substitute Greek yogurt for mayonnaise and sour cream.
- Use gluten-free pasta to accommodate dietary restrictions.
- Swap cheddar cheese with a dairy-free cheese alternative for a vegan option.
- Replace fresh dill with dried dill if fresh isn’t available, but use half the amount as dried dill is more potent.
- If red onions are too strong, try using green onions for a milder flavor.
You Must Know
1. Use Fresh Dill: To maximize the flavor of your Dill Pickle Pasta Salad, always opt for fresh dill rather than dried.
Fresh dill greatly enhances the overall taste and aroma of the salad.
2. Adjust Pickle Juice: Customize the tanginess of your salad by adjusting the amount of pickle juice.
Start with 2 tablespoons and add more if you prefer a bolder, tangier flavor.
3. Cool Pasta Properly: After cooking, rinse the pasta under cold water to stop the cooking process and cool it down.
This prevents the pasta from becoming mushy and guarantees it maintains a firm texture in the salad.
4. Prep Ingredients Simultaneously: Save time by chopping the dill pickles, cheddar cheese, and red onion while the pasta is cooking.
This efficient use of time guarantees your salad comes together quickly.
5. Rest for Flavor: Allow the salad to rest in the refrigerator for at least 30 minutes before serving.
This resting time is vital for allowing the flavors to meld together, resulting in a more cohesive and flavorful salad.
Serving Tips
- Serve in individual bowls for easy portion control.
- Pair with grilled chicken or burgers for a complete meal.
- Garnish with extra fresh dill for enhanced presentation and flavor.
- Serve alongside a cold glass of lemonade for a revitalizing combination.
- Add a sprinkle of crumbled bacon for a savory twist.
Storage & Make-Ahead
Dill Pickle Pasta Salad can be stored in the refrigerator for up to 3 days in an airtight container. It’s ideal for making ahead, as the flavors meld beautifully over time. Freezing isn’t recommended, as the texture of the pasta and mayonnaise-based dressing may be compromised upon thawing.
Reheating
Reheating Dill Pickle Pasta Salad isn’t recommended as it’s meant to be served chilled.
If you prefer to warm it slightly, use the microwave on low power, stirring occasionally.
Alternatively, warm it in an oven set to low heat or on the stovetop over low flame.
Culinary Traditions and Trends
As culinary traditions evolve, they often blend the old with the new, creating delightful dishes like Dill Pickle Pasta Salad that capture the essence of contemporary trends while nodding to classic flavors.
Imagine the tangy crunch of dill pickles mingling with creamy pasta, a fusion that tickles the taste buds with nostalgic and innovative notes.
In today’s culinary scene, we embrace bold flavors and unexpected combinations, making this salad a perfect fit.
It’s a dish that speaks to our love for comfort food, yet it’s innovative enough to surprise and delight at any gathering.
I love how it embodies the current trend of elevating simple ingredients, transforming them into something extraordinary with just a touch of creativity and flair.
Final Thoughts
Why not give this Dill Pickle Pasta Salad a try and delight in its tangy, invigorating flavors? Feel free to tweak the recipe by adding extra veggies or proteins to make it your own delicious creation!
Frequently Asked Questions
Can I Use Gluten-Free Pasta for This Salad?
Absolutely, you can use gluten-free pasta in this salad! I’ve tried it myself, and it works wonderfully. Just make sure to follow the cooking instructions on the package for the best texture. Enjoy your creation!
How Long Can the Salad Be Stored in the Fridge?
You can store the salad in the fridge for up to three days. I love making it ahead for busy weeks. Just keep it in an airtight container to maintain its freshness and delightful crunchiness. Enjoy!
Is There a Vegan Alternative for the Mayonnaise and Sour Cream?
I’d recommend using vegan mayo and sour cream. They’re widely available in most grocery stores and taste fantastic. You’ll still enjoy the creamy texture and tangy flavor without any dairy. Give it a try!
Can I Use Different Types of Cheese?
Absolutely, you can swap in different cheeses! I recommend using feta for a tangy twist or mozzarella for a milder flavor. Feel free to experiment until you find the perfect cheesy combination that delights your taste buds!
Does the Salad Need to Be Served Immediately After Chilling?
You don’t have to serve it immediately after chilling. In fact, letting it sit longer enhances the flavors even more. I’ve found that it tastes even better the next day, making it perfect for meal prep!
Dill Pickle Pasta Salad
Equipment
- 1 Large pot
- 1 colander
- 1 large mixing bowl
- 1 Whisk
- 1 measuring cup set
- 1 measuring spoon set
- 1 Cutting board
- 1 Knife
Ingredients
- 8 ounce pasta shells
- 1 cup dill pickles chopped
- 1/2 cup cheddar cheese diced
- 1/4 cup red onion chopped
- 1/2 cup mayonnaise
- 1/4 cup sour cream
- 2 tablespoon pickle juice
- 1 tablespoon fresh dill chopped
- 1 teaspoon garlic powder
- 1/4 teaspoon salt
- 1/4 teaspoon black pepper
Instructions
- Cook pasta shells according to package instructions until al dente.
- Drain and rinse the pasta under cold water to cool.
- In a large mixing bowl, whisk together mayonnaise, sour cream, pickle juice, garlic powder, salt, and pepper.
- Add the cooled pasta, chopped dill pickles, cheddar cheese, and red onion to the bowl.
- Gently toss everything together until well combined.
- Stir in the fresh dill until evenly distributed.
- Cover the bowl and refrigerate for at least 30 minutes to allow flavors to meld.
- Serve chilled and enjoy.
Notes

Cynthia Weatherford is a seasoned chef and culinary enthusiast who serves as the Recipe creator of Somonday. With decades of experience in the kitchen and a passion for exploring diverse cuisines, Cynthia brings a blend of creativity and technique to every dish. Known for transforming simple ingredients into show-stopping meals, Cynthia believes that cooking is an art form anyone can master. Dedicated to inspiring home cooks, Cynthia shares approachable recipes, pro tips, and culinary wisdom to make every meal memorable.