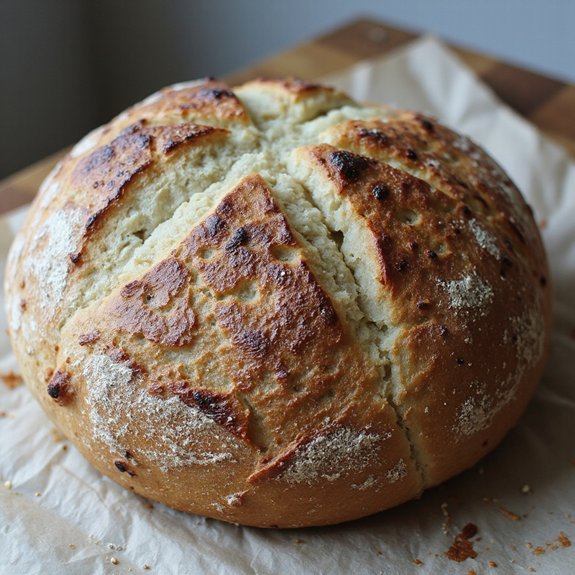
There’s something about the crackle of a golden crust and the tangy aroma of fresh sourdough that instantly feels like home.
Picture a rustic loaf cooling on the counter, its blistered, caramel-brown exterior giving way to a tender, chewy crumb full of glossy air pockets.
This is a cozy, slow-baked bread—an all-day project that rewards you with a bakery-worthy result, perfect for comfort seekers, bread lovers, and curious beginners ready to try a hands-on weekend bake.
I still remember one rainy Sunday when a simple sourdough loaf turned a quiet afternoon into a small celebration; we tore off warm pieces, spread them with butter, and suddenly the house felt brighter and calmer.
This bread shines at relaxed Sunday suppers, shared brunches, and any time you want to turn an ordinary meal into something special.
Ready to bring this loaf to life?
Why You’ll Love It
- Delivers bold, tangy flavor with a shatteringly crisp artisan crust
- Uses just four simple ingredients—flour, water, starter, and salt
- Relies on long fermentation for better digestion and deeper flavor
- Bakes effortlessly in a Dutch oven for reliable, bakery-style results
- Slices beautifully for toast, sandwiches, or serving with soups and stews
Ingredients
- 500 g bread flour — high‑protein bread flour gives better chew
- 375 g water — room temperature for easier mixing
- 100 g active sourdough starter (100% hydration) — use recently fed, bubbly starter
- 10 g fine sea salt — fine grains dissolve and mix more evenly
Step-by-Step Method
Mix Starter and Water
Whisk the active sourdough starter with room-temperature water in a mixing bowl.
Stir until the starter is mostly dissolved and the liquid looks milky and uniform.
This helps distribute yeast and bacteria evenly.
Use a spatula or whisk and scrape down the sides so no starter clings to the bowl.
Form a Shaggy Dough
Add the bread flour to the starter-water mixture.
Mix with your hand or a dough scraper until no dry flour remains.
Aim for a rough, shaggy mass rather than a smooth dough.
Make certain all flour is hydrated, scraping the bottom and sides.
Cover the bowl and let it rest.
Autolyse the Dough
Let the covered dough rest for 30 minutes at room temperature.
Don’t add salt yet.
This autolyse period allows the flour to fully hydrate and gluten to begin forming naturally.
The dough will feel softer and more extensible afterward, making later mixing and folding easier and more effective.
Incorporate the Salt
Sprinkle fine sea salt evenly over the dough’s surface.
Use your fingers to pinch, squeeze, and fold the dough until the salt is fully dissolved and integrated.
Rotate the bowl as you work.
The dough will tighten slightly as the salt strengthens the gluten, preparing it for bulk fermentation.
Begin Bulk Fermentation
Cover the bowl and let the dough ferment at room temperature for 3–4 hours.
Adjust time based on warmth; a cooler kitchen needs longer.
Watch the dough, not the clock.
It should gradually become smoother, puffier, and show small bubbles.
Keep it covered between folds to prevent drying.
Perform Stretch and Folds
During the first 2 hours, complete 3–4 sets of stretch-and-folds every 30 minutes.
With wet hands, lift one side of the dough, stretch it up, and fold it over itself.
Rotate the bowl and repeat from all sides.
This gently strengthens gluten without kneading.
Cover the dough after each set.
Let Dough Rise Fully
After the final stretch-and-fold, leave the dough undisturbed to finish bulk fermentation.
Allow it to rise by about 50% in volume.
Look for bubbles along the sides and a domed, airy surface.
Avoid letting it double completely, which can overproof the dough and weaken structure.
Turn Dough onto the Counter
Lightly flour your work surface.
Gently loosen the dough from the bowl with a dough scraper.
Turn it out onto the counter in one piece, trying not to deflate it.
Use minimal extra flour.
Preserve the air pockets developed during fermentation to support an open crumb later.
Pre-Shape into a Round
Fold the dough’s edges toward the center to create a rough ball.
Flip it seam-side down and use your hands or scraper to gently drag it toward you, tightening the surface.
Aim for a loose, rounded shape.
Don’t overwork or tear the dough.
Let the structure start forming gently.
Bench Rest the Dough
Cover the pre-shaped dough with a clean kitchen towel.
Let it rest for 20–30 minutes at room temperature.
This bench rest relaxes gluten and makes final shaping easier.
The dough should slightly spread but still hold shape.
Avoid drafts that could dry the surface during this period.
Shape a Tight Loaf
Lightly flour the top of the dough, then flip it over so the floured side is down.
Fold and roll the dough to create surface tension, forming a tight round or oval.
Seal seams firmly.
Use your hands to gently tighten the shape by dragging it toward you on the counter.
Prepare the Proofing Basket
Generously flour your proofing basket or line a bowl with a floured kitchen towel.
Dust well to prevent sticking, especially at the bottom and sides.
Use rice flour or a flour blend if available for better release.
Shake out excess.
The basket should be ready before you lift the shaped dough.
Place Dough Seam-Side Up
Lift the shaped loaf carefully and place it seam-side up into the prepared basket or bowl.
Center it so it proofs evenly.
Tuck edges gently if needed.
Lightly flour the exposed surface if it seems sticky.
This orientation allows the seams to support natural expansion during proofing.
Proof at Room Temperature
Cover the basket and let the dough proof at room temperature for 30–60 minutes.
Watch for a slight puffiness and a softer feel when gently pressed.
The dough should relax but not spread excessively.
This stage jump-starts the final rise before moving the loaf into the refrigerator.
Cold-Proof in the Fridge
Transfer the covered basket to the refrigerator and cold-proof for 12–14 hours.
The long, cool rest improves flavor, structure, and handling.
The dough will firm up, making scoring easier.
Keep it covered to prevent drying.
Plan this step so you can bake directly from the fridge next day.
Preheat the Dutch Oven
About 45 minutes before baking, place your Dutch oven with lid into your oven.
Preheat to 250°C (480°F).
Make sure the pot heats fully to create strong oven spring.
Position the rack in the center.
Don’t add the dough until both the oven and Dutch oven are thoroughly preheated.
Prepare Parchment and Invert
Cut a sheet of parchment large enough to lift the loaf.
Place it on your counter.
Remove the proofed dough from the fridge.
Gently invert the basket onto the parchment so the dough is now seam-side down.
Adjust its position without pressing down.
Work quickly to keep it chilled.
Score the Dough
Use a sharp knife or bread lame to score the top of the dough with a decisive slash about 1 cm (½ inch) deep.
Angle the blade slightly.
Create one main score to control expansion.
Move swiftly and confidently to avoid dragging.
Proper scoring encourages a tall, attractive ear.
Load into the Dutch Oven
Carefully remove the hot Dutch oven from the oven and set it on a heat-safe surface.
Using the parchment as a sling, lift the scored dough and lower it into the pot.
Adjust if needed with oven mitts.
Cover with the lid immediately to trap steam for maximum oven spring.
Bake Covered, Then Uncovered
Return the Dutch oven to the oven and bake covered for 20 minutes at 250°C (480°F).
Then reduce temperature to 230°C (450°F), remove the lid, and continue baking for 20–25 minutes.
Watch for a deep golden-brown crust and good expansion.
Rotate if necessary for even coloring.
Cool Completely on a Rack
Using oven mitts, lift the loaf out of the Dutch oven by the parchment and transfer it to a wire cooling rack.
Let it cool at least 1–2 hours before slicing.
This resting time allows the crumb to set and moisture to redistribute.
Resist cutting early to avoid a gummy interior.
Ingredient Swaps
- Use up to 25–50% whole wheat or rye flour in place of bread flour; you may need 10–20 g more water.
- For lower-gluten or budget options, you can swap some bread flour for all-purpose, but expect a slightly denser loaf.
- If you’re salt-sensitive, reduce salt to 7–8 g; if using coarse sea salt or kosher salt, measure by weight, not spoons.
- For a more sour flavor without changing ingredients, extend the cold-proof by a few hours rather than altering the starter.
You Must Know
- Troubleshoot – If your dough feels stiff or tears during stretch-and-folds, add 5–10 g water and work it in gently with wet fingers; this boosts extensibility so it can trap gas better and improves oven spring and open crumb.
- Doneness – To confirm the loaf is fully cooked, check that the internal temperature is around 96–99°C (205–210°F) and the bottom sounds hollow when tapped; under 94°C (201°F) often gives a gummy center once cooled.
- Flavor Boost – For deeper tang and complexity, extend the cold proof to 18–24 hours at 3–5°C (37–41°F); dough should feel puffy and hold a gentle fingerprint dent that springs back slowly, not instantly.
- Avoid – To prevent over-proofing, don’t let the dough more than double in volume during bulk; aim for roughly 50% rise and visible side bubbles, otherwise the loaf may spread flat and have a tight, weak crumb.
- Scale – For a smaller loaf for 2–4 servings, use 250 g flour, 188 g water, 50 g starter, 5 g salt, and shorten baking by about 5 minutes covered and 5 minutes uncovered, watching for the same deep-golden crust cue.
Serving Tips
- Serve warm slices with salted butter and flaky sea salt.
- Pair with olive oil, balsamic vinegar, and cracked black pepper for dipping.
- Use as a base for open-faced sandwiches with soft cheese and roasted vegetables.
- Toast slices and top with avocado, lemon, and chili flakes.
- Accompany soups or stews; grill lightly for extra crunch.
Storage & Make-Ahead
This sourdough keeps in the fridge, well-wrapped, for up to 5 days.
Slice only as needed to prevent drying.
It’s very freezer-friendly: slice, wrap tightly, and freeze for up to 3 months.
Reheat from frozen in a toaster or hot oven to refresh the crust and crumb.
Reheating
Reheat slices in a 150°C (300°F) oven, wrapped loosely in foil, until warm.
Briefly microwave with a damp towel for softness, or toast in a covered skillet on low heat.
Sourdough in Dutch Traditions
Long before a cast-iron Dutch oven sat in modern kitchens, Dutch bakers were already coaxing deep flavor from slow-fermented loaves in brick ovens, their streets perfumed with warm grain and crackling crust.
When I think about sourdough in Dutch traditions, I picture dark, nutty loaves scored with simple patterns, tucked beside rounds of cheese and salted butter.
You’d have heard the slap of dough on wooden benches, seen flour drifting like fog in the morning light.
Sourdough wasn’t romantic; it was survival—a way to keep bread nourishing, slice after slice. Today, when I lift the lid of my Dutch oven and hear the crust sing, I feel linked to those bakers, carrying their patient craft into my own kitchen.
Final Thoughts
Give this Dutch oven sourdough a try and see how satisfying a crackly, homemade loaf can be.
Once you’ve baked it once, play around with tweaks—like adding seeds, different flours, or adjusting the crust—to make it your own signature bread.
Frequently Asked Questions
How Do I Fix Dough That’s Too Sticky to Handle?
I dust your counter and hands with flour, then gently fold the dough, not knead, until it feels like soft, tacky satin instead of glue. I might briefly chill it, letting the stickiness relax.
What Can I Do if My Loaf Doesn’T Rise Enough?
If your loaf stays squat, I’d first feed the starter more often, then let the dough ferment longer until jiggly and airy. I’d also warm your kitchen a bit and make certain a deep, confident score.
How Can I Tell if My Starter Is Too Sour or Too Weak?
I watch bubbles and smell. If it’s sharply vinegary, collapses fast, it’s too sour. If it smells floury, barely domes, rises sluggishly, it’s too weak. Feed warmer, thicker for strength; cooler, thinner for balance.
Is It Safe to Bake Sourdough in an Enameled Dutch Oven?
Yes, it’s safe. I love lowering that pale dough into a heavy, humming enamel pot; as heat blooms, you’ll hear crust crackle, smell deep caramel, and watch steam swirl like fog around a rising golden loaf.
How Do I Adapt This Recipe for High-Altitude Baking?
You’ll cut hydration slightly, shorten bulk rise, and bake a bit hotter. I’d watch dough, not clock: seek a softly domed, airy mass, then score deep and trap that thin mountain air inside the crackling crust.

Dutch Oven Sourdough Bread
Equipment
- 1 Mixing bowl
- 1 digital kitchen scale
- 1 measuring cup
- 1 measuring spoon set
- 1 Dough scraper
- 1 Dutch oven with lid (4–6 quart)
- 1 parchment paper sheet
- 1 proofing basket or medium bowl
- 1 clean kitchen towel
- 1 sharp knife or bread lame
- 1 wire cooling rack
Ingredients
- 500 gram bread flour
- 375 gram water room temperature
- 100 gram active sourdough starter 100% hydration
- 10 gram fine sea salt
Instructions
- In a mixing bowl, whisk together the water and active sourdough starter until mostly dissolved.
- Add the bread flour and mix with your hand or a dough scraper until no dry flour remains and a shaggy dough forms.
- Cover the bowl and let the dough rest for 30 minutes at room temperature for autolyse.
- Sprinkle the fine sea salt over the dough and gently pinch and fold the dough until the salt is fully incorporated.
- Begin bulk fermentation by covering the bowl and letting it sit at room temperature for 3–4 hours, depending on room warmth.
- During the first 2 hours of bulk fermentation, perform 3–4 sets of stretch-and-folds every 30 minutes, lifting and folding the dough over itself from each side.
- After the final set of folds, let the dough rest undisturbed until it has risen by about 50% and looks airy with bubbles along the sides.
- Lightly flour your work surface and gently turn the dough out onto it, trying not to deflate it.
- Pre-shape the dough into a loose round by folding the edges toward the center and flipping it seam-side down, then gently tightening it into a ball.
- Cover the dough with a kitchen towel and let it rest for 20–30 minutes.
- Lightly flour the top of the dough, flip it over, and shape it into a tight round or oval by folding and rolling to create surface tension.
- Generously flour your proofing basket or line a bowl with a floured kitchen towel.
- Place the shaped dough seam-side up into the prepared basket or bowl.
- Cover and let the dough proof at room temperature for 30–60 minutes, then transfer to the refrigerator to cold-proof for 12–14 hours.
- About 45 minutes before baking, place the Dutch oven with its lid into your oven and preheat to 250°C (480°F).
- Cut a piece of parchment paper large enough to lift the dough and place it on your counter.
- Gently invert the chilled dough onto the parchment so it is now seam-side down.
- Using a sharp knife or bread lame, score the top of the dough with a deep slash about 1 cm (½ inch) deep.
- Carefully remove the preheated Dutch oven from the oven, lift the dough using the parchment, and lower it into the pot.
- Cover with the lid and return the Dutch oven to the oven to bake for 20 minutes at 250°C (480°F).
- After 20 minutes, reduce the oven temperature to 230°C (450°F), remove the lid, and continue baking for 20–25 minutes until the crust is deep golden-brown.
- Use oven mitts to carefully lift the bread out of the Dutch oven by the parchment and transfer it to a wire cooling rack.
- Allow the bread to cool completely for at least 1–2 hours before slicing to let the crumb set and moisture redistribute.
Notes

Cynthia Weatherford is a seasoned chef and culinary enthusiast who serves as the Recipe creator of Somonday. With decades of experience in the kitchen and a passion for exploring diverse cuisines, Cynthia brings a blend of creativity and technique to every dish. Known for transforming simple ingredients into show-stopping meals, Cynthia believes that cooking is an art form anyone can master. Dedicated to inspiring home cooks, Cynthia shares approachable recipes, pro tips, and culinary wisdom to make every meal memorable.


