Picture a ruby-red loaf emerging from the oven, its velvety crumb perfumed with cocoa and vanilla, the top gently glossed with tangy cream cheese glaze that drips in slow, luxurious ribbons.
Imagine slicing through a tender, plush interior—moist, close-knit, and comforting—while warm aromas fill the kitchen and promise a treat that’s both nostalgic and a little bit fancy.
Red velvet matters to me because it bridges celebration and everyday comfort: a cake that feels special yet never fussy.
It’s the loaf I reach for when I want something beautiful on the table without juggling tiers and frosting bags—perfect for busy weeknights, casual coffee breaks, or cozy Sunday suppers.
Last winter, this loaf saved dessert when unexpected guests arrived; ten minutes later, the glaze was on and everyone was asking for seconds.
It’s forgiving, bakes up reliably, and keeps wonderfully—so you can share now and nibble later.
Ready? Let’s cook!
Why You’ll Love It
- Delivers classic red velvet flavor with natural cocoa richness
- Stays incredibly moist, thanks to oil, sour cream, butter
- Comes together fast with simple pantry-friendly ingredients
- Bakes in one loaf pan for easy slicing and serving
- Finishes with creamy tangy cream cheese glaze
Ingredients
- 1 1/2 cups all-purpose flour, sifted — spoon and level to avoid dense loaf (use fresh, finely milled flour)
- 3/4 cup granulated sugar — balances cocoa’s bitterness (use pure cane sugar)
- 1/4 cup light brown sugar, packed — adds moisture and depth (look for soft, fresh sugar)
- 1 teaspoon baking soda — reacts with acid for lift (check it’s fresh/active)
- 1/2 teaspoon fine sea salt — sharpens flavors (avoid coarse crystals)
- 2 tablespoons natural unsweetened cocoa powder — classic red velvet flavor (choose natural, not Dutch)
- 2 large eggs, room temperature — for better emulsification (use true large grade)
- 3/4 cup buttermilk, room temperature — tender crumb and tang (shake well before measuring)
- 1/2 cup neutral oil (canola or similar) — keeps crumb ultra-moist (choose neutral, fresh oil)
- 1/4 cup sour cream, room temperature — extra richness and moisture (use full-fat)
- 2 teaspoons vanilla extract — rounds out cocoa notes (use pure extract)
- 1 tablespoon red liquid food coloring — signature hue (gel works; adjust to taste)
- 1 teaspoon white vinegar — brightens color and activates soda (distilled)
- 2 tablespoons unsalted butter, melted — added moisture and flavor (cool slightly before adding)
- 4 ounces cream cheese, softened — for glaze body (brick style, not spread)
- 1 cup powdered sugar, sifted — smooth, lump-free glaze (10x confectioners)
- 2–3 tablespoons milk — loosen glaze to pourable consistency (add gradually)
- 1/2 teaspoon vanilla extract — glaze aroma (pure extract)
- Pinch of salt — balances glaze sweetness (fine grain for quick dissolve)
Step-by-Step Method
Prepare the Pan
Preheat oven to 350°F (175°C). Line a 9×5-inch loaf pan with parchment, leaving overhang for easy lifting. Lightly grease the parchment and sides. This prevents sticking and promotes even browning.
Set a wire rack nearby for cooling. Gather equipment and measure ingredients to streamline mixing and avoid overworking the batter later.
Combine Dry Ingredients
Whisk flour, granulated sugar, brown sugar, baking soda, fine sea salt, and natural cocoa powder in a large bowl. Break up any clumps for a uniform mixture.
Sifting the flour helps create a tender crumb. Make certain everything is evenly distributed so leavening works consistently and the cocoa flavor is balanced throughout the loaf.
Blend Wet Ingredients
In a separate bowl, whisk eggs, buttermilk, neutral oil, sour cream, vanilla, red food coloring, white vinegar, and melted butter until smooth. Aim for a fully homogenous, evenly tinted mixture.
Use room-temperature dairy and eggs for better emulsification. The vinegar brightens color and helps activate baking soda, enhancing lift and texture.
Combine Wet & Dry
Pour the wet mixture into the dry ingredients. Mix gently with a whisk or rubber spatula just until no dry streaks remain.
Avoid overmixing to prevent a tough crumb. Scrape the bowl’s sides and bottom to incorporate flour pockets. The batter should be smooth and thick, but still easily pourable.
Fill the Pan
Transfer the batter to the prepared loaf pan. Smooth the top with a spatula for even baking.
Tap the pan firmly on the counter a few times to release trapped air bubbles. This reduces tunneling and helps the loaf rise uniformly. If desired, lightly swirl the top for a decorative finish.
Bake to Perfection
Place the pan in the center of the oven. Bake 50–60 minutes, checking at 50 minutes.
Insert a toothpick in the center; it should come out with a few moist crumbs, not wet batter. Tent with foil if the top browns too quickly. For best accuracy, pull at about 205°F on an instant-read thermometer.
Cool the Loaf
Set the pan on a wire rack and cool for 15 minutes to set the crumb. Use the parchment overhang to lift the loaf out.
Cool until just slightly warm or room temperature before glazing. Cooling prevents the glaze from melting off and ensures clean slices. Avoid cutting too early to maintain structure.
Make the Cream Cheese Glaze
Beat softened cream cheese until smooth and creamy. Add sifted powdered sugar, vanilla, a pinch of salt, and 2 tablespoons milk.
Mix until thick and pourable, adding a little more milk if needed. Aim for a consistency that drips slowly off a spoon. Taste and adjust salt or vanilla to balance sweetness.
Glaze & Set
Spread or drizzle the glaze over the cooled loaf, letting it cascade down the sides. Allow it to set for about 10 minutes so it firms slightly.
This short rest helps the glaze cling and slice neatly. If desired, chill briefly to speed setting, but serve at room temperature for the best texture.
Slice & Store
Use a serrated knife for clean, even slices. Wipe the blade between cuts to maintain tidy edges.
Serve immediately or store wrapped airtight. Keep at room temperature 1–2 days, or refrigerate up to 5 days. Bring to room temperature before serving for ideal softness. Freeze slices well-wrapped for longer storage.
Ingredient Swaps
- No buttermilk? Use 3/4 cup milk + 2 teaspoons lemon juice or white vinegar; rest 5 minutes.
- Sour cream swap: equal Greek yogurt.
- Neutral oil: canola, vegetable, or light olive oil; for richer flavor use 1/2 cup melted butter (reduce added melted butter in recipe).
- Cocoa powder: natural recommended; if using Dutch-process, keep vinegar to retain tang and color.
- Red food coloring: 1 tablespoon liquid or 1–2 teaspoons gel; for natural, use 1–2 tablespoons beet powder mixed with buttermilk.
- Gluten-free: use a 1:1 gluten-free all-purpose blend; add 1 tablespoon milk if batter seems thick.
- Dairy-free: use plant milk + 2 tsp acid for buttermilk, dairy-free yogurt for sour cream, vegan butter in glaze, and dairy-free cream cheese.
- Egg-free: replace 2 eggs with 1/2 cup unsweetened applesauce or 2 flax eggs (2 tbsp ground flax + 6 tbsp water); expect a slightly denser crumb.
- Budget/availability sugars: use all granulated sugar (1 cup total) if no brown sugar.
- Vinegar: apple cider vinegar works in place of white vinegar.
You Must Know
Doneness • If the loaf domes then cracks widely, rotate the pan and loosely tent with foil once the top is set but still glossy; continue until an instant-read thermometer reads 203–207°F in the center. This curbs over-browning while ensuring a moist crumb.
Troubleshoot • When batter looks curdled after combining wet ingredients, add 1 tablespoon of the dry mix and fold just until it smooths out. The small starch addition helps emulsify fats; batter should flow in a thick ribbon from the spatula.
Flavor Boost • For deeper cocoa notes without muddying color, bloom 1 extra teaspoon natural cocoa in 1 tablespoon hot coffee, then fold into the wet mixture; you’ll get a subtle mocha aroma with no added sweetness, and color stays vibrant.
Scale • For two 8×4-inch pans, divide batter by weight (about 1,050–1,100 g total, so ~525 g each) and start checking at 35 minutes; they’re done at 200–205°F or when the center springs back with faint resistance.
Make-Ahead • To keep glaze smooth for later, beat and thin to a slow-ribbon consistency, then refrigerate up to 3 days; rewarm 10–15 seconds in the microwave and stir until glossy before drizzling—no lumps and an easy pour.
Serving Tips
- Serve slightly warm with a thick cream cheese glaze drizzle.
- Pair slices with hot coffee or cold milk for contrast.
- Top with fresh raspberries and a dusting of powdered sugar.
- Add a scoop of vanilla ice cream for dessert plates.
- Garnish with chocolate shavings or toasted pecans for crunch.
Storage & Make-Ahead
Store the glazed loaf tightly wrapped in the fridge for up to 5 days.
Bring to room temperature before serving for best texture.
For make-ahead, bake, cool, and wrap unglazed, then glaze before serving.
It freezes well (unglazed) up to 2 months.
Thaw overnight in the fridge.
Reheating
For gentle reheating, wrap slices in a damp paper towel and microwave ****10–15 seconds.
Or warm in a 300°F oven, tented with foil, 8–10 minutes.
Stovetop: covered skillet, low heat.
Juneteenth Dessert Tables
A quick warm-up in the microwave or a low oven brings each slice back to its tender crumb, and that gentle heat makes the cream cheese glaze smell like vanilla clouds—just right for a Juneteenth dessert table.
I set the loaf beside bowls of sweet berries, their juices glistening like rubies, and a pitcher of cold milk beading with condensation.
The red crumb feels celebratory—bold against white plates, a nod to resilience and joy.
I slice with a serrated knife so the edges stay neat, then drizzle extra glaze, slow as ribbon.
Guests lean in; the vanilla and cocoa bloom in the warm air.
I offer napkins, small forks, and seconds.
Your plate waits—soft, velvety, tender, and bright with remembrance.
Final Thoughts
Ready to bake? Give this extra-moist red velvet loaf a try, and feel free to tweak the glaze thickness or food coloring to make it your own!
Frequently Asked Questions
Can I Make This Loaf Gluten-Free Without Compromising Texture?
Yes—you can. I’d swap in a quality 1:1 gluten-free flour with xanthan gum, sift well, and keep the buttermilk, sour cream, and oil. Mix gently. You’ll slice into a tender, velvety crumb, beautifully moist.
How Do I Prevent Red Dye From Staining Utensils?
I coat bowls and spatulas with a whisper of oil, switch to stainless or glass, and rinse promptly. I wear gloves, wipe splashes immediately, and soak stained tools in warm, soapy water with a squeeze of lemon.
What Altitude Adjustments Are Needed for High-Elevation Baking?
Reduce leavening slightly, add a tablespoon extra liquid, increase oven temp 15–25°F, and shorten bake a touch. I’ll whisk gently, feel the thinner batter, breathe the brisk mountain air, and watch crumbs set like ruby snow.
Can I Freeze the Loaf With the Cream Cheese Glaze?
Yes, you can, but I prefer freezing slices unglazed. Wrap snugly, freeze, then thaw slowly overnight. Add fresh glaze—silky, tangy ribbons over tender crumb. If already glazed, freeze well-wrapped; expect slight weeping, but flavors still sing.
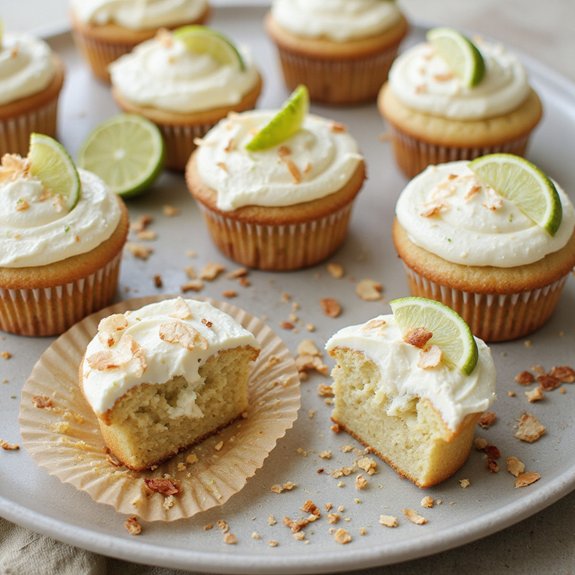
How Do I Convert This Recipe to Cupcakes?
Fill 12–14 cupcake liners two-thirds full; bake at 350°F for 18–22 minutes, until tops spring back. I’ll swirl cream cheese glaze on cooled crowns—soft crumb, cocoa-kissed aroma, tender sighs, and ruby crumbs gleaming under sweet drizzle.
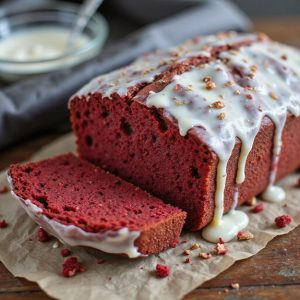
Extra Moist Red Velvet Cake Loaf
Equipment
- 2 Mixing bowl
- 1 Whisk
- 1 hand mixer or stand mixer
- 1 9×5-inch loaf pan
- 1 Rubber spatula
- 1 Wire rack
- 1 measuring cup set
- 1 Measuring spoon set
- 1 parchment sheet
Ingredients
- 1 1/2 cup all-purpose flour sifted
- 3/4 cup granulated sugar
- 1/4 cup light brown sugar packed
- 1 teaspoon baking soda
- 1/2 teaspoon fine sea salt
- 2 tablespoon unsweetened cocoa powder natural
- 2 large eggs room temperature
- 3/4 cup buttermilk room temperature
- 1/2 cup neutral oil such as canola
- 1/4 cup sour cream room temperature
- 2 teaspoon vanilla extract
- 1 tablespoon red liquid food coloring
- 1 teaspoon white vinegar
- 2 tablespoon unsalted butter melted (for added moisture)
- 4 ounce cream cheese softened (for glaze)
- 1 cup powdered sugar sifted (for glaze)
- 2–3 tablespoon milk as needed (for glaze)
- 1/2 teaspoon vanilla extract for glaze
- pinch salt for glaze
Instructions
- Preheat the oven to 350°F (175°C) and line a 9×5-inch loaf pan with parchment, leaving overhang for easy lifting.
- In a large bowl whisk together flour, granulated sugar, brown sugar, baking soda, salt, and cocoa powder until well combined.
- In a separate bowl whisk eggs, buttermilk, oil, sour cream, vanilla, food coloring, vinegar, and melted butter until smooth and evenly tinted.
- Pour the wet ingredients into the dry and mix with a whisk or spatula just until no dry streaks remain, avoiding overmixing.
- Transfer the batter to the prepared pan, smooth the top, and tap the pan gently on the counter to release air bubbles.
- Bake for 50–60 minutes until a toothpick inserted in the center comes out with a few moist crumbs but no wet batter.
- Cool the loaf in the pan on a wire rack for 15 minutes, then lift it out and cool until just slightly warm.
- For the glaze, beat cream cheese until creamy, then add powdered sugar, vanilla, salt, and enough milk to reach a thick, pourable consistency.
- Spread or drizzle the glaze over the cooled loaf and let it set for 10 minutes before slicing.
- Slice with a serrated knife, wiping the blade between cuts for clean slices.
Notes

Cynthia Weatherford is a seasoned chef and culinary enthusiast who serves as the Recipe creator of Somonday. With decades of experience in the kitchen and a passion for exploring diverse cuisines, Cynthia brings a blend of creativity and technique to every dish. Known for transforming simple ingredients into show-stopping meals, Cynthia believes that cooking is an art form anyone can master. Dedicated to inspiring home cooks, Cynthia shares approachable recipes, pro tips, and culinary wisdom to make every meal memorable.