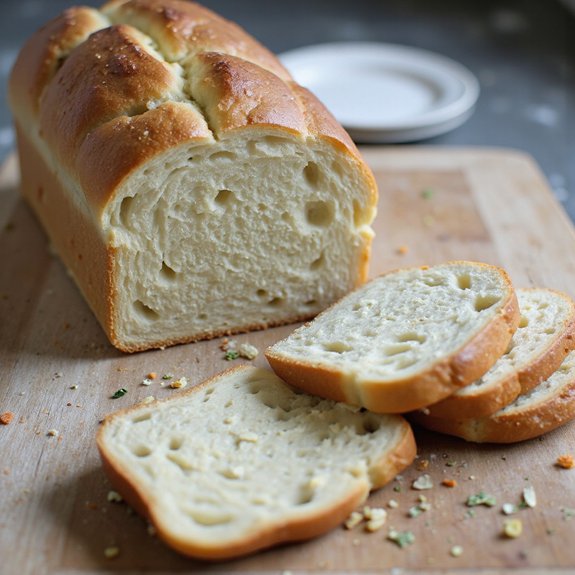
There’s something about the sight of a golden loaf of sourdough sandwich bread cooling on the counter—the crust a soft, toasty caramel, the interior pale cream and delicately springy—that makes the whole kitchen feel calmer.
This is everyday bread: tender, sliceable, perfect for toast, grilled cheese, or simple buttered slabs. It’s not “instant,” but it’s hands-off and steady, ideal for anyone who loves real sourdough flavor without the fuss of artisan boules.
It suits busy families packing lunches, beginners learning sourdough, and meal-preppers who like a stocked freezer.
I still remember a hectic week when everything felt scattered; pulling two homemade loaves from the oven gave me breakfasts, school sandwiches, and an easy dinner of tomato soup and grilled cheese—all from one bake.
This bread shines for Sunday suppers, quick weekday lunches, and casual entertaining boards. Ready to bring this loaf to life?
Why You’ll Love It
- Delivers classic sourdough tang with a soft, sandwich-friendly crumb.
- Stays fluffy and tender thanks to milk, honey, and butter enrichment.
- Fits busy schedules with flexible room-temperature or overnight proofing options.
- Uses simple pantry staples and a standard 9×5-inch loaf pan.
- Slices cleanly for toast, grilled cheese, or meal-prep sandwiches.
Ingredients
- 120 g active sourdough starter, 100% hydration — use bubbly, recently fed starter for best rise
- 280 g warm water, about 80°F (27°C) — lukewarm to the touch, not hot
- 30 g honey or sugar — honey adds flavor, sugar is more neutral
- 40 g unsalted butter, melted and cooled — cool to lukewarm so it doesn’t harm the starter
- 450 g bread flour — higher protein flour gives better structure and softness
- 8 g fine sea salt — fine grain dissolves more evenly in the dough
- 30 g whole milk, room temperature — enriches the crumb and softens the texture
- 10 g neutral oil, for greasing pan — use canola, sunflower, or similar light-flavored oil
Step-by-Step Method
Mix the Starter, Water & Honey
Whisk the active sourdough starter, warm water, and honey in a medium bowl. Stir until the starter dissolves and the liquid looks cloudy and uniform.
This guarantees the natural yeast is evenly dispersed. Keep whisking gently until there are no thick starter clumps. Set this wet mixture aside while you prepare the dry ingredients.
Combine the Wet Ingredients
Stir the cooled melted butter into the starter mixture. Mix until fully incorporated and smooth.
The butter shouldn’t be hot, or it may weaken the yeast. Make sure the fat is evenly distributed for a tender crumb. The mixture should look creamy and cohesive before moving on to the flour.
Mix the Dry Ingredients
In a large mixing bowl, whisk together the bread flour and fine sea salt. Distribute the salt evenly so it seasons the dough uniformly.
Create a slight well in the center to help catch the wet mixture. This step prevents pockets of salt or flour, promoting an even texture in the finished loaf.
Form a Shaggy Dough
Pour the wet mixture into the flour and salt. Stir with a spoon or spatula until all dry bits are moistened.
Scrape the bowl’s sides and bottom to catch stray flour. Stop mixing once a rough, shaggy dough forms. Don’t knead yet; the dough should look messy but without visible dry patches.
Rest the Dough to Hydrate
Cover the bowl and let the dough rest at room temperature for 30 minutes. This autolyse period allows the flour to fully hydrate.
Gluten begins forming with minimal effort. The dough will feel softer and more elastic afterward. Avoid disturbing it during this time so the structure can develop naturally.
Incorporate the Milk Fully
Drizzle the room-temperature whole milk over the rested dough. Use your hand to squeeze, fold, and pinch the dough until the milk disappears.
Work gently but thoroughly to avoid tearing. Continue until the dough feels cohesive and slightly sticky. This step enriches the dough, helping create a softer, fluffier sandwich crumb.
Perform the First Stretch & Fold
With damp hands, lift one side of the dough and fold it over the center. Rotate the bowl and repeat 4–6 times around.
This strengthens the gluten without traditional kneading. Cover the bowl when finished. The dough should begin feeling smoother and more elastic, though still loose and sticky at this stage.
Rest Between Fold Sets
Let the dough rest for 30 minutes at room temperature after the first folds. Keep it covered to prevent drying.
This rest allows the gluten to relax and fermentation to start. The dough will slowly become more airy. Avoid moving or jostling the bowl so the developing structure remains undisturbed and consistent.
Repeat Stretch & Folds Twice More
Perform two more sets of stretch-and-folds at 30-minute intervals. Each time, fold 4–6 times around the bowl.
Notice the dough tightening and gaining strength. It should become smoother and slightly more domed. Cover after each set. These gentle folds build structure for good oven spring and a fine, even crumb.
Bulk Ferment Until Puffy
After the final fold, cover the bowl and let the dough rise 3–4 hours at room temperature. Watch for about a 50% increase in volume, not a doubling.
The dough should look puffy, jiggly, and airy. Adjust time based on your kitchen’s temperature. Under-proofed dough feels dense; properly proofed dough feels light.
Prepare the Loaf Pan
Lightly oil your 9×5-inch loaf pan with neutral oil. Use a brush or paper towel to coat the bottom, corners, and sides.
Make certain an even, thin layer to prevent sticking without frying the crust. Set the greased pan aside while you shape the dough. Good preparation here guarantees easier release after baking.
Shape the Dough into a Log
Turn the dough onto a lightly floured surface. Gently pat it into a rectangle roughly the length of your loaf pan.
Avoid deflating it excessively. Starting from a short end, roll the dough tightly into a log. Pinch the seam and ends closed. This creates surface tension for a tall, even loaf.
Pan the Loaf Seam-Side Down
Place the shaped log seam-side down into the prepared loaf pan. Center it and gently even out the shape with your hands.
Tuck the ends in if needed for a snug fit. The dough should sit level in the pan. This positioning encourages an even rise and a uniform sandwich-friendly shape.
Proof Until Domed Over the Rim
Cover the pan loosely with plastic wrap or a towel. Let the dough proof at room temperature 1–2 hours.
Watch for it to rise about 1 inch over the pan’s rim. The loaf should look domed and slightly jiggly when nudged. If your kitchen is cool, allow longer. Avoid over-proofing to prevent collapse.
Chill Overnight for an Alternative Proof
For an overnight option, cover the pan and place it in the refrigerator 8–12 hours. The dough will rise slowly and develop deeper flavor.
In the morning, check that it’s well risen and domed. If needed, let it finish proofing at room temperature. Bake once the loaf looks airy and nicely rounded.
Preheat the Oven Thoroughly
When the dough is nearly ready, preheat your oven to 375°F (190°C). Position a rack in the center.
Allow enough time for the oven to fully heat, usually at least 20 minutes. Proper preheating ensures good oven spring and even browning. Don’t start baking until the correct temperature is reached.
Brush the Top for a Soft Crust
Optionally brush the top of the risen loaf with a little milk. Use a pastry brush and apply a thin, even coat.
This helps achieve a soft, golden crust. Be gentle to avoid deflating the dough. Skip this step if you prefer a slightly firmer, drier crust on your sandwich bread.
Bake Until Golden and Cooked Through
Place the pan on the center rack and bake 30–35 minutes. Watch for a deep golden brown top.
If the crust browns too quickly, tent loosely with foil. Check internal temperature with an instant-read thermometer. Aim for 195–200°F (90–93°C). Fully baked bread sounds hollow when tapped on the bottom.
Cool Briefly in the Pan
Remove the pan from the oven and set it on a cooling rack. Let the loaf cool in the pan for 10 minutes.
This short rest helps the structure set and makes removal easier. Don’t leave it in the pan much longer, or steam may soften the crust excessively and cause slight sogginess.
Finish Cooling on a Wire Rack
Gently turn the loaf out onto a wire rack. Let it cool completely for at least 1 hour before slicing.
This prevents a gummy interior and preserves the crumb texture. Resist cutting while warm. Once cool, slice with a sharp serrated knife. Wrap and store at room temperature or freeze slices for longer keeping.
Ingredient Swaps
- Sweetener: Swap honey 1:1 with granulated sugar, light brown sugar, or maple syrup. For sugar-free, use 10–15 g more water and a granulated sweetener that bakes well.
- Fat: Replace butter with equal weight neutral oil or melted coconut oil (refined for no coconut flavor); for dairy-free, also swap milk with equal weight water or unsweetened non-dairy milk.
- Flour: You can use up to 30–40% whole wheat or rye (reduce total flour by 10–15 g and/or add 10–20 g extra water as needed). If using all-purpose flour instead of bread flour, expect a slightly softer, less tall loaf.
- Starter: If your starter isn’t 100% hydration, adjust water or flour so the total dough hydration stays about the same (thicker starter → add a splash more water; thinner starter → hold back 10–20 g water).
You Must Know
– Scale • To make two loaves instead of one: Multiply all ingredients by 2 (e.g., 900 g flour, 240 g starter, 560 g water) and divide the dough by weight into two equal portions before shaping.
Keeping ratios identical preserves the same texture and rise in multiple pans.
Serving Tips
- Slice thick for grilled cheese; pan-toast in butter until deeply golden and crisp.
- Use for BLTs or turkey clubs; toast lightly to support juicy fillings.
- Cube into 1-inch pieces for garlic croutons; bake until crunchy and fragrant.
- Make French toast with slightly stale slices; soak well for custardy centers.
- Serve alongside soups or stews; brush with olive oil and broil briefly.
Storage & Make-Ahead
This sourdough sandwich bread keeps covered at room temperature for 2–3 days, or in the fridge up to 1 week (well wrapped to prevent drying).
For longer storage, slice, wrap tightly, and freeze up to 2 months.
Thaw at room temperature and refresh briefly in a low oven if desired.
Reheating
Reheat slices gently: in a 300°F (150°C) oven for 8–10 minutes.
Briefly in the microwave wrapped with a damp towel.
Or on a covered skillet over low heat until warmed through.
Sourdough in American Lunches
Often overlooked in the rush to pack a quick meal, sourdough sandwich bread can turn an everyday American lunch into something you actually look forward to eating.
I think of it as the quiet upgrade: that softly tangy slice cradling turkey, crisp lettuce, and a swipe of mayo, or hugging warm cheddar until it melts into the airy crumb.
When you bite in, there’s a gentle chew, a tender pull, and that faint, yogurt-like tang that makes deli meat taste richer and tomatoes taste sweeter.
It’s just as at home under peanut butter and jam as it’s around leftover roast chicken. Packed in a lunchbox or eaten over the kitchen sink, it feels simple, generous, and deeply comforting.
Final Thoughts
Give this fluffy sourdough sandwich bread a try and see just how soft and flavorful homemade bread can be.
Once you’ve made it once, have fun tweaking it with different sweeteners, mix-ins, or flour blends to make it your own.
Frequently Asked Questions
Can I Convert This Sourdough Loaf Into a Cinnamon Swirl Sandwich Bread?
Yes, you can. I’d roll the dough into a rectangle, brush with butter, sprinkle cinnamon‑sugar, then coil it tightly. As it bakes, ribbons of spiced sweetness marble the tender crumb and perfume your kitchen.
How Do I Adapt This Recipe for a Pullman or Pain De Mie Pan?
You’ll use 13–15% more dough, fill the Pullman halfway, then proof until ¾–1″ from the lid. Bake lidded at 375°F about 40–45 minutes, until fragrant, squared, and around 200°F inside.
What’s the Best Way to Troubleshoot a Gummy or Underbaked Crumb?
I test with a thermometer—aim for 200°F in the loaf’s steamy center. I’d bake longer, tent with foil, extend proof slightly, then cool completely; warm bread’s seductive softness often masquerades as gummy, underbaked crumb.
Can This Dough Be Shaped Into Burger Buns or Dinner Rolls Instead?
Yes, you can absolutely turn this dough into burger buns or dinner rolls. I’d divide it into equal pieces, shape into tight balls, proof until pillowy, then bake until lightly bronzed and softly fragrant.
How Can I Scale the Recipe for Multiple Loaves in One Bake?
You can scale it straight by weight: double ingredients for 2 loaves, triple for 3. I’d mix in one big bowl, then divide by weight, shape, proof, and bake side‑by‑side, filling your kitchen with buttery warmth.

Fluffy Sourdough Sandwich Bread
Equipment
- 1 digital kitchen scale
- 2 medium mixing bowls
- 1 large mixing bowl
- 1 Dough scraper
- 1 wooden spoon or silicone spatula
- 1 9×5-inch loaf pan
- 1 plastic wrap or reusable cover
- 1 clean kitchen towel
- 1 wire cooling rack
Ingredients
- 120 gram active sourdough starter 100% hydration
- 280 gram warm water about 80°F 27°C
- 30 gram honey or sugar
- 40 gram unsalted butter melted and cooled
- 450 gram bread flour
- 8 gram fine sea salt
- 30 gram whole milk room temperature
- 10 gram neutral oil for greasing pan
Instructions
- In a medium bowl whisk together active sourdough starter, warm water, and honey until mostly dissolved.
- Stir in melted butter until the mixture is smooth and well combined.
- In a large mixing bowl whisk together bread flour and salt.
- Pour the wet mixture into the dry ingredients and stir with a spoon until a rough shaggy dough forms and no dry flour remains.
- Cover the bowl and let the dough rest for 30 minutes at room temperature to hydrate (autolyse).
- After resting drizzle in the whole milk and squeeze and fold the dough with your hand until milk is fully absorbed and dough is cohesive.
- Perform 1 set of stretch-and-folds by pulling up one side of the dough and folding it over the center 4–6 times around the bowl.
- Cover the bowl and let the dough rest 30 minutes at room temperature.
- Repeat the stretch-and-fold process 2 more times at 30-minute intervals for a total of 3 sets.
- After the final set of folds cover the bowl and allow the dough to bulk ferment at room temperature 3–4 hours until slightly puffy and risen by about 50%.
- Lightly oil your loaf pan and set it aside.
- Turn the dough out onto a lightly floured surface and gently pat it into a rectangle roughly the length of your loaf pan.
- Tightly roll the rectangle from the short end into a log pinching the seam and ends closed to create surface tension.
- Place the dough log seam side down into the prepared loaf pan and gently even out the shape.
- Cover the pan loosely with plastic wrap or a towel and let the dough proof at room temperature 1–2 hours until it has risen about 1 inch over the rim of the pan.
- For an overnight proof alternative place the covered pan in the refrigerator 8–12 hours until well risen and domed.
- When ready to bake preheat the oven to 375°F (190°C) with a rack in the center position.
- Optionally brush the top of the loaf with a little milk for a soft golden crust.
- Bake the bread for 30–35 minutes until deep golden brown and an instant-read thermometer inserted in the center reads about 195–200°F (90–93°C).
- Remove the pan from the oven and let the loaf cool in the pan for 10 minutes.
- Carefully turn the loaf out onto a wire rack and cool completely at least 1 hour before slicing.
Notes

Cynthia Weatherford is a seasoned chef and culinary enthusiast who serves as the Recipe creator of Somonday. With decades of experience in the kitchen and a passion for exploring diverse cuisines, Cynthia brings a blend of creativity and technique to every dish. Known for transforming simple ingredients into show-stopping meals, Cynthia believes that cooking is an art form anyone can master. Dedicated to inspiring home cooks, Cynthia shares approachable recipes, pro tips, and culinary wisdom to make every meal memorable.


