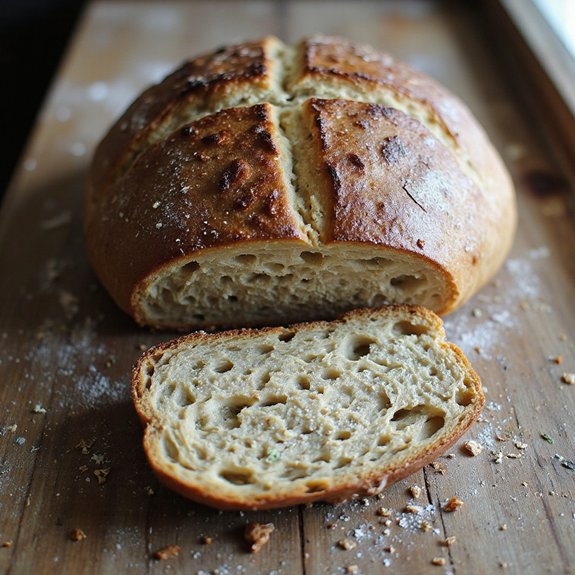
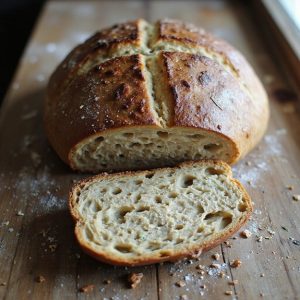
There’s something about the first crackle of a knife through a loaf of fresh milled sourdough bread—the blistered, caramel-brown crust giving way to a tender, custardy crumb that’s still warm, fragrant, and tangy.
This is no rushed shortcut loaf; it’s a slow, deeply flavored everyday bread that pairs with everything from hearty stews and skillet dinners to simple buttered toast.
While the fermentation takes time, your actual hands-on work is surprisingly quick and beginner-friendly, perfect for home bakers, families, and comfort seekers.
I still remember one icy Sunday when dinner was nothing more than a pot of soup—until a just-baked sourdough came out of the oven, turning a humble meal into something that felt like a celebration.
This bread shines at Sunday suppers, easy entertaining, and quiet weekday lunches, and it’s ideal for meal-prepping slices for the week ahead. Ready to bring this loaf to life?
Why You’ll Love It
- Delivers bold, complex flavor from freshly milled whole wheat flour
- Maximizes nutrition with minimally processed, just-milled grains
- Creates a crackly crust and tender, open crumb interior
- Relies on wild sourdough culture instead of commercial yeast
- Adapts easily to your schedule with flexible fermentation times
Ingredients
- 400 g wheat berries hard red or hard white — mill fresh for best flavor
- 100 g bread flour unbleached — optional but adds strength and lift
- 380 g water room temperature — adjust slightly based on dough feel
- 90 g sourdough starter 100% hydration, active — use bubbly and recently fed
- 10 g fine sea salt — balances flavor and strengthens gluten
Step-by-Step Method
Grind the wheat berries on a fine setting. Weigh 400 g fresh flour and combine with 100 g bread flour in a large bowl. Mix well.
Fresh flour is warm and aromatic; use it soon after milling for best flavor. Keep your scale nearby so you can stay precise with later water and starter additions.
Hydrate and Autolyse
Pour 320 g room‑temperature water over the flour mix. Mix by hand until no dry bits remain. Scrape down the bowl. Cover with a towel or plastic wrap.
Rest 45–60 minutes. Let the flour fully hydrate. This relaxes gluten, improves extensibility, and makes later mixing and folding easier.
Mix Starter Slurry
In a small bowl, add 60 g water and 90 g active, bubbly starter. Stir until mostly dissolved. Break up any thick pieces with your fingers or a spoon. Aim for a milky, loose mixture.
Using starter at peak activity guarantees strong fermentation and better oven spring in this high‑extraction dough.
Incorporate Starter
Pour the starter slurry over the autolysed dough. Pinch and squeeze the dough repeatedly. Fold edges toward the center as you work. Rotate the bowl as you mix.
Continue until the starter is fully incorporated and the dough looks uniform. Scrape down the sides. Cover again to prevent drying.
Add and Distribute Salt
Sprinkle 10 g fine sea salt evenly over the dough surface. Wet your hand slightly. Squeeze and fold the dough to dissolve and spread the salt. Use a pinch‑and‑fold motion.
Work gently but thoroughly. Salt strengthens gluten and slows fermentation, so guarantee it’s fully integrated before bulk fermentation.
Begin Bulk Fermentation
Cover the bowl and set it at 21–24°C / 70–75°F. Let the dough ferment 3–5 hours. Watch volume and feel, not just time.
Aim for about 50–75% rise by the end. Keep the dough covered between folds. Avoid drafts and direct sunlight, which can overheat or dry the dough surface.
Perform Stretch and Folds
During the first 2 hours, perform 3–4 sets of stretch‑and‑folds every 30–40 minutes. With wet hands, lift one side of the dough up and fold over the center. Repeat on all four sides.
Strengthen the dough gradually. Work gently to avoid tearing. After each set, re‑cover and let it rest undisturbed.
Finish Bulk and Assess Dough
After the last folds, let the dough rest without handling. Watch for a 50–75% increase in volume. Look for small bubbles on the surface and a smoother, slightly domed top.
Gently jiggle the bowl; the dough should wobble and feel airy. If it still seems dense, allow a bit more time.
Pre‑Shape the Dough
Lightly flour the work surface. Gently turn the dough out using a scraper. Avoid deflating completely. Use a bench scraper to tuck and rotate the dough into a loose round.
Create light surface tension without over‑tightening. Let the dough sit as a relaxed, rough ball in preparation for final shaping.
Rest the Dough
Leave the pre‑shaped round uncovered on the counter for 15–20 minutes. Let the gluten relax so final shaping is easier. Watch for slight spreading but not complete flattening.
This bench rest balances strength and extensibility. If the dough feels very tight, allow the full rest for better handling.
Shape into Final Loaf
Lightly flour the surface as needed. Gently flip the dough so the smooth side is down. Stretch and fold edges toward the center to build structure. Roll or tighten into a boule or batard, creating firm surface tension.
Avoid tearing. Seal the seam well. Adjust flour lightly to prevent sticking.
Prepare Proofing Basket
Generously flour your banneton or towel‑lined bowl. Use rice flour or a mix to reduce sticking. Shake to distribute flour evenly. Place the shaped dough seam‑side up into the basket.
Let it nestle evenly. Dust lightly on top if tacky. Proper flouring guarantees clean release after cold proofing.
Proof and Cold Retard
Cover the basket with a towel or plastic wrap. Proof at room temperature 45–90 minutes. Gently press the dough; it should spring back slowly.
Once ready, refrigerate 10–14 hours. Use the cold retard to develop flavor and make scoring easier. Avoid over‑proofing by watching the poke test closely.
Preheat the Oven and Dutch Oven
About 45 minutes before baking, place your Dutch oven with lid inside the oven. Preheat to 250°C / 480°F. Allow full preheat time so both oven and Dutch oven are thoroughly hot.
Proper preheating promotes strong oven spring and good crust development. Prepare parchment while the oven heats.
Turn Out and Score
Remove the chilled basket from the fridge. Place parchment over the basket and invert onto the counter. Lift the basket away.
Quickly adjust the loaf if off‑center. Using a lame or sharp serrated knife, score the top decisively. Make at least one deep, confident slash to guide expansion.
Load the Dutch Oven
Carefully remove the hot Dutch oven from the oven and set it on a heat‑safe surface. Lift the dough using the parchment as a sling. Lower it into the pot.
Cover with the lid. Work quickly to retain heat and steam. Return the covered Dutch oven to the oven center rack immediately.
Steam‑Bake Covered
Bake covered for 20 minutes at 250°C / 480°F. Then reduce the oven temperature to 230°C / 450°F and continue baking covered for another 10 minutes.
Let the trapped steam keep the crust flexible. This encourages maximum oven spring and a glossy, blistered surface before final browning.
Finish Uncovered Baking
After 30 minutes covered, remove the Dutch oven lid. Continue baking 10–15 minutes, uncovered, until the crust is deep golden‑brown. Check color and internal temperature; aim for about 96°C / 205°F.
Rotate the pot if browning unevenly. Pull the loaf once it looks richly caramelized.
Cool Completely Before Slicing
Use the parchment to lift the loaf from the Dutch oven. Transfer to a wire rack. Cool at least 1–2 hours to set the crumb.
Resist slicing early; steam will escape and texture can gum. Once cool, slice with a sharp serrated knife. Store cut‑side down on a board for the first day.
Ingredient Swaps
- Use any hard wheat berries you have (red or white); you can swap in up to 30–40% spelt, rye, or einkorn, but expect a slightly denser, more tender crumb and consider adding 10–20 g more water.
- For 100% whole grain, replace the 100 g bread flour with fresh-milled wheat and add 10–30 g extra water as needed; more folds and slightly shorter bulk can help maintain strength.
- To make it vegan-friendly, simply make certain your starter is fed with just flour and water (no honey, milk, etc.); the base recipe is otherwise already vegan.
You Must Know
– Troubleshoot • If your dough races through bulk in under 2 hours: Gently chill it by setting the bowl over a cold pack or moving to a 20–21°C / 68–70°F spot and end bulk when it’s only 50–60% bigger****, not the full 75%.
Fresh‑milled flour and a warm kitchen (above ~24°C / 75°F) can cause over‑fermentation and a flat loaf.
– Troubleshoot • If the dough feels weak, tears, or spreads after shaping: Next time, drop hydration by 10–20 g water and add 1 extra set of folds within the first 90 minutes.
This firms the gluten network so whole‑grain shards don’t cut it down and you get better height.
– Scale • For two loaves instead of one: Multiply every ingredient by 2 (e.g., 400 g berries → 800 g; 90 g starter → 180 g) and divide the dough into equal portions by weight before shaping.
Matching dough weights (±5 g) keeps proofing and oven timing the same for both loaves.
– Flavor Boost • To tune flavor and sourness: For a sweeter, grain‑forward loaf, shorten the fridge time to 4–6 hours and use starter just at peak.
For more tang and complexity, extend cold time to 16–18 hours and use starter that’s very bubbly and just starting to recede, which increases acid development.
Serving Tips
- Serve slightly warm with salted cultured butter and a drizzle of raw honey.
- Pair slices with a rustic cheese board: aged cheddar, blue cheese, nuts, and dried fruit.
- Toast and top with smashed avocado, lemon, chili flakes, and flaky sea salt.
- Use as a base for open-faced sandwiches with cured meats, pickles, and mustard.
- Grill thick slices in olive oil and serve alongside soups, stews, or salads.
Storage & Make-Ahead
This bread keeps at room temperature for 2–3 days, loosely wrapped or in a paper bag.
For longer storage, slice and freeze up to 2 months in an airtight bag, toasting straight from frozen.
You can also refrigerate dough during cold retard 10–18 hours to bake fresh later.
Reheating
To gently reheat slices, briefly microwave wrapped in a damp towel.
Warm in a 150°C / 300°F oven loosely wrapped in foil.
Toast in a covered skillet on low.
Sourdough in Daily Rituals
Even before I weigh the flour or feed the starter, sourdough quietly anchors the day like a familiar melody. I wake to the soft burble of bubbles in the jar, that gentle, living hush.
When I crack the lid, a tangy, yogurty fragrance rises, weaving itself into the morning steam of coffee.
You might feel it too: how mixing fresh‑milled flour into water turns a regular day into something almost ceremonial. My hands sink into the dough; warm, damp, and slightly tacky, it clings like a promise.
Folds mark the afternoon, a slow choreography between tasks. By evening, the baked loaf rests on the cooling rack, crackling softly—our shared punctuation mark at the end of the day.
Final Thoughts
Give this fresh milled sourdough a try and see how much flavor and character freshly ground grain brings to your bread.
Once you’ve baked it once, don’t be afraid to tweak the hydration, fermentation time, or flour blend to make the loaf uniquely your own.
Frequently Asked Questions
How Can I Adjust This Recipe for High-Altitude Baking Conditions?
You’ll shorten bulk and proof a bit, hold dough near 24°C, and steam well. I’d slightly increase water, reduce starter 10–15%, and bake a touch hotter, listening for that hollow, crackling song.
What Are Common Troubleshooting Signs of Over-Proofed or Under-Proofed Fresh-Milled Dough?
I watch your dough like weather: over-proofed feels slack, sighs flat in the oven, blisters, smells sharply sour; under-proofed feels tight, resists shaping, tears, bursts wildly while baking, its crumb dense like damp morning fog.
How Do I Convert This Formula to Use Commercial Yeast Instead of Starter?
Use 3–4 g instant yeast, reader, and keep total water and flour the same; I’d skip autolyse, mix everything, then let the dough rise once until pillowy and fragrant like warm, sunlit grain.
Can I Adapt This Loaf for a Bread Machine or Stand Mixer?
You can. I’d use the stand mixer on low for gentle kneading, watching softness like warm clay. In a bread machine, I’d choose “dough” only, then bake conventionally for better crust and aroma.
How Should I Modify the Recipe for Gluten-Sensitive (Not Celiac) Eaters?
You can’t truly make this loaf low‑gluten, but you can help sensitive tummies: I’d lengthen fermentation, use mostly lower‑gluten soft wheat, add a soaker, and toast slices well—warm, nutty, easier‑to‑digest crumbs.
Fresh Milled Sourdough Bread
Equipment
- 1 digital kitchen scale
- 1 grain mill (for milling wheat berries)
- 2 medium mixing bowls
- 1 Dough scraper
- 1 large mixing bowl or dough tub
- 1 proofing basket or 1 medium bowl lined with a clean towel
- 1 lame or sharp serrated knife for scoring
- 1 Dutch oven with lid or baking stone and steam tray
- 1 wire cooling rack
- 1 clean kitchen towel or plastic wrap
Ingredients
- 400 gram wheat berries hard red or hard white
- 100 gram bread flour unbleached optional for strength
- 380 gram water room temperature
- 90 gram active 100% hydration sourdough starter bubbly and recently fed
- 10 gram fine sea salt
Instructions
- Mill the 400 g of wheat berries in your grain mill on a fine setting and combine the fresh flour with the 100 g bread flour in a large mixing bowl.
- Add 320 g of the water to the flour mixture and mix by hand until no dry bits remain, then cover and let autolyse for 45–60 minutes.
- In a small bowl, mix the remaining 60 g water with the 90 g active sourdough starter until mostly dissolved.
- Add the starter mixture to the autolysed dough and pinch and fold until fully incorporated.
- Sprinkle the 10 g salt over the dough and squeeze and fold until the salt is evenly distributed.
- Cover the bowl and begin bulk fermentation at room temperature (21–24°C / 70–75°F) for 3–5 hours, depending on room warmth.
- During the first 2 hours of bulk, perform 3–4 sets of stretch-and-folds every 30–40 minutes, lifting and folding each side of the dough over the center.
- After the last set of folds, let the dough rest undisturbed until it has grown by about 50–75% and looks airy with small bubbles on the surface.
- Lightly flour your work surface, gently turn the dough out, and pre-shape it into a loose round using a bench scraper.
- Let the pre-shaped dough rest uncovered for 15–20 minutes to relax.
- Shape the dough into a tight boule or batard by gently stretching and folding, creating surface tension without tearing.
- Generously flour your proofing basket or towel-lined bowl and place the shaped dough seam-side up inside.
- Cover the basket and proof at room temperature for 45–90 minutes, or until the dough slowly springs back when gently pressed, then refrigerate for 10–14 hours for cold retard.
- About 45 minutes before baking, place your Dutch oven (with lid) in the oven and preheat to 250°C / 480°F.
- When ready to bake, carefully remove the hot Dutch oven, turn the cold dough out onto a piece of parchment seam-side down, and score the top with a lame or sharp knife.
- Lift the dough (with parchment) into the Dutch oven, cover with the lid, and place it back in the oven.
- Bake covered for 20 minutes at 250°C / 480°F, then reduce the temperature to 230°C / 450°F and bake covered for 10 more minutes.
- Remove the lid and continue baking for 10–15 minutes, or until the crust is deep golden-brown and the internal temperature reaches about 96°C / 205°F.
- Carefully remove the loaf from the Dutch oven and cool completely on a wire rack for at least 1–2 hours before slicing.
Notes

Cynthia Weatherford is a seasoned chef and culinary enthusiast who serves as the Recipe creator of Somonday. With decades of experience in the kitchen and a passion for exploring diverse cuisines, Cynthia brings a blend of creativity and technique to every dish. Known for transforming simple ingredients into show-stopping meals, Cynthia believes that cooking is an art form anyone can master. Dedicated to inspiring home cooks, Cynthia shares approachable recipes, pro tips, and culinary wisdom to make every meal memorable.


