You’re about to commence on crafting a delectable Garlic Butter Chicken dish, a staple that balances simplicity and rich flavor, ideal for both weeknights and special gatherings.
You’ll need to gather your kitchen tools, such as a skillet and meat thermometer, as precision is key.
By adhering to the precise steps and understanding the culinary techniques involved, you’ll guarantee the chicken achieves the perfect tenderness.
Ready to enhance your culinary repertoire?
Kitchen Tools Required
To master the Garlic Butter Chicken recipe, you’ll need a carefully selected array of kitchen tools to guarantee precision and efficiency.
Begin with a sturdy cutting board and sharp chef’s knife to secure clean cuts of your boneless, skinless chicken breasts.
Use a mixing bowl and whisk to combine ingredients seamlessly.
A heavy-duty skillet is essential for maintaining even heat distribution while searing the chicken.
Opt for a skillet with a lid to control splatter and retain moisture.
Tongs will give you the control needed to flip the chicken with ease, securing a perfect sear.
A silicone spatula is ideal for stirring the garlic butter sauce without scratching your cookware.
With these tools, you’ll elevate your culinary technique and achieve delicious results.
Recipe
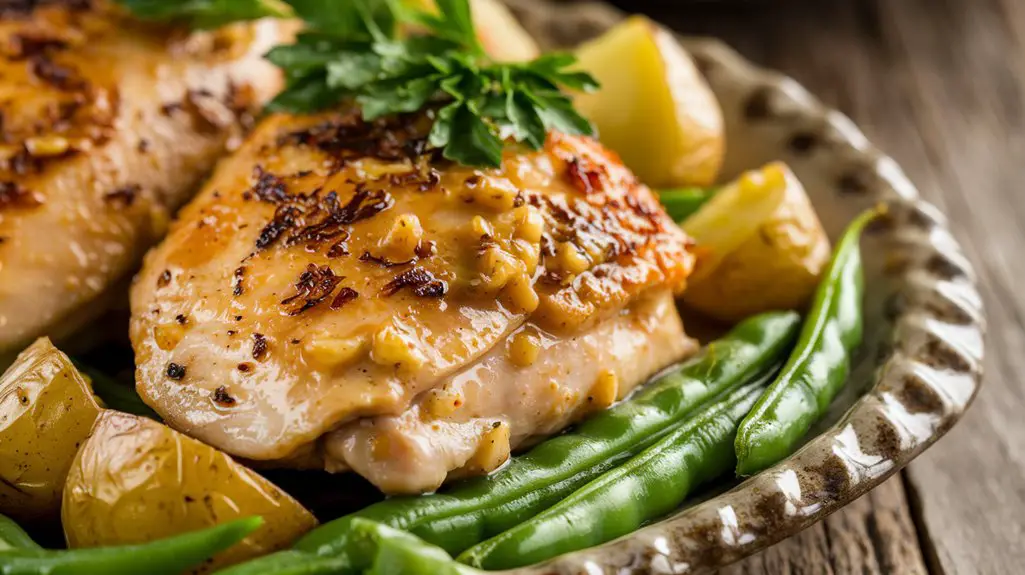
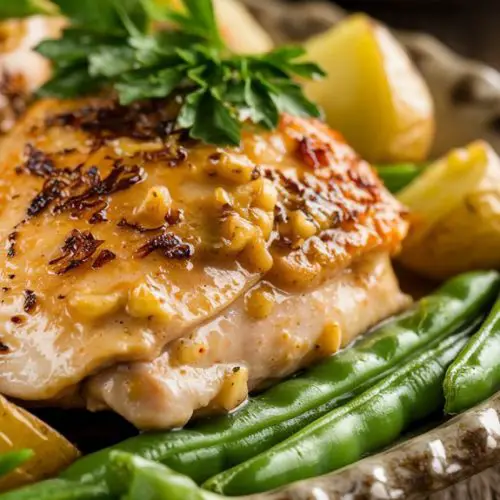
Garlic Butter Chicken is a delightful main course that brings out the best of American cuisine with its rich, savory flavors.
This dish combines tender chicken breasts with a luscious garlic butter sauce, accented with fresh lemon juice and parsley.
It’s both easy to prepare and quick to cook, making it a perfect choice for a weeknight dinner or a special occasion.
The recipe’s simplicity guarantees that the natural flavors of the ingredients shine, while the garlic and lemon provide a zesty contrast to the butter’s richness.
The key to this recipe lies in the preparation and cooking technique, which guarantees that the chicken remains juicy and flavorful.
By seasoning the chicken generously and cooking it to perfection in a skillet, you create a delicious foundation for the garlic butter sauce.
After cooking, the chicken is coated in a fragrant mixture of melted butter, garlic, and lemon juice, infusing it with layers of flavor.
This dish is best enjoyed fresh off the skillet, garnished with a sprinkle of parsley for added color and taste.
Ingredients:
- 4 tablespoons unsalted butter
- 4 cloves garlic, minced
- 1 pound chicken breasts, boneless and skinless
- 1 teaspoon salt
- 1/2 teaspoon black pepper
- 1 tablespoon olive oil
- 1 tablespoon fresh parsley, chopped
- 1 tablespoon lemon juice
To prepare the Garlic Butter Chicken, start by seasoning the chicken breasts with salt and black pepper on both sides.
Heat the olive oil in a skillet over medium-high heat, and cook the chicken breasts for 6-7 minutes on each side until golden brown.
Once cooked, remove the chicken from the skillet and set it aside.
Reduce the heat to medium and add the butter to the skillet.
When the butter has melted, add the minced garlic and sauté for 1-2 minutes.
Stir in the lemon juice, then return the chicken to the skillet, coating it with the garlic butter sauce.
Allow the chicken to cook for an additional 2-3 minutes, occasionally spooning the sauce over it.
Before serving, garnish the dish with chopped parsley.
For the best results, verify that the chicken breasts are of even thickness to guarantee uniform cooking.
If you prefer a more pronounced garlic flavor, feel free to adjust the amount of garlic to your liking.
Using fresh lemon juice instead of bottled will greatly enhance the dish’s flavor profile.
After cooking, let the chicken rest for a few minutes to allow the juices to redistribute, verifying a juicy and flavorful bite with every piece.
Cook & Prep Time
Equipped with the right kitchen tools, you’re ready to efficiently tackle the Garlic Butter Chicken recipe.
First, allocate 10 minutes for preparation. Utilize your cutting board and knife to mince garlic and chop parsley.
Season the chicken breasts with salt and pepper, ensuring even coverage.
With your ingredients prepped, shift to cooking. Engage your skillet and heat olive oil over medium-high heat.
The cook time is approximately 20 minutes.
Sear the chicken, turning with tongs, to achieve a golden-brown exterior. Allocate 6-7 minutes per side for ideal doneness.
After cooking, allow the chicken to rest on a plate for 5 minutes.
This resting period is essential for redistributing juices, ensuring a moist, flavorful main course. Maintain precision for delectable results.
Cooking Steps
Start by seasoning the chicken breasts thoroughly with salt and black pepper on both sides.
Warm the olive oil in your skillet over medium-high heat until it shimmers, then carefully place the chicken in the skillet, cooking until each side achieves a golden-brown sear.
Once cooked, transfer the chicken to a plate, allowing the butter to melt in the skillet for the next step.
Step 1. Season Chicken With Salt
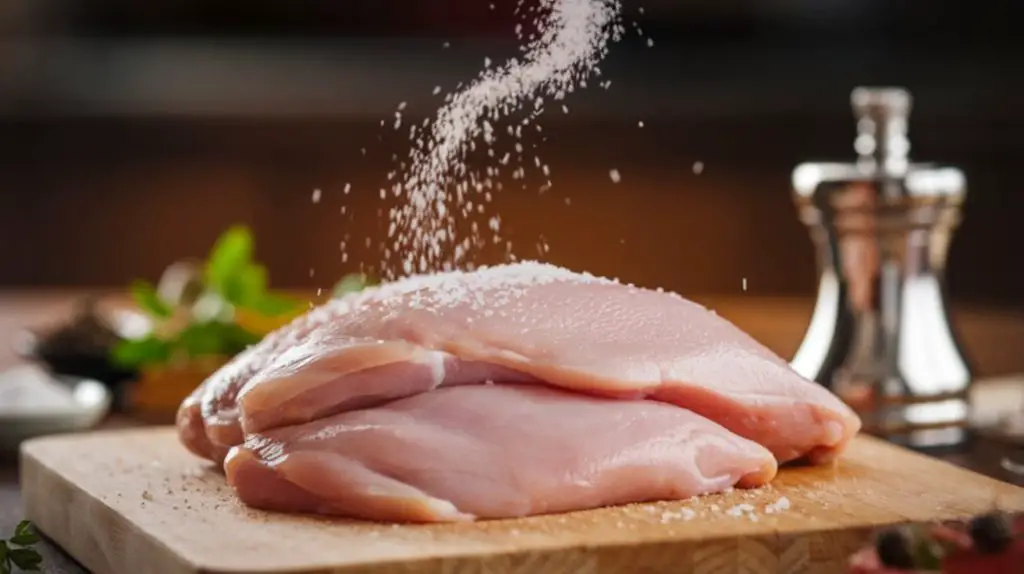
When preparing your chicken breasts, make certain they’re dry by patting them with paper towels to promote even seasoning adhesion.
This essential step guarantees the salt adheres properly, enhancing flavor and moisture retention.
Next, season each side meticulously with salt and black pepper, ensuring a uniform distribution.
This method elevates the chicken’s natural taste while preparing it for the subsequent cooking stages.
Follow these steps for best results:
- Measure Precisely: Use 1 teaspoon of salt for evenly balanced seasoning.
- Distribute Evenly: Apply salt and pepper uniformly on both sides of the chicken.
- Allow Resting: Let the seasoned chicken rest briefly to absorb the flavors.
Step 2. Warm Olive Oil in Skillet
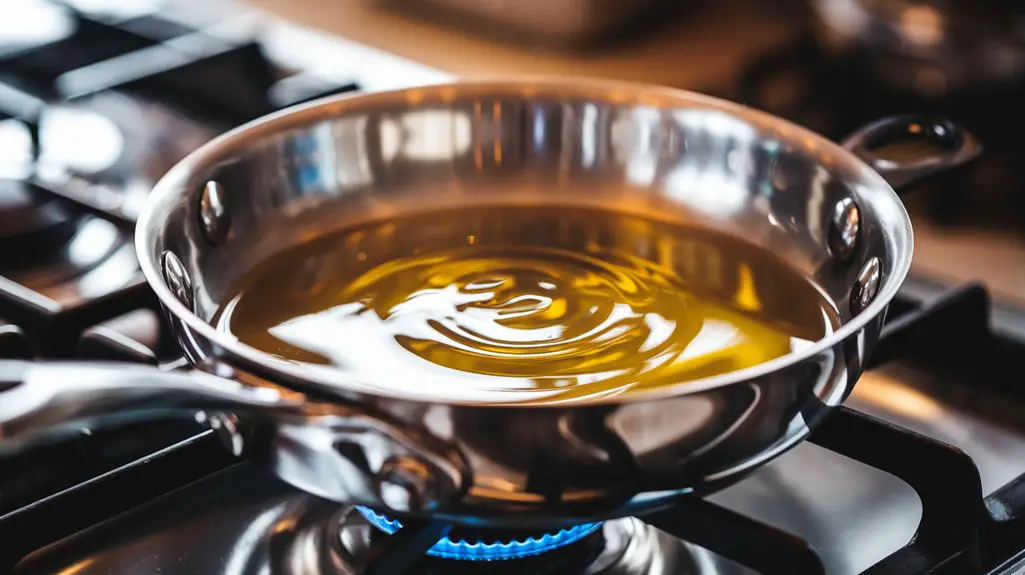
Heat the olive oil in your skillet over medium-high heat until it shimmers, indicating it’s ready for cooking.
The shimmering effect signifies the oil has reached the ideal temperature for searing.
Use a skillet with a heavy base to guarantee even heat distribution, minimizing hot spots that could cause uneven cooking.
Avoid overcrowding the pan, as this traps moisture and prevents proper browning.
Once the oil shimmers, it’s essential to move swiftly and add the seasoned chicken breasts.
This method locks in moisture and enhances flavor.
Make certain you’re using fresh olive oil for a clean taste and best performance.
Don’t rush this step; patience guarantees the oil reaches the right temperature, forming the foundation for achieving a perfectly seared, flavorful dish.
Step 3. Cook Chicken Until Golden
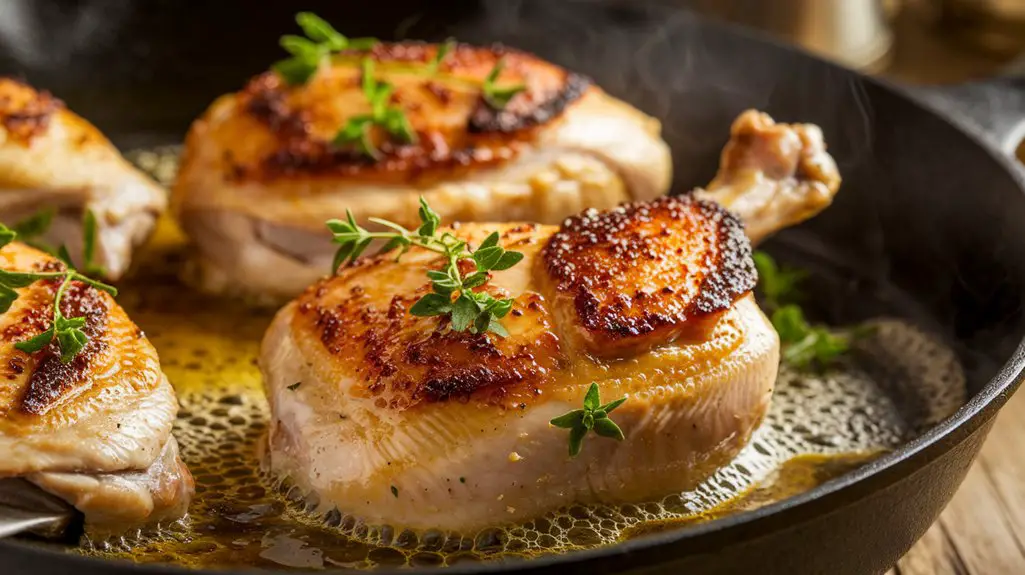
Sear the seasoned chicken breasts in the shimmering olive oil, making sure each side cooks for 6-7 minutes until a golden crust forms.
Maintain medium-high heat to achieve ideal caramelization; this will enhance flavor and create a savory texture.
Use tongs for precise handling, making sure even searing without tearing the meat.
Here’s how to achieve that perfect golden hue:
- Monitor Heat: Keep the skillet at medium-high to prevent burning and make sure an even golden finish.
- Check Doneness: Aim for an internal temperature of 165°F using a meat thermometer.
- Avoid Overcrowding: Cook in batches if necessary to prevent steaming, which can hinder browning.
Step 4. Transfer Chicken to Plate
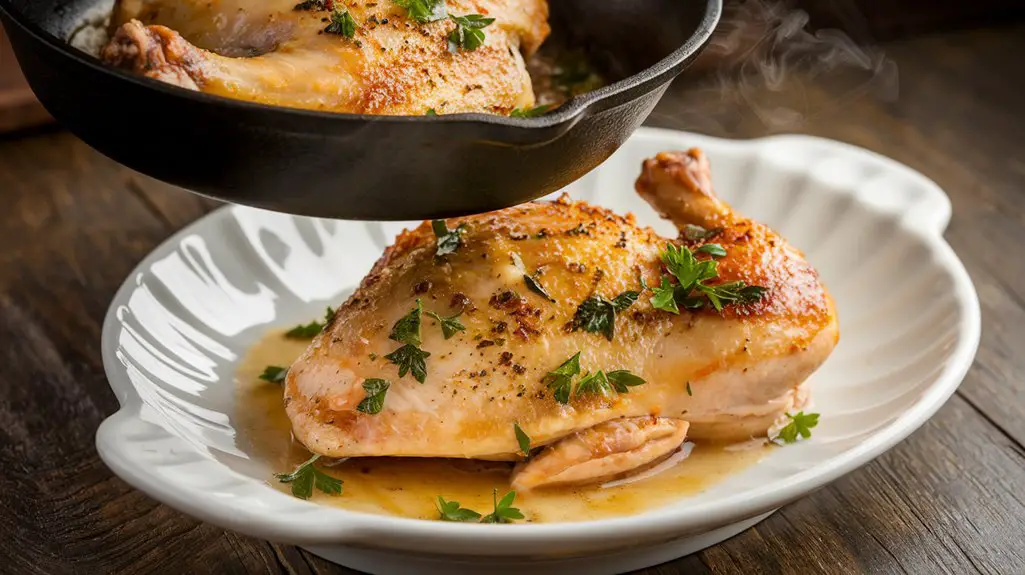
Lift the seared chicken breasts from the skillet using tongs and carefully transfer them to a plate.
Make sure the chicken rests undisturbed, allowing the juices to redistribute, enhancing their succulence.
Position the chicken in a single layer, preventing overlap, which could trap steam and affect texture.
Here’s a quick reference for the process:
| Step | Description |
|---|---|
| Use Tongs | Ensure a firm grip without piercing the meat |
| Transfer to Plate | Avoid crowding to maintain crispness |
| Allow to Rest | Let sit for 5 minutes for juice redistribution |
Maintain focus on timing; the resting phase is vital for juicy chicken.
This pause also allows you to direct attention to the next steps in your culinary preparation without haste.
Step 5. Butter Melts in Skillet
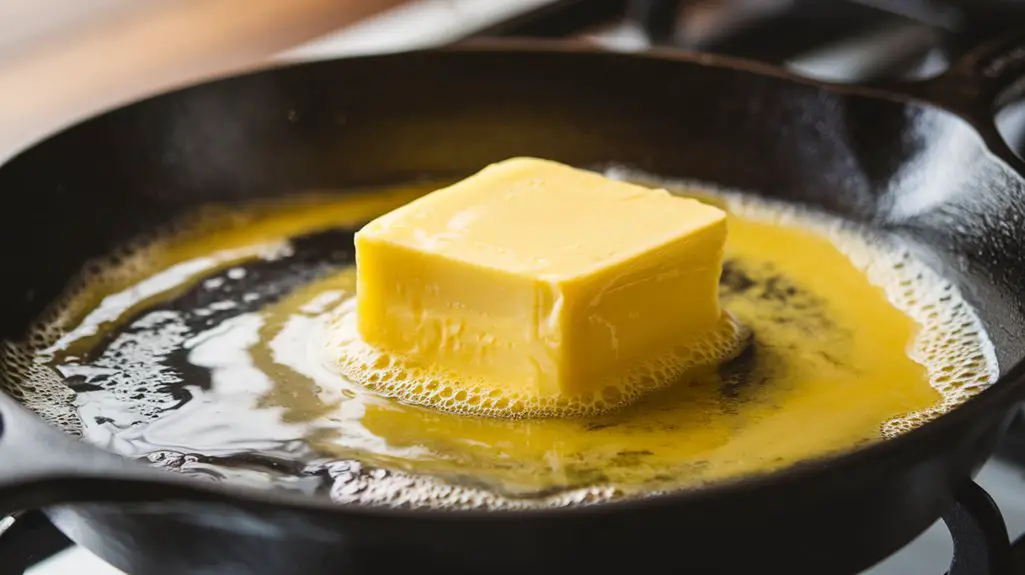
Now that your chicken is resting, it’s time to focus on the skillet.
Lower the heat to medium; maintaining this temperature prevents the butter from burning.
Add 4 tablespoons of unsalted butter to the skillet. Here’s how to guarantee it melts perfectly:
- Watch Closely: As the butter melts, look for a uniform golden hue, indicating even melting.
- Stir Gently: Use a whisk to incorporate any remaining chicken juices into the butter, enhancing flavor.
- Avoid Overheating: If the butter browns too quickly, remove the skillet from heat momentarily.
Once the butter is fully melted and fragrant, you’re ready to incorporate the minced garlic.
This step is essential for the sauce’s depth of flavor, setting the stage for the next aromatic infusion.
Final Thoughts
While mastering the art of cooking, you’ll find that the Garlic Butter Chicken recipe is a quintessential addition to your culinary repertoire.
This dish exemplifies the balance between simplicity and sophistication, making it ideal for both novice cooks and seasoned chefs.
By ensuring each chicken breast is evenly seasoned and cooked to perfection, you achieve an exquisite texture and flavor profile.
The key is in the meticulous preparation: searing the chicken to a golden-brown hue, crafting a savory garlic butter sauce, and incorporating fresh lemon juice for acidity.
Don’t overlook the resting period; it’s essential for maintaining succulence.
With each step, you refine your technique and enhance your understanding of flavor dynamics, ultimately elevating your culinary skills with this versatile main course.
Frequently Asked Questions
Can I Use Chicken Thighs Instead of Chicken Breasts?
You can substitute chicken thighs for breasts. Adjust cooking time to 8-10 minutes per side, ensuring internal temperature reaches 165°F. Thighs provide richer flavor and tender texture. Remember to trim excess fat for even cooking.
What Can I Serve as a Side Dish With Garlic Butter Chicken?
Pair your dish with roasted asparagus or a creamy risotto for a harmonious balance. Alternatively, sautéed spinach with a hint of nutmeg complements the flavors perfectly. Make certain your sides don’t overpower the delicate garlic butter sauce.
How Can I Make the Dish Spicier?
Incorporate heat by adding 1/2 teaspoon of red pepper flakes or 1 finely chopped jalapeño to the garlic butter sauce. Sauté briefly to release flavors. Adjust spice level to taste, ensuring it complements the existing ingredients.
Can I Prepare the Garlic Butter Sauce in Advance?
You can prepare the garlic butter sauce in advance. Melt the butter, sauté minced garlic, and add lemon juice. Store the sauce in an airtight container in the fridge. Reheat gently before coating the chicken.
Is It Possible to Use Dried Parsley Instead of Fresh?
You can substitute fresh parsley with dried parsley, but use one-third of the amount. Dried herbs have a concentrated flavor. Rehydrate by adding it to the sauce early to release its aroma and flavor effectively.
Garlic Butter Chicken Recipe
Equipment
- Skillet
- Mixing bowl
- Whisk
- Tongs
- Cutting board
- Knife
Ingredients
- 4 tablespoons unsalted butter
- 4 cloves garlic minced
- 1 pound chicken breasts boneless skinless
- 1 teaspoon salt
- 1/2 teaspoon black pepper
- 1 tablespoon olive oil
- 1 tablespoon fresh parsley chopped
- 1 tablespoon lemon juice
Instructions
- Season the chicken breasts with salt and black pepper on both sides.
- Heat olive oil in a skillet over medium-high heat.
- Add the chicken breasts to the skillet and cook for 6-7 minutes on each side.
- Remove the chicken from the skillet and set aside.
- Lower the heat to medium and add butter to the skillet.
- Once the butter is melted, add minced garlic and sauté for 1-2 minutes.
- Pour in lemon juice and stir to combine with the garlic butter.
- Return the chicken to the skillet and coat with the garlic butter sauce.
- Cook for an additional 2-3 minutes, spooning the sauce over the chicken.
- Garnish with chopped parsley before serving.
Notes

Cynthia Weatherford is a seasoned chef and culinary enthusiast who serves as the Recipe creator of Somonday. With decades of experience in the kitchen and a passion for exploring diverse cuisines, Cynthia brings a blend of creativity and technique to every dish. Known for transforming simple ingredients into show-stopping meals, Cynthia believes that cooking is an art form anyone can master. Dedicated to inspiring home cooks, Cynthia shares approachable recipes, pro tips, and culinary wisdom to make every meal memorable.