
There’s something about the smell of garlic and buttered crust drifting from the oven that makes the whole kitchen feel like home.
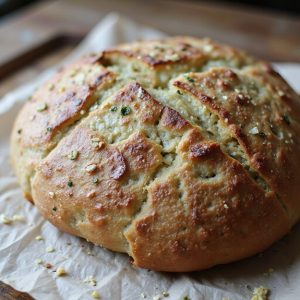
Picture a golden sourdough loaf, its crackly exterior dusted with Parmesan, torn open to reveal a warm, chewy crumb laced with roasted garlic.
This isn’t just bread; it’s a cozy side that turns simple meals—like soup, salad, or pasta—into something special, and it’s surprisingly straightforward once your dough is ready.
It’s perfect for comfort seekers, family dinners, and anyone new to sourdough who wants a big payoff with familiar flavors.
I still remember sliding a garlicky loaf onto the table after a chaotic weekday, instantly turning leftover tomato soup into a meal everyone lingered over.
This bread shines at Sunday suppers, casual gatherings, or those last-minute cravings when you need something warm and reassuring. Ready to bring this loaf to life?
Why You’ll Love It
- Delivers bold, savory garlic-Parmesan flavor in every slice
- Elevates everyday sandwiches, soups, and pastas into something special
- Builds a beautifully chewy crumb with crisp, golden crust
- Makes your kitchen smell like an artisan bakery while baking
- Takes simple sourdough technique and adds impressive, crowd-pleasing flair
Ingredients
- 150 g active sourdough starter (100% hydration) — use at peak, bubbly and doubled.
- 325 g water, lukewarm — around 75–80°F to keep fermentation steady.
- 450 g bread flour, unbleached — higher protein for stronger gluten.
- 50 g whole wheat flour — adds flavor and a bit of nutrition.
- 10 g fine sea salt — dissolves evenly and seasons the crumb.
- 30 g extra-virgin olive oil — enriches dough and softens crumb.
- 40 g unsalted butter, melted and slightly cooled — carry garlic flavor without scrambling it.
- 5 cloves garlic, finely minced — fresh cloves give the best aroma.
- 60 g Parmesan cheese, finely grated — use real Parmigiano Reggiano if possible.
- 5 g dried Italian herbs (optional) — oregano–basil blends work well.
- 10 g honey or sugar (optional) — gently balances the savory garlic and cheese.
Step-by-Step Method
Mix Starter & Water
Whisk the active sourdough starter with lukewarm water in a large mixing bowl.
Dissolve the starter as much as possible. Aim for a smooth, milky mixture with few lumps.
This helps distribute yeast and bacteria evenly. Proper mixing here guarantees even fermentation and better dough strength later in the process.
Combine Flours & Hydrate Dough
Add bread flour and whole wheat flour to the bowl.
Mix with a wooden spoon until no dry bits remain.
Form a shaggy, sticky dough without worrying about smoothness yet.
Guarantee all flour is moistened. This initial mix starts gluten development and prepares the dough for the resting (autolyse) step.
Rest the Dough (Autolyse)
Cover the bowl and let the dough rest for 30–45 minutes at room temperature.
Allow the flour to fully hydrate and gluten to start forming naturally.
Avoid touching or stirring during this time. This rest improves dough extensibility, makes mixing easier, and leads to better structure and flavor in the final loaf.
Add Salt, Sweetener & Olive Oil
Sprinkle fine sea salt and honey or sugar evenly over the dough.
Drizzle in the olive oil.
Gently squeeze and fold the dough with your hands until everything is incorporated.
Avoid tearing the dough aggressively. Work until the ingredients are evenly distributed and the dough feels smoother and slightly more cohesive.
Prepare Garlic Butter Infusion
Melt the unsalted butter in a small saucepan over low heat.
Add the finely minced garlic and cook 1–2 minutes, just until fragrant and lightly sizzling.
Don’t brown the garlic. Remove from heat and cool to lukewarm.
This step mellows the garlic’s sharpness and infuses the butter with rich, savory flavor.
Fold in Garlic Butter & Parmesan
Pour the cooled garlic butter over the dough.
Add about half of the grated Parmesan.
Gently fold using stretch-and-fold motions, lifting and folding the dough over itself.
Rotate the bowl as you work. Aim for rough, not perfect, distribution.
Avoid overworking to keep the gluten network intact and the dough airy.
Bulk Ferment & Stretch-Fold
Cover the bowl and let the dough bulk ferment at room temperature for 3–5 hours.
During the first 2 hours, perform 3–4 sets of stretch-and-folds every 30–45 minutes.
Gently lift and fold each side of the dough toward the center.
Then let it rest undisturbed until puffy, jiggly, and about 50% risen.
Turn Out & Pre-Shape Gently
Lightly flour your work surface.
Gently turn the dough out of the bowl, preserving as much gas as possible.
Avoid pressing or flattening the dough. Fold the edges toward the center to form a loose round.
Flip it seam-side down and use a bench scraper to tighten into a soft, relaxed ball without tearing.
Bench Rest the Dough
Let the pre-shaped round rest uncovered for 15–20 minutes.
Allow the gluten to relax so final shaping is easier.
Watch for the dough to slightly spread and soften. This short bench rest improves handling, helps you build better surface tension later, and reduces the risk of tearing during the final shape.
Shape Into a Tight Loaf
Shape the dough into a tight boule or batard.
Gently stretch the surface and tuck the dough under itself to create tension.
Keep the top smooth while avoiding rips. Rotate and pull against the counter if needed to tighten.
A well-shaped loaf holds its form, rises higher, and bakes more evenly.
Prepare Banneton & Add Cheese
Generously flour your banneton or a medium bowl lined with a clean towel.
Sprinkle the remaining grated Parmesan into the basket so it coats the surface.
This creates a cheesy crust. Place the shaped dough seam-side up into the prepared banneton, allowing the cheese to adhere to what’ll become the crust.
Proof at Room Temperature Briefly
Cover the banneton and let the dough proof at room temperature for 30–60 minutes.
Watch the dough more than the clock. Look for slight puffing and a gentle spring when poked.
Avoid full expansion now, since it will proof further in the refrigerator. Proper timing prevents over-proofing and maintains oven spring.
Cold-Proof Overnight in Fridge
Transfer the covered banneton to the refrigerator.
Cold-proof for 8–12 hours.
Allow slow fermentation to deepen flavor and improve texture. The chilled dough will be firmer, making scoring easier.
This step also enhances the bread’s structure and gives better control over timing, especially for baking the next day.
Preheat Dutch Oven Thoroughly
Place the Dutch oven with its lid into your oven about 45 minutes before baking.
Preheat to 475°F (245°C).
Let the pot heat fully so it acts like a mini steam oven. Proper preheating ensures strong oven spring, a well-developed crust, and even baking from the moment the dough enters the pot.
Invert Dough Onto Parchment
Remove the dough from the refrigerator.
Cut a piece of parchment paper larger than the loaf. Gently invert the dough from the banneton onto the parchment so it’s seam-side down.
Handle carefully to avoid deflating. Adjust the parchment around the loaf to create an easy sling for transferring into the hot pot.
Top with Herbs (Optional)
If using dried Italian herbs, sprinkle them evenly over the surface of the dough.
Lightly press them into the surface so they adhere.
This adds aroma and flavor to the crust. Use a light hand to avoid compressing the dough.
The herbs will toast during baking, enhancing both appearance and taste.
Score the Loaf Confidently
Use a sharp knife or lame to score the top of the dough.
Make one long, decisive slash or your preferred pattern. Cut at a slight angle, about ¼ inch deep.
Scoring directs expansion in the oven, preventing random bursting. Proper scoring improves both the bread’s appearance and its final structure.
Load Dough & Bake Covered
Carefully remove the hot Dutch oven from the oven.
Using the parchment as a sling, lower the scored dough into the pot.
Cover with the lid and return to the oven. Bake covered for 20 minutes at 475°F (245°C).
This trapped steam supports maximum oven spring and helps form a glossy, blistered crust.
Finish Baking Uncovered
Remove the lid and reduce the oven temperature to 450°F (230°C).
Continue baking for 12–15 minutes until the loaf is deep golden brown and the cheese on the crust is nicely colored.
Check for a hollow sound when tapped. Proper browning develops flavor and ensures the interior is fully baked.
Cool Completely Before Slicing
Carefully lift the bread from the Dutch oven and place it on a wire cooling rack.
Let it cool for at least 1 hour before slicing. Allow the crumb to set and steam to escape.
Cutting too early can make the interior gummy. Once cooled, slice and serve, then store leftovers in a towel or paper bag.
Ingredient Swaps
- Use all-purpose flour instead of bread flour; reduce water by 10–20 g if the dough feels too wet.
- Swap Parmesan with Pecorino Romano, Grana Padano, or a hard aged local cheese.
- Replace butter with more olive oil for a dairy-light version; for fully dairy-free, omit cheese and add 1–2 tbsp nutritional yeast for a savory note.
- Use 1–2 tsp garlic powder instead of fresh garlic if needed; mix it with the flour rather than the butter.
- Honey can be replaced 1:1 with sugar, light brown sugar, or omitted entirely.
You Must Know
– Doneness • If the loaf sounds hollow but the crumb feels gummy when sliced: Return it (without the Dutch oven) directly to the oven rack for 5–10 minutes at 400°F (205°C).
This drives off extra moisture; the interior should feel dry to the touch and spring back instead of smearing on the knife.
– Troubleshoot • When your dough spreads out like a pancake after shaping: Shorten bulk fermentation next time by 30–60 minutes or use cooler water by ~10°F (≈5°C).
Over-fermented dough loses strength; properly fermented dough should look jiggly, hold a mounded shape on the counter, and show bubbles at the surface.
– Scale • To make a smaller test loaf (about 5 slices): Cut every ingredient in half (e.g., 75 g starter, 225 g water total, 250 g flour mix), and check doneness 5 minutes earlier in the uncovered phase.
Smaller masses heat faster, so crust darkens more quickly while the interior is already set.
– Flavor Boost • For a stronger garlic profile without burning it: Add 1–2 extra cloves (total 6–7), but keep them very fine and keep the butter only lightly sizzling for 1–2 minutes max; any browning or toasty smell means dial back the heat.
Over-colored garlic turns bitter and that flavor intensifies over the 8–12 hour chill.
– Avoid • If your Parmesan on the crust is turning too dark in the last minutes: Tent the loaf loosely with foil for the final 5–10 minutes at 450°F (230°C).
Hard cheeses scorch quickly above ~430°F (220°C); the foil shields the top while the crumb finishes setting.
Serving Tips
- Serve warm slices with marinara for dipping, like cheesy garlic bread.
- Pair with creamy tomato soup or minestrone for a cozy, complete meal.
- Use for gourmet grilled cheese with mozzarella, basil, and sliced tomatoes.
- Plate alongside roasted chicken, vegetables, and a green salad for dinner.
- Toast leftovers and top with poached eggs and sautéed spinach for brunch.
Storage & Make-Ahead
Garlic Parmesan sourdough keeps 3–4 days at room temperature, wrapped in a towel or paper bag, or up to a week in the fridge (well-wrapped).
It freezes very well for 2–3 months; slice before freezing for easy toasting.
You can also refrigerate shaped dough 24 hours before baking.
Reheating
Reheat slices gently in a low oven (300°F/150°C) for 8–10 minutes, or briefly in a covered skillet.
Use the microwave sparingly, wrapped in a towel, to avoid tough, chewy crust.
Italian Feasts and Gatherings
When I envision this garlic Parmesan sourdough on the table at an Italian feast, I imagine it arriving still warm, the crust crackling as someone tears off a piece and the scent of butter, roasted garlic, and cheese drifting over platters of pasta and roasted vegetables.
I picture you standing nearby, fingers dusted with flour, quietly proud as everyone reaches for “your” bread first.
In my mind, it anchors the table the way a nonna’s lasagna does—familiar, generous, a little rustic.
I’d serve it in thick, irregular slices, tucked into a linen-lined basket, ready to swipe through tomatoey pan juices or the last puddle of olive oil and balsamic.
It’s the kind of loaf that turns a simple gathering into a memory.
Final Thoughts
Give this Garlic Parmesan Sourdough a try and enjoy how it fills your kitchen with the best bakery-style aroma.
Once you’ve made it once, don’t hesitate to tweak the herbs, cheese, or garlic level to make it completely your own.
Frequently Asked Questions
Can I Make This Garlic Parmesan Sourdough Completely Vegan?
Yes, you can. I’d swap butter for olive oil, Parmesan for nutritional yeast or vegan Parmesan, and honey for sugar. Imagine tearing into a crackling loaf that’s garlicky, tangy, and completely kind to animals.
How Do Altitude Changes Affect Fermentation and Baking Times?
Altitude speeds fermentation and shortens baking; up high, dough rises faster and dries sooner. I’d watch the dough like a shifting sky, shorten proofs, add moisture, and bake a bit cooler and slightly longer.
Is This Recipe Suitable for Sourdough Beginners With Minimal Equipment?
Yes, you can absolutely tackle this as a beginner with minimal gear. I’d swap the Dutch oven for a sturdy pot, proof in any floured bowl, and let your hands learn the dough’s soft, living rhythm.
Can I Freeze the Dough Before Baking Instead of After?
You can, but I wouldn’t. Freezing the shaped dough dulls its rise and flavor; instead, chill it in the fridge overnight, bake, then freeze the cooled loaf—crackling crust, tender crumb, aroma perfectly preserved.
How Can I Adjust This Loaf for a Bread Machine?
You can, but I’d treat your machine like a knead-and-proof assistant: use “dough” cycle, add garlic butter and cheese in the add‑ins stage, then shape, chill overnight if you can, and bake in the oven.
Garlic Parmesan Sourdough Bread
Equipment
- 1 large mixing bowl
- 1 medium mixing bowl
- 1 Small saucepan
- 1 Dough scraper
- 1 digital kitchen scale
- 1 measuring spoon set
- 1 Wooden spoon or spatula
- 1 banneton or medium bowl lined with a clean towel
- 1 Dutch oven with lid (4–5 quart)
- 1 wire cooling rack
- 1 sharp knife or lame
Ingredients
- 150 gram active sourdough starter 100% hydration
- 325 gram water lukewarm
- 450 gram bread flour unbleached
- 50 gram whole wheat flour
- 10 gram fine sea salt
- 30 gram olive oil extra virgin
- 40 gram unsalted butter melted and cooled slightly
- 5 clove garlic finely minced
- 60 gram Parmesan cheese finely grated
- 5 gram dried Italian herbs optional
- 10 gram honey or sugar optional to balance flavor
Instructions
- In a large mixing bowl whisk together the active sourdough starter and lukewarm water until mostly dissolved.
- Add the bread flour and whole wheat flour to the bowl and mix with a wooden spoon until no dry flour remains and a shaggy dough forms.
- Cover the bowl and let the dough rest (autolyse) at room temperature for 30–45 minutes.
- Sprinkle the fine sea salt and honey or sugar over the dough, then drizzle in the olive oil and gently squeeze and fold the dough until everything is incorporated.
- In a small saucepan melt the butter over low heat, add the minced garlic, and cook 1–2 minutes just until fragrant, then let cool to lukewarm.
- Pour the cooled garlic butter and half of the grated Parmesan over the dough and gently fold it in with stretching and folding motions until roughly distributed.
- Cover the dough and let it bulk ferment at room temperature for 3–5 hours, performing 3–4 sets of stretch-and-folds every 30–45 minutes during the first 2 hours, then leaving it undisturbed until puffy and about 50% risen.
- When the dough has risen and feels airy, lightly flour your work surface and gently turn the dough out, trying not to deflate it completely.
- Pre-shape the dough into a loose round by folding the edges toward the center and then flipping it seam-side down, tightening into a ball with a bench scraper.
- Let the pre-shaped dough rest uncovered for 15–20 minutes to relax.
- After resting, shape the dough into a tight boule or batard, creating good surface tension without tearing the dough.
- Sprinkle the banneton or towel-lined bowl with flour and the remaining grated Parmesan, then place the dough seam-side up into the basket.
- Cover and let the dough proof at room temperature for 30–60 minutes, then transfer to the refrigerator to cold-proof for 8–12 hours.
- About 45 minutes before baking, place the Dutch oven with its lid into your oven and preheat to 475°F (245°C).
- Carefully remove the hot Dutch oven from the oven, take the dough from the refrigerator, and gently invert it onto a piece of parchment paper so it is seam-side down.
- If using, sprinkle dried Italian herbs over the top of the dough and lightly press them in.
- Score the top of the dough with a sharp knife or lame to allow for controlled expansion.
- Using the parchment as a sling, lower the dough into the hot Dutch oven, cover with the lid, and place it back into the oven.
- Bake covered for 20 minutes at 475°F (245°C), then remove the lid, reduce the temperature to 450°F (230°C), and bake for another 12–15 minutes until deep golden brown.
- Carefully remove the bread from the Dutch oven and transfer it to a wire rack, then cool completely for at least 1 hour before slicing.
Notes

Cynthia Weatherford is a seasoned chef and culinary enthusiast who serves as the Recipe creator of Somonday. With decades of experience in the kitchen and a passion for exploring diverse cuisines, Cynthia brings a blend of creativity and technique to every dish. Known for transforming simple ingredients into show-stopping meals, Cynthia believes that cooking is an art form anyone can master. Dedicated to inspiring home cooks, Cynthia shares approachable recipes, pro tips, and culinary wisdom to make every meal memorable.


