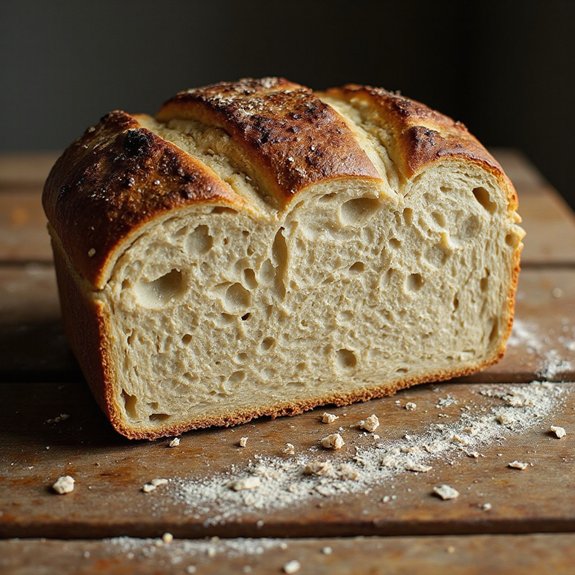
There’s something about a loaf of high hydration sourdough emerging from the oven—deep golden crust blistered and crackling, a cloud of warm, tangy aroma filling the kitchen—that makes time slow down.
This isn’t a rushed weeknight fix; it’s a rustic, bakery-style bread with a custardy, open crumb and crackling shell that rewards a relaxed day at home.
It’s perfect for bread lovers, curious beginners ready to level up, weekend bakers, and anyone who lives for thick slices piled with butter, soup, or cheese.
I remember one rainy Sunday when a slow, frustrating week finally eased as I cut into a still-warm loaf, the knife crunching through the crust, steam curling upward—suddenly dinner was simple: bread, olive oil, and a pot of stew.
This bread shines at cozy Sunday suppers, casual gatherings, and make-ahead lunches. Ready to bring this loaf to life?
Why You’ll Love It
- Delivers bold, tangy sourdough flavor with an ultra-tender, moist crumb
- Builds an open, airy interior and thin, shatteringly crisp crust
- Uses just flour, water, salt, and starter—no commercial yeast required
- Fits into your schedule with flexible room-temperature or overnight proofing
- Elevates everyday meals, from simple toast to gourmet sandwiches and boards
Ingredients
- 100 g active sourdough starter 100% hydration — use bubbly, recently fed starter
- 400 g water room temperature — cool to slightly warm, not hot
- 500 g bread flour unbleached — higher protein helps structure in wet dough
- 10 g fine sea salt — weigh for accuracy and even seasoning
Step-by-Step Method
Mix the Starter and Water
Whisk the active sourdough starter with room-temperature water in a mixing bowl. Dissolve the starter as much as possible so it disperses evenly. This helps fermentation start uniformly.
Use a spatula or your hand to break up any clumps. Aim for a cloudy, milky mixture before adding flour.
Hydrate the Flour Thoroughly
Add the bread flour all at once. Mix with your hand or a dough scraper until no dry bits remain.
Scrape the bowl’s sides and bottom to incorporate everything. Expect a shaggy, sticky mass. Don’t knead yet. Just make certain every particle of flour is moistened before resting.
Autolyse the Dough Gently
Cover the bowl with a towel or lid and let the dough rest 30–60 minutes at room temperature. Allow the flour to fully hydrate and gluten to begin forming naturally.
Avoid disturbing the dough during this time. This rest improves extensibility and makes later handling easier, especially with high hydration doughs.
Incorporate the Salt Evenly
Sprinkle the fine sea salt over the surface of the dough. Pinch and squeeze the dough repeatedly to distribute the salt.
Fold the dough over itself several times. Continue pinching and folding until you feel the texture tighten slightly and no salt grains remain visible or gritty between your fingers.
Perform the First Stretch and Fold
Grab one edge of the dough with damp fingers, stretch it upward without tearing, then fold it over onto itself. Rotate the bowl and repeat this 4–6 times around the dough.
Build gentle strength rather than tugging hard. Cover the bowl again and let it rest for about 30 minutes before the next set.
Repeat Stretch and Folds for Structure
Continue doing sets of stretch and folds every 30 minutes for 1.5–2 hours, totaling 3–4 sets. Notice the dough becoming smoother, stronger, and slightly more elastic each round.
Keep movements deliberate but gentle. Cover the dough between sets to prevent drying out on the surface.
Bulk Ferment Until Jiggly and Aerated
Leave the dough covered at room temperature to bulk ferment. Wait until it has risen roughly 50–100%, looks airy, and jiggles when the bowl is shaken.
Expect many small bubbles along the sides. This may take 4–6 hours, depending on your kitchen temperature. Prioritize appearance over exact timing.
Turn the Dough Out Carefully
Lightly flour your work surface. Gently coax the dough from the bowl using a scraper, letting it fall out without pulling.
Try not to press or squish it. Keep as much gas inside as possible for an open crumb. Position the dough with the smooth side up and seams underneath.
Pre-Shape into a Loose Round
Use a bench scraper to nudge and rotate the dough into a loose round. Tuck edges underneath to create gentle surface tension.
Don’t over-tighten at this stage. Let the dough sit uncovered for 20–30 minutes. This bench rest relaxes gluten and makes final shaping more controlled and precise.
Shape into a Tight Boule or Batard
Lightly flour the dough surface and your hands. Shape into a tight ball (boule) or oval (batard) by folding edges toward the center and then rolling or dragging on the counter to create strong tension.
Aim for a smooth, taut surface. Seal the seam well on the underside to maintain structure.
Prepare and Fill the Proofing Basket
Generously flour your proofing basket or a towel-lined bowl. Use rice flour or a flour blend to reduce sticking.
Lift the shaped dough and place it seam-side up into the basket. Adjust its shape if needed. Dust the exposed surface lightly. Make certain there’s enough flour to prevent tearing on release.
Proof at Room Temperature or Cold Retard
Cover the basket with a towel or plastic. Let the dough proof 1–2 hours at room temperature, or refrigerate 8–12 hours for a cold retard.
Watch for slight puffiness and a gentle spring back when pressed. Cold proofing improves flavor, strengthens the dough, and makes scoring easier.
Preheat the Oven and Dutch Oven
Place your Dutch oven with its lid into the oven. Preheat to 250°C (480°F) for about 45 minutes.
Allow the pot to get thoroughly hot to create strong oven spring and steam. Arrange racks so there’s clearance for the lid. Prepare parchment if you plan to lower the dough in with it.
Transfer the Dough to the Hot Pot
Carefully remove the hot Dutch oven. Invert the proofed dough onto parchment or directly into the pot so it ends up seam-side down.
Work quickly but gently to avoid deflating. Adjust its position if off-center. If using parchment, trim excess to prevent burning on the edges.
Score the Loaf Confidently
Use a razor blade or very sharp knife to score the top of the dough. Make one deep central slash or a pattern of your choice.
Angle the blade slightly for an “ear” if desired. Cut decisively to control expansion. Avoid shallow, hesitant cuts, which can lead to random bursting.
Bake Covered to Generate Steam
Cover the Dutch oven with its lid and place it back in the hot oven. Bake at 250°C (480°F) for 20 minutes.
The enclosed environment traps steam, allowing the loaf to expand fully. Don’t open the oven during this phase, as losing steam can reduce oven spring markedly.
Finish Baking Uncovered Until Deeply Brown
Remove the lid carefully, then reduce the oven temperature to 230°C (450°F). Continue baking 20–25 minutes until the crust is deep golden brown and crisp.
Rotate the pot if browning is uneven. Look for a rich color rather than pale surfaces, which often indicate underbaking inside.
Cool Completely Before Slicing
Lift the finished loaf from the Dutch oven and place it on a wire rack. Let it cool at least 1 hour, preferably longer.
Resist cutting early, as steam must redistribute and the crumb set. Early slicing can compress the interior and make it seem gummy even when fully baked.
Ingredient Swaps
- Use up to 20–30% whole wheat or rye flour in place of bread flour; you may need to add 10–20 g extra water and expect a slightly denser crumb.
- If you only have all‑purpose flour, use it for the full amount but reduce water by 10–20 g to compensate for lower protein.
- For a low‑sodium version, cut salt to 5–7 g (flavor and gluten strength will be milder).
- If you don’t have a sourdough starter, this becomes a different recipe: use ~2–3 g instant yeast and increase water slightly, as yeast doughs often hydrate differently.
You Must Know
– Avoid • To prevent a gummy or dense crumb in a high-hydration loaf**** – Let the baked bread cool at least 1–2 hours until the interior is barely warm, and slice with a sharp serrated knife.
Cutting while hot traps steam inside, making the crumb paste-like even if it reached full internal temperature during baking.
Serving Tips
- Serve with salted cultured butter and flaky sea salt to highlight the tangy crumb.
- Pair slices with soft cheeses, cured meats, and olives for a rustic grazing board.
- Toast and top with smashed avocado, lemon, chili flakes, and a poached egg.
- Use thick slices for hearty grilled cheese or panini-style sandwiches.
- Serve alongside soups or stews; the open crumb is perfect for soaking up broth.
Storage & Make-Ahead
This sourdough keeps in the fridge, tightly wrapped, for up to 5 days.
For best texture, let it come to room temperature, then re-crisp slices in a toaster or low oven.
The loaf also freezes well (whole or sliced) for 2–3 months; wrap tightly in plastic, then foil.
Reheating
Reheat sourdough gently to preserve moisture.
Wrap in foil and warm in a 150°C oven, briefly microwave slices with a damp towel, or toast on a covered skillet over low heat.
Sourdough in European Culture
As the aroma of reheated sourdough fills your kitchen, it quietly echoes a much older story that stretches across European tables and centuries.
When you tear into the crackling crust, I imagine village ovens in France, rye loaves in German farmhouses, and Tuscan bakers pulling smoky rounds from wood-fired mouths.
Across Europe, sourdough isn’t just bread; it’s a quiet ritual of sharing and survival.
I love how your loaf joins that lineage when you:
- Slice it thick and dip it into olive oil, like rustic countryside suppers.
- Pair it with cheese and cured meats, echoing Alpine mountain boards.
- Save the last heel for tomorrow’s soup, as thrifty cooks have always done.
Each bite carries a whisper of those kitchens into yours.
Final Thoughts
Give this high hydration sourdough a try and don’t be afraid to get a little sticky—your patience and practice will be rewarded with incredible flavor and an open, airy crumb.
Once you’ve baked it once, have fun tweaking the fermentation time, flour blends, and shaping style to make the loaf your own.
Frequently Asked Questions
How Can I Troubleshoot Dense or Gummy High Hydration Sourdough Loaves?
I’d fix dense, gummy loaves by baking longer, letting them cool fully, and proofing until jiggly and airy. Watch dough temperature, use strong flour, gentle shaping, and deep scoring so your crumb bakes open and tender.
What Common Mistakes Do Beginners Make With High Hydration Dough?
You often rush fermentation, underestimate how sticky it’ll feel, or keep sprinkling in flour. I slow down, wet my hands, trust the wobble and bubbles, and let that soft, trembling dough become airy, fragrant bread.
How Do Altitude and Climate Affect High Hydration Sourdough Baking?
Altitude thins your dough’s rise and hastens evaporation; dry climates drink in water, humid ones sag and stick. I watch your dough’s feel—soft, billowy, slightly tacky—and adjust water, fermentation time, and temperature until it whispers ready.
Can I Scale This Recipe for Commercial or Cottage Bakery Production?
You can scale it, but I’d keep percentages, not grams. I’d test small batches, watch fermentation like a hawk, feel the dough’s warmth, listen to its bubbles, and adjust timing to your bakery’s rhythm.
How Does Hydration Percentage Influence Crumb Structure and Oven Spring?
Hydration shapes crumb and spring: higher gives you open, glossy tunnels and wild lift; lower yields tighter, neater slices. I watch the dough swell like a rising moon, hearing tiny bubbles whisper under my fingertips.
High Hydration Sourdough Bread
Equipment
- 2 Mixing bowls
- 1 digital kitchen scale
- 1 Dough scraper
- 1 bench scraper
- 1 proofing basket or 1 medium bowl lined with a floured towel
- 1 Dutch oven with lid (or 1 heavy lidded oven-safe pot)
- 1 spray bottle (optional)
- 1 clean kitchen towel
- 1 razor blade or sharp knife for scoring
- 1 wire cooling rack
Ingredients
- 100 gram active sourdough starter 100% hydration
- 400 gram water room temperature
- 500 gram bread flour unbleached
- 10 gram fine sea salt
Instructions
- In a mixing bowl, whisk together the active sourdough starter and water until mostly dissolved.
- Add the bread flour and mix with your hand or a dough scraper until no dry flour remains and a shaggy dough forms.
- Cover the bowl and let the dough rest (autolyse) for 30–60 minutes at room temperature.
- Sprinkle the salt over the dough and pinch and fold it into the dough until evenly incorporated.
- Begin the first set of stretch and folds by grabbing one edge of the dough, stretching it up, and folding it over, turning the bowl and repeating 4–6 times.
- Cover and repeat stretch and folds every 30 minutes for a total of 3–4 sets over 1.5–2 hours.
- After the final set, cover the dough and let it bulk ferment at room temperature until roughly doubled in size, bubbly, and jiggly, about 4–6 hours depending on temperature.
- Lightly flour your work surface and gently turn the dough out onto it, trying not to deflate it.
- Pre-shape the dough into a loose round using a bench scraper, then let it rest uncovered for 20–30 minutes.
- Lightly flour the surface and your hands, then shape the dough into a tight boule or batard by stretching the surface to create tension.
- Generously flour the proofing basket (or towel-lined bowl), then place the dough seam-side up into it.
- Cover and let the dough proof at room temperature for 1–2 hours, or refrigerate for 8–12 hours for a cold retard.
- About 45 minutes before baking, place the Dutch oven (with lid) into your oven and preheat to 250°C (480°F).
- When ready to bake, carefully remove the hot Dutch oven from the oven and gently invert the dough onto a piece of parchment or directly into the pot, seam-side down.
- Score the top of the dough with a razor blade or sharp knife to allow for controlled expansion.
- Cover with the lid and bake for 20 minutes at 250°C (480°F).
- Remove the lid, reduce the oven temperature to 230°C (450°F), and bake for an additional 20–25 minutes until deep golden brown.
- Carefully remove the loaf from the Dutch oven and place it on a wire rack to cool completely for at least 1 hour before slicing.
Notes

Cynthia Weatherford is a seasoned chef and culinary enthusiast who serves as the Recipe creator of Somonday. With decades of experience in the kitchen and a passion for exploring diverse cuisines, Cynthia brings a blend of creativity and technique to every dish. Known for transforming simple ingredients into show-stopping meals, Cynthia believes that cooking is an art form anyone can master. Dedicated to inspiring home cooks, Cynthia shares approachable recipes, pro tips, and culinary wisdom to make every meal memorable.