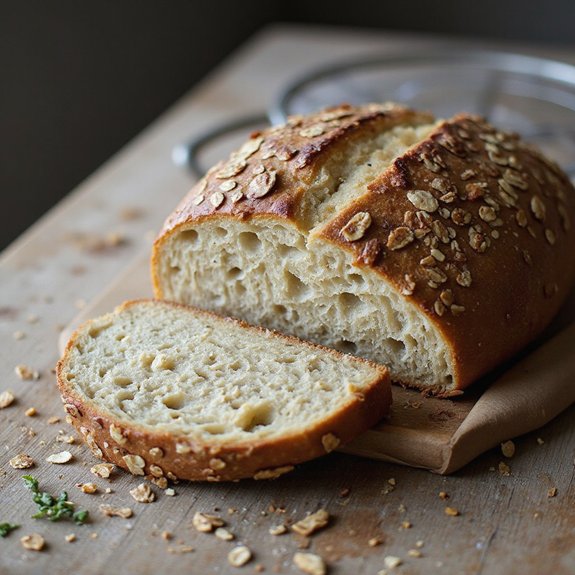
There’s something about pulling a warm loaf of honey oat sourdough from the oven that instantly softens the day.
The crust is a deep golden brown, freckled with toasted oats, and as you slice in, steam curls up, carrying the gentle aroma of honey and tangy fermentation.
This is cozy, everyday bread—perfect for toast at breakfast, hearty sandwiches at lunch, or a simple buttered slice with soup at dinner.
It’s not “instant,” but the hands-on time is surprisingly short, making it ideal for busy home cooks and curious beginners.
I remember one particularly long week when I mixed this dough on Friday night, then baked it Saturday morning.
That first slice, shared quietly at the table with coffee, reset the whole weekend.
This loaf shines for slow Sunday suppers, easy entertaining, and make-ahead meal prep that feels special, not stressful.
Ready to bring this bread to life?
Why You’ll Love It
- Delivers a softly sweet, nutty loaf with chewy, moist crumb
- Elevates everyday toast, sandwiches, and breakfast with bakery-style flavor
- Uses simple, wholesome ingredients you likely already have on hand
- Relies on natural sourdough fermentation for better flavor and digestion
- Bakes into an oat-crusted showstopper perfect for gifting or sharing
Ingredients
- 100 g active sourdough starter — 100% hydration, bubbly and recently fed
- 350 g water — room temperature for easier mixing and fermentation
- 40 g honey — mild, runny honey mixes in best
- 400 g bread flour — higher protein supports good structure
- 50 g whole wheat flour — adds flavor and extra nutrition
- 50 g rolled oats — use old-fashioned, plus extra for topping
- 9 g fine sea salt — dissolves evenly and seasons the crumb
- 10 g olive oil — or neutral oil, for lightly greasing the bowl
Step-by-Step Method
Mix Water, Honey, and Starter
Whisk the water and honey in a large mixing bowl until the honey completely dissolves.
Add your active sourdough starter and stir until the mixture looks milky and slightly frothy.
This guarantees the starter is evenly dispersed, helping the dough ferment consistently and rise well later.
Combine Flours and Oats
Add bread flour, whole wheat flour, and rolled oats to the bowl.
Mix with a spatula or your hand until no dry bits remain.
Aim for a rough, shaggy dough rather than a smooth ball.
Scrape down the sides so everything is gathered at the bottom of the bowl.
Autolyse the Dough
Cover the bowl and let the dough rest at room temperature for 30 minutes.
Don’t add salt yet.
This autolyse period allows the flour to hydrate fully and gluten to begin developing.
The dough will feel softer and more extensible afterward, making it easier to handle and strengthen.
Add Salt and Incorporate Evenly
Sprinkle the salt evenly over the dough’s surface.
Use your fingers to pinch and squeeze the dough, folding it over itself to distribute the salt throughout.
Continue until you no longer feel distinct grains of salt.
Proper incorporation helps flavor and strengthens gluten structure.
Perform Initial Stretch-and-Folds
Grasp one edge of the dough, stretch it upward gently, then fold it over toward the center.
Rotate the bowl and repeat 4–6 times until you’ve worked all around the dough.
This simple motion strengthens gluten without kneading.
Cover the bowl again when finished to prevent drying.
Rest and Repeat Folds
Let the dough rest for 30 minutes at room temperature.
Then repeat the same series of stretch-and-folds.
Do this cycle—rest, then folds—three more times at 30-minute intervals.
Over about two hours, the dough will gradually become smoother, stronger, and more elastic.
Bulk Ferment Until Puffy
Lightly oil a clean bowl and transfer the dough into it.
Cover and let it bulk ferment at room temperature until roughly doubled, puffy, and slightly jiggly when shaken.
This usually takes 2–4 hours, depending on room temperature.
Use visual cues more than the clock to judge readiness.
Pre-Shape and Relax the Dough
Lightly flour your work surface and gently turn out the dough.
Use a scraper to tuck the edges under, forming a loose round.
Handle it gently to preserve gas bubbles.
Let the dough relax uncovered for 10–15 minutes.
This rest makes final shaping easier and prevents tearing.
Shape Into a Tight Loaf
Shape the dough into a round or oval loaf.
Gently stretch the surface and tuck edges underneath, rotating as you go to build surface tension.
Aim for a smooth, taut top without tearing.
Proper shaping supports good oven spring and an attractive final loaf structure.
Coat with Oats and Prepare Banneton
Lightly flour your banneton or towel-lined bowl.
Dampen a clean towel and gently roll the top of the shaped loaf on it.
Immediately roll the damp surface in extra rolled oats to coat.
Place the loaf seam-side up in the prepared banneton so the oat side will bake on top.
Cold Proof in the Refrigerator
Cover the banneton tightly with plastic wrap or a reusable cover.
Refrigerate the dough for 8–12 hours.
This cold proof slows fermentation, deepens flavor, and makes the dough easier to score.
Plan your schedule so baking aligns with the end of this chilling period.
Preheat Dutch Oven and Oven
Place your Dutch oven with its lid in your oven.
Preheat to 475°F (245°C) for 45–60 minutes before baking.
This guarantees both the pot and oven are thoroughly heated.
A properly preheated Dutch oven traps steam, helping the loaf expand and develop a crisp crust.
Invert, Score, and Prepare for Baking
Remove the chilled dough from the refrigerator.
Carefully invert it onto a piece of parchment so the oat-coated side faces up.
Quickly score the top with a sharp knife or lame, making a deep, confident slash.
This guided opening allows the bread to expand attractively in the oven.
Load into Dutch Oven and Start Bake
Using the parchment as a sling, lower the dough into the hot Dutch oven.
Cover with the lid and place it back into the oven.
Bake covered at 475°F (245°C) for 20 minutes.
This covered phase creates steam, encouraging good oven spring and a glossy, blistered crust surface.
Finish Baking and Cool Completely
Remove the lid and reduce the oven temperature to 450°F (230°C).
Continue baking 18–22 minutes, until deep golden and hollow-sounding when tapped underneath.
Transfer the loaf to a wire rack and cool at least 1–2 hours before slicing.
Cooling sets the crumb and preserves moisture.
Ingredient Swaps
- Use up to 100 g whole wheat flour (reducing bread flour) for a heartier, denser loaf; you may need 10–20 g more water.
- Swap honey 1:1 with maple syrup or agave for a vegan loaf; granulated sugar works too but won’t add the same flavor.
- Replace bread flour with all-purpose if needed; expect a slightly softer dough and a bit less oven spring.
- Sub rolled oats with quick oats (same weight); avoid steel-cut oats unless they’re pre‑soaked and partially cooked.
You Must Know
– Flavor Boost – *For a nuttier, more pronounced oat note,* toast the 50 g oats in a dry pan over medium heat for 4–6 minutes until lightly golden and they smell fragrant,
which adds Maillard depth that carries through even under the honey’s sweetness.
Serving Tips
- Serve warm slices with salted butter and a drizzle of extra honey.
- Pair with sharp cheddar, apple slices, and nuts for a rustic snack board.
- Toast for breakfast and top with Greek yogurt and fresh berries.
- Use for hearty turkey sandwiches with crisp lettuce and cranberry spread.
- Serve alongside creamy soups or stews to soak up the broth.
Storage & Make-Ahead
Honey oat sourdough keeps well at room temperature, wrapped or in a bread box, for 2–3 days.
For longer storage, refrigerate up to 1 week, well wrapped to prevent drying.
This loaf freezes very well: slice, wrap tightly, and freeze up to 2–3 months; toast slices straight from frozen.
Reheating
Reheat slices gently: in a 300°F (150°C) oven for 8–10 minutes.
In a covered skillet over low heat.
Or briefly microwave wrapped in a slightly damp towel to avoid drying.
Honey Oat Bread History
After warming a slice until the crust crackles and the crumb turns soft and fragrant again, I like to remember that this cozy loaf has roots that reach far beyond a single kitchen.
Honey and oats feel humble, but they’re part of a long story: farmers stirring pots of oat porridge, beekeepers spinning liquid amber from comb, bakers folding both into dough for something nourishing and a little luxurious.
When I tuck oats around the dough and watch them toast to gold in the oven, I’m echoing those older loaves—Scottish oat breads, American farmhouse sandwich breads sweetened with honey, European sourdoughs kept alive on counters.
This honey oat sourdough simply gathers those threads into one warm, crackling slice.
Final Thoughts
Give this honey oat sourdough a try and see how the gentle sweetness and chewy crumb fit into your weekly baking rotation.
Feel free to tweak the honey level, toast the oats, or play with different flour ratios until it becomes your own house favorite loaf.
Frequently Asked Questions
Can I Make This Honey Oat Sourdough Completely Overnight for Breakfast Baking?
Yes, you can. I’d mix and fold in the evening, cold-proof it overnight, then slide the chilled dough into the hot Dutch oven at dawn, filling your kitchen with warm, honeyed, crackling-crust perfume.
How Do Altitude or Very Cold Kitchens Affect Fermentation and Proofing Times?
Altitude speeds fermentation while your very cold kitchen slows it; I watch the dough, not the clock. I wait for a soft swell, gentle jiggle, and airy feel beneath my fingertips before baking.
Is This Loaf Suitable for People With Mild Gluten Sensitivity or IBS?
It’s often gentler than regular bread but still not safe for celiac disease. I’d invite you to try a small slice, notice your belly’s whispers afterward, and keep low-FODMAP days in mind.
Can I Knead This Dough in a Stand Mixer Instead of Stretch-And-Fold?
Yes, you can. I’d mix on low just until smooth and slightly elastic, then stop early, letting time and gentle folds finish the work, preserving that tender, open crumb and softly fragrant, wheaty aroma.
How Can I Adapt This Recipe for a Pullman Loaf Pan Sandwich Bread?
You can, and I’d scale dough to about 900–950g, shape gently, proof in the Pullman until nearly 1″ from the rim, then bake covered; you’ll get tender, square slices with soft, fragrant crust.
Honey Oat Sourdough Bread
Equipment
- 1 large mixing bowl
- 1 Medium bowl
- 1 digital kitchen scale
- 1 measuring cup set
- 1 set of measuring spoons
- 1 dough scraper or spatula
- 1 banneton or medium bowl lined with a clean towel
- 1 Dutch oven with lid (4–6 quart) or baking stone
- 1 sharp scoring knife or bread lame
- 1 wire cooling rack
Ingredients
- 100 gram active sourdough starter 100% hydration
- 350 gram water room temperature
- 40 gram honey
- 400 gram bread flour
- 50 gram whole wheat flour
- 50 gram rolled oats plus extra for topping
- 9 gram fine sea salt
- 10 gram olive oil or neutral oil for greasing bowl
Instructions
- In a large mixing bowl, whisk together the water and honey until the honey is fully dissolved.
- Stir in the active sourdough starter until loosely combined and slightly milky.
- Add the bread flour, whole wheat flour, and rolled oats to the bowl and mix with a spatula or your hand until no dry flour remains and a rough shaggy dough forms.
- Cover the bowl and let the dough rest (autolyse) for 30 minutes at room temperature.
- Sprinkle the salt over the dough and use your fingers to pinch and fold it in until evenly incorporated.
- Perform a series of 4–6 stretch-and-folds around the dough, pulling up one edge and folding it over toward the center, rotating the bowl as you go.
- Cover and let the dough rest for 30 minutes at room temperature.
- Repeat the stretch-and-fold process 3 more times at 30-minute intervals for a total of about 2 hours of bulk fermentation activity.
- After the final set of folds, lightly oil a clean bowl, place the dough inside, cover, and let it continue to bulk ferment at room temperature until roughly doubled and puffy, 2–4 hours depending on temperature.
- Lightly flour your work surface, gently turn the dough out, and let it relax for 10–15 minutes.
- Shape the dough into a tight round or oval loaf by gently stretching the surface and tucking the edges underneath to build tension.
- Lightly flour your banneton or towel-lined bowl, then roll the top of the shaped loaf on a damp towel and into extra rolled oats to coat the surface.
- Place the dough seam-side up in the prepared banneton or bowl, cover tightly, and refrigerate for 8–12 hours for a cold proof.
- About 45–60 minutes before baking, place the Dutch oven with its lid into your oven and preheat to 475°F (245°C).
- When ready to bake, carefully remove the hot Dutch oven from the oven, gently invert the chilled dough onto a piece of parchment paper so the oat-coated side is up, and quickly score the top with a sharp knife or bread lame.
- Using the parchment as a sling, lower the dough into the hot Dutch oven, cover with the lid, and place it back into the oven.
- Bake covered for 20 minutes at 475°F (245°C).
- Remove the lid, reduce the oven temperature to 450°F (230°C), and continue baking for 18–22 minutes until the loaf is deep golden brown and sounds hollow when tapped on the bottom.
- Carefully transfer the bread from the Dutch oven to a wire cooling rack and let it cool completely for at least 1–2 hours before slicing.
Notes

Cynthia Weatherford is a seasoned chef and culinary enthusiast who serves as the Recipe creator of Somonday. With decades of experience in the kitchen and a passion for exploring diverse cuisines, Cynthia brings a blend of creativity and technique to every dish. Known for transforming simple ingredients into show-stopping meals, Cynthia believes that cooking is an art form anyone can master. Dedicated to inspiring home cooks, Cynthia shares approachable recipes, pro tips, and culinary wisdom to make every meal memorable.


