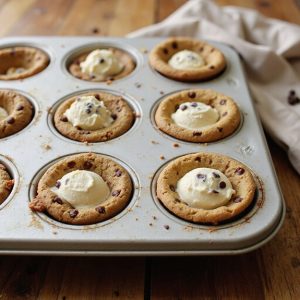
Picture warm, golden cookie cups emerging from the oven, edges caramel-brown and crisp, centers soft and chewy, filling the kitchen with the buttery aroma of vanilla and chocolate.
Imagine a scoop of velvety vanilla ice cream tucked inside, its cool creaminess melting just enough to kiss the cookie’s nooks and crags, speckled with mini chips and sprinkles like confetti.
This little dessert matters to me because it’s comfort disguised as fun—handheld joy that feels festive but doesn’t demand all day in the kitchen.
It’s perfect for busy weeknights when you want a quick win, for Sunday suppers that need a sweet finish, or for birthdays when everyone wants their own treat.
Once, these cookie cups rescued a last-minute family gathering—no cake, no problem; I’d dough, ice cream, and twenty minutes. The table went quiet, then happy.
That’s their magic: simple, sharable, and a little bit nostalgic. Ready? Let’s cook!
Why You’ll Love It
- Delivers warm, chewy cookie with creamy ice cream contrast
- Uses pantry staples and simple equipment you already own
- Freezes beautifully for make-ahead, grab-and-go desserts
- Customizes easily with flavors, toppings, or drizzle
- Bakes in muffin tins for perfectly portioned treats
Ingredients
- 1 cup unsalted butter, softened — room temp for easy creaming (choose high-fat European-style if possible)
- 3/4 cup granulated sugar — for crisp edges (use fresh, dry sugar)
- 3/4 cup light brown sugar, packed — adds chew and caramel notes (look for soft, moist texture)
- 2 large eggs, room temperature — binds and enriches (farm-fresh if available)
- 2 teaspoons vanilla extract — rounds out flavor (pure vanilla, not imitation)
- 2 1/4 cups all-purpose flour — structure for the cups (unbleached, medium protein)
- 1 teaspoon baking soda — lift and spread control (check it’s fresh)
- 1/2 teaspoon fine salt — balances sweetness (use fine sea salt)
- 1 1/2 cups semisweet chocolate chips — classic melty pockets (choose 50–60% cacao)
- 1 1/2 pints vanilla ice cream, slightly softened — easy to portion (creamy, high butterfat)
- 1/4 cup mini chocolate chips, optional topping — extra texture (mini size adheres well)
- 2 tablespoons rainbow sprinkles, optional topping — fun finish (use jimmies to prevent bleeding)
Step-by-Step Method
Prep the Pan
Preheat oven to 350°F (175°C). Lightly grease a 12-cup muffin tin. Set a second muffin tin aside for the ice cream step. Gather tools and ingredients. Let butter and eggs come to room temperature. Prepare plastic wrap for later by tearing 12 small squares to line the second tin’s cups.
Whisk the Dry
Combine flour, baking soda, and salt in a bowl. Whisk until evenly blended and lump-free. Set aside. This guarantees even leavening and consistent texture.
Keep the bowl nearby so you can add it immediately after creaming the butter and sugars.
Cream the Butter & Sugars
Beat softened butter with granulated and brown sugars until light and creamy, about 2 minutes. Use medium speed. Scrape the bowl once to ensure even mixing. Proper aeration helps the cups hold their shape and bake evenly, with crisp edges and chewy centers.
Add Eggs & Vanilla
Beat in eggs one at a time until smooth. Mix in vanilla until fully incorporated. Don’t overmix after the eggs are added. Overmixing can create tough cookies. Scrape the bowl and beater to ensure no streaks remain before adding the dry ingredients.
Combine the Dough
Add dry ingredients to the wet. Mix on low just until combined. Stop when no dry streaks remain. Fold in semisweet chocolate chips with a spatula. Avoid overworking the dough. This keeps the cookie cups tender and prevents doming.
Shape the Cups
Scoop about 2 tablespoons of dough into each muffin cup. Press dough up the sides to form shallow cups. Dampen fingertips or use parchment if sticky. Aim for even thickness. Leave a small well in the center to hold ice cream later.
Bake and Press
Bake 10–12 minutes until edges are golden and centers are just set. Remove pan. Immediately press centers deeper with the back of a spoon to reinforce the cup shape. Work gently to avoid cracking. Allow cups to set while hot for defined wells.
Cool Completely
Let cookie cups cool in the pan for 10 minutes. Transfer to a wire rack to cool completely. Cooling firms the structure and prevents melting the ice cream during assembly.
If cups are stuck, twist gently to release rather than prying straight up.
Portion the Ice Cream
Line the second muffin tin with plastic wrap, letting it overhang. Scoop 2 tablespoons of slightly softened vanilla ice cream into each cup. Smooth tops with a small offset spatula or spoon. Cover loosely and keep level to ensure uniform pucks.
Freeze the Pucks
Freeze ice cream portions 20–30 minutes until firm but not rock hard. They should lift cleanly without bending. Overfreezing makes assembly harder. If very hard, let sit a minute before unmolding so they press into the cookie cups without cracking.
Assemble the Cups
Nestle one ice cream puck into each cooled cookie cup. Press lightly to adhere. Work quickly to minimize melting. If needed, trim edges with a knife for neatness. Sprinkle with mini chocolate chips or rainbow sprinkles for texture and color.
Serve or Store
Serve immediately for soft, chewy cups and creamy centers. Or freeze assembled cups, covered, until ready to serve. For make-ahead, store cookie cups airtight at room temperature up to 2 days and keep ice cream pucks frozen separately; assemble just before serving.
Ingredient Swaps
- Dairy-free: Use vegan butter and dairy-free chocolate chips; fill with coconut, oat, or almond milk ice cream.
- Gluten-free: Substitute a 1:1 gluten-free all-purpose flour blend; make certain chips are certified GF.
- Egg-free: Replace each egg with 3 tablespoons aquafaba or 1 flax egg (1 tbsp ground flax + 3 tbsp water, rested).
- Lower sugar/budget: Reduce sugar by 2–4 tablespoons; use store-brand chips and ice cream.
- Flavor swaps: Try brown butter for depth; mix in chopped nuts, toffee bits, or swap vanilla ice cream for chocolate, strawberry, or cookies-and-cream.
- Regional availability: If light brown sugar is scarce, use white sugar plus 1–2 teaspoons molasses; replace semisweet chips with chopped local chocolate bars.
You Must Know
Doneness • If edges look golden but centers appear glossy and puffed, leave in the hot tin 3–4 minutes before unmolding; carryover heat sets the middle so cups stay chewy, not dry.
Troubleshoot • When cups collapse or turn greasy, chill shaped dough in the tin 15–20 minutes; colder fat spreads less, yielding sturdier walls about 1/4 inch thick.
Make-Ahead • For crisp-meets-chewy texture on serving day, keep cups airtight at 65–70°F up to 48 hours and freeze ice cream pucks separately up to 2 weeks; assemble within 5 minutes of serving to prevent melting.
Swap • For deeper caramel notes, replace 1/4 cup granulated sugar with 1/4 cup dark brown sugar and add a pinch (1/8 teaspoon) espresso powder; boosts chocolate flavor without tasting like coffee.
Scale • For mini bites, use a 24-cup mini muffin tin with 1 tablespoon dough per cup and ~1 tablespoon ice cream; check doneness at 7–8 minutes—edges lightly browned, centers matte.
Serving Tips
- Serve on chilled plates to slow melting; add a drizzle of warm fudge.
- Pair with fresh berries and a mint sprig for color and brightness.
- Offer a trio: vanilla, chocolate, and strawberry cups on a dessert board.
- Dust rims with crushed nuts or cookie crumbs for crunch and contrast.
- Pour small espresso shots alongside for an affogato-style treat.
Storage & Make-Ahead
Cookie cups keep airtight at room temperature 2 days.
Refrigerating can dry them.
Make ahead by baking cups and freezing ice cream pucks separately.
Assemble just before serving.
Fully assembled cups freeze well up to 1 month.
Wrap individually to prevent freezer burn.
Thaw 5 minutes at room temp before eating.
Reheating
Reheat cookie cups gently.
Microwave 5–10 seconds to soften without melting.
In oven, warm at 300°F for 3–5 minutes.
For stovetop, briefly steam covered over low heat to restore tenderness.
State Fair Blue-Ribbon Sightings
Strolling past the quilting barn and the scent of kettle corn, I spotted a gleam of blue ribbon beside a tray of golden, deep-dished cookie cups crowned with frosty vanilla domes.
I leaned in; the edges were caramel-bronze, the centers tender as a bakery crumb, and the ice cream sat like snow under July sun—just soft enough to sigh when pressed.
The judge caught my grin. “Perfect contrast,” she said—warm cookie, cold cream, a sprinkle of mischief.
I tasted crisp, then chew, then cool vanilla blooming with chocolate chips.
It was our recipe’s county-fair moment, swaggering without fuss.
- Buttery edges, soft centers, clean ice cream “pucks”
- Glossy chips, confetti sprinkles, show-stopping stack
- Neat shapes, no drips, fast-serve thrills
Final Thoughts
Ready to give these Ice Cream Sandwich Cookie Cups a try? Mix and match ice cream flavors, toppings, or even drizzle with chocolate to make them your own!
Frequently Asked Questions
Can I Make Them Gluten-Free and Dairy-Free Simultaneously?
Yes—you can. I swap in a 1:1 gluten-free flour, dairy-free butter, and coconut or oat milk ice cream. I fold chocolate chips labeled GF/DF. The cups bake golden, smell nutty-sweet, and taste tender, creamy, joyfully safe.
How Do I Scale the Recipe for a Crowd?
Double or triple everything by weight; bake in batches. I’d pre-scoop dough and ice cream “pucks,” then assemble assembly-line style. Keep trays chilling, rotate tins, and serve fast—cold, melty edges, warm cookie perfume drifting over happy guests.
What’s the Best Way to Transport Them Without Melting?
Pack them frozen, nestled in a chilled airtight container, layered with parchment. I tuck ice packs beneath and above, then drive fast. Shade the box, minimize opens, and serve immediately—cold cups, frosty perfume, chocolate freckles glinting.
Can I Use Silicone Muffin Cups Instead of Metal?
Yes—you can. I’ve used silicone cups; they release like a dream and keep edges tender. Set them on a sturdy sheet for support, cool longer, then pop out those golden, chewy nests, still whispering warm butter.
Are There Kid-Friendly Tasks for Helping With Assembly?
Yes. I’d let kids sprinkle mini chips and rainbow confetti, press chilled ice cream pucks into cooled cups, and gently smoosh. I’ll handle scooping and ovens; they’ll feel proud, sticky-fingered, giggly, and delighted with frosty, crunchy treats.
Ice Cream Sandwich Chocolate Chip Cookie Cups
Equipment
- 2 muffin tin 12-cup each
- 2 Mixing bowl
- 1 hand mixer or stand mixer
- 1 Rubber spatula
- 1 Whisk
- 1 Cookie scoop 2-tablespoon size
- 1 Measuring cups set
- 1 Measuring spoons set
- 1 wire cooling rack
- 1 small offset spatula or spoon
- 1 plastic wrap roll
Ingredients
- 1 cup unsalted butter softened
- 3/4 cup granulated sugar
- 3/4 cup light brown sugar packed
- 2 large eggs room temperature
- 2 teaspoon vanilla extract
- 2 1/4 cup all-purpose flour
- 1 teaspoon baking soda
- 1/2 teaspoon fine salt
- 1 1/2 cup semisweet chocolate chips
- 1 1/2 pint vanilla ice cream slightly softened
- 1/4 cup mini chocolate chips optional topping
- 2 tablespoon rainbow sprinkles optional topping
Instructions
- Preheat the oven to 350°F (175°C) and lightly grease a 12-cup muffin tin.
- In a mixing bowl whisk together flour, baking soda, and salt, then set aside.
- In a separate bowl beat the softened butter, granulated sugar, and brown sugar until light and creamy, about 2 minutes.
- Beat in the eggs one at a time, then mix in vanilla until smooth.
- Add the dry ingredients to the wet and mix on low just until combined.
- Fold in the semisweet chocolate chips with a spatula.
- Using a cookie scoop, portion about 2 tablespoons of dough into each muffin cup and press up the sides to form a shallow cup.
- Bake for 10–12 minutes until the edges are golden and centers are just set.
- Remove from the oven and immediately use the back of a spoon to gently press the centers to deepen the cup.
- Cool in the pan for 10 minutes, then transfer cookie cups to a wire rack to cool completely.
- Line a second muffin tin with plastic wrap, allowing overhang for easy lifting.
- Scoop 2 tablespoons of slightly softened vanilla ice cream into each lined cup and smooth the tops.
- Freeze the ice cream portions for 20–30 minutes until firm but not rock hard.
- To assemble, nestle an ice cream puck into each cooled cookie cup and press lightly to adhere.
- Sprinkle tops with mini chocolate chips or sprinkles if using, then serve immediately or freeze covered until ready to serve.
Notes

Cynthia Weatherford is a seasoned chef and culinary enthusiast who serves as the Recipe creator of Somonday. With decades of experience in the kitchen and a passion for exploring diverse cuisines, Cynthia brings a blend of creativity and technique to every dish. Known for transforming simple ingredients into show-stopping meals, Cynthia believes that cooking is an art form anyone can master. Dedicated to inspiring home cooks, Cynthia shares approachable recipes, pro tips, and culinary wisdom to make every meal memorable.