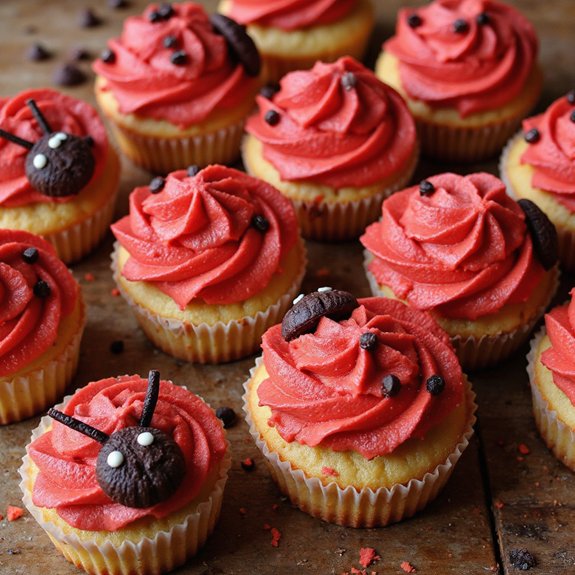
Picture a tray of tiny red-and-black “ladybugs” lined up on your counter, their glossy chocolate spots gleaming under the kitchen light.
These ladybug cupcakes are a cozy, cheerful dessert—soft, tender cakes topped with creamy frosting—ready in under an hour from mixing bowl to first bite.
They’re perfect for sweet-tooth fans, busy parents planning a kid-friendly treat, or beginners looking for a fun, low-stress baking project.
I still remember the rainy Saturday when these cupcakes saved the day: a canceled picnic, disappointed kids, and a gray sky.
We turned the afternoon around by decorating ladybug cupcakes together, and the kitchen buzzed with laughter instead of complaints. They’ve been my go-to ever since for birthday parties, classroom celebrations, and last-minute “Can I bring dessert?” invitations.
Whether you’re brightening a dull afternoon or adding charm to a gathering, these cupcakes fit the moment. Ready to bring this dish to life?
Why You’ll Love It
- Delivers adorable, kid-approved decor perfect for parties and celebrations
- Uses simple pantry ingredients with no special cake-mix shortcuts required
- Bakes into soft, tender vanilla cupcakes with rich buttercream frosting
- Doubles as a fun decorating project for kids and beginners
- Holds shape and color well for easy make-ahead entertaining
Ingredients
- 1 1/2 cups all-purpose flour — spoon and level for accurate measuring
- 1 cup granulated sugar — fine white sugar works best for texture
- 1 1/2 teaspoons baking powder — guarantees the cupcakes rise evenly
- 1/4 teaspoon baking soda — adds extra lift and browning
- 1/4 teaspoon fine salt — balances sweetness and enhances flavor
- 1/2 cup unsalted butter, softened — leave at room temp for easy mixing
- 2 large eggs, room temperature — helps batter emulsify smoothly
- 1/2 cup whole milk, room temperature — full-fat milk keeps cupcakes tender
- 2 teaspoons vanilla extract — pure vanilla gives best flavor
- 1 1/2 cups powdered sugar, sifted — sifting prevents lumpy frosting
- 1/2 cup unsalted butter, softened — use for a smooth, creamy buttercream
- 1 tablespoon heavy cream or milk — adjust for desired frosting consistency
- 1 teaspoon vanilla extract — flavors the buttercream
- 1–2 drops red gel food coloring — creates bright ladybug-red frosting
- 1–2 drops black gel food coloring — for deep black details without thinning
- 1–2 drops white gel food coloring (optional) — for small eye highlights
- 24 mini chocolate chips or candy pieces — use two per cupcake for eyes
- 12 chocolate wafer cookies or large chocolate buttons — form raised heads
- 2 tablespoons mini chocolate chips — press into frosting for ladybug spots
Step-by-Step Method
Preheat and Prepare the Pan
Preheat the oven to 350°F (175°C). Line a 12-cup muffin tin with paper cupcake liners. Set the pan aside. Gather your ingredients and equipment so everything is within reach. Ensure the butter, eggs, and milk are at room temperature. This helps the batter mix smoothly and bake evenly.
Mix the Dry Ingredients
Combine all-purpose flour, granulated sugar, baking powder, baking soda, and salt in a large mixing bowl. Whisk thoroughly to distribute the leaveners evenly and break up any lumps. Keep whisking until the mixture looks uniform and fine. This step helps create a consistent texture in your cupcakes once baked.
Beat in Wet Ingredients
Add softened butter, eggs, milk, and vanilla extract directly to the dry mixture. Use an electric mixer or whisk to beat on medium speed until smooth and just combined. Stop and scrape down the sides of the bowl as needed. Avoid overmixing; once no dry streaks remain, the batter is ready to portion.
Fill the Cupcake Liners
Divide the batter evenly among the 12 liners. Fill each liner about two-thirds full to allow room for rising. Use a spoon, scoop, or measuring cup for even portions. Tap the pan gently on the counter to release any large air bubbles. Check that all cups look similar in level before baking.
Bake and Cool the Cupcakes
Place the muffin tin in the preheated oven. Bake for 16–18 minutes until the tops are lightly golden and a toothpick inserted in the center comes out clean. Transfer the pan to a wire rack and let the cupcakes cool 5 minutes. Remove from the pan and cool completely on the rack.
Whip the Buttercream Frosting
Beat softened butter in a clean mixing bowl until creamy and smooth. Gradually add sifted powdered sugar, mixing on low to avoid a sugar cloud. Pour in vanilla extract and heavy cream or milk. Increase speed and beat until the frosting is light, fluffy, and spreadable. Adjust consistency with more sugar or cream if needed.
Tint the Frosting in Three Colors
Divide the buttercream evenly into three small bowls. Tint one portion red with gel food coloring, adding a drop at a time until bright. Tint the second portion black the same way. Leave the third portion plain or tint very lightly with white gel if desired. Stir thoroughly so each color is uniform and vivid.
Prepare Piping Bags and Tips
Fit three piping bags with small round piping tips. Fill one bag with red frosting, one with black, and one with white. Twist the tops of the bags to secure the frosting and prevent it from squeezing out the back. Keep the bags cool but pliable. If frosting softens too much, briefly chill before piping.
Pipe the Red Ladybug Bodies
Ensure cupcakes are completely cool. Use the red frosting bag to pipe a smooth dome on top of each cupcake. Start in the center and spiral outward, then gently smooth with a small offset spatula or leave the piped texture. Aim for an even, rounded shape to form the ladybug’s body base on every cupcake.
Add the Black Heads and Wing Line
Use the black frosting to pipe a semicircle “head” at one edge of each red dome. Fill it in solidly for a bold contrast. Then pipe a straight line of black frosting from the head to the opposite edge, down the center of the red area. This creates the separation between the wings on each ladybug.
Create Spots and Add Dimension
Add black spots by piping small dots of black frosting across the red wings, spacing them evenly. Alternatively, press mini chocolate chips into the red frosting, tip-side down, to form spots. If using, press a chocolate wafer cookie or large chocolate button upright at the head area for extra three-dimensional detail.
Finish the Faces and Chill to Set
Pipe two small black dots on each head for eyes if you didn’t place candy pieces there. Add tiny white dots of frosting on top as highlights to bring the eyes to life. Arrange the cupcakes on a tray and refrigerate for about 30 minutes. Let the frosting firm up before serving or transporting.
Ingredient Swaps
- Use cake flour instead of all-purpose for a softer crumb, or swap up to half the flour with whole wheat pastry flour for a slightly heartier cupcake.
- Replace butter in the batter and frosting with vegan baking sticks and use plant-based milk/cream for a dairy-free version; use allergy-friendly chocolate chips and cookies as well.
- If you don’t have gel colors, use cocoa powder to deepen the black frosting and beet or strawberry powder for a natural red tone (colors will be softer).
- Swap chocolate wafer cookies with Oreo halves, chocolate coins, or any flat round candy for the ladybug “heads.”
You Must Know
– Avoid – over-tinting frosting: add gel color in toothpick-tip amounts and wait 30–60 seconds between additions.
Red and black deepen as they sit, so this prevents bitter, overly dark frosting and keeps the texture from getting gummy.
Serving Tips
- Arrange cupcakes on a green frosted platter to mimic a grassy garden.
- Serve with fresh berries or fruit salad for a light, colorful pairing.
- Add tiny edible flowers or leaf-shaped sprinkles around each cupcake for decoration.
- Place cupcakes in individual clear boxes or jars for party favors or picnics.
- Pair with strawberry lemonade or berry punch for a coordinated red-and-pink dessert table.
Storage & Make-Ahead
Ladybug cupcakes keep 3–4 days in an airtight container in the fridge.
Bring to room temperature before serving.
You can bake cupcakes a day ahead and decorate later.
Undecorated cupcakes freeze well up to 2 months; wrap tightly.
Frosted cupcakes can be frozen 3–4 weeks, well protected.
Reheating
Reheat leftover cupcakes gently.
For best texture, skip microwave frosting; instead, warm un-iced cupcakes 5–7 minutes at 300°F in the oven, or briefly microwave at 50% power without over-heating.
Ladybug Cupcakes in Culture
Every time I spot a tray of these ladybug cupcakes at a party, they instantly feel like tiny good-luck charms you can eat. There’s something folkloric about them—the shiny red “shells,” the dark chocolate spots, the little sugar eyes looking up like they’re about to scuttle across the table.
I notice guests gravitate toward them, the way people reach for something familiar yet whimsical. In many cultures ladybugs symbolize luck, love, even wishes, and these cupcakes borrow that meaning without saying a word.
When you bring them to baby showers or garden parties, they quietly signal protection and new beginnings. Kids see playful bugs; adults taste nostalgia. With one bite, strawberry-vanilla warmth replaces superstition, but the feeling of charm lingers.
Final Thoughts
Give these Ladybug Cupcakes a try and have fun bringing their little “personalities” to life as you decorate.
Feel free to tweak the colors, toppings, or faces to make each bug uniquely your own!
Frequently Asked Questions
Can I Make These Cupcakes Gluten-Free Without Affecting the Design Details?
Yes, you can. I’d swap in a good 1:1 gluten‑free flour blend and keep the batter slightly thicker. The frosting, colors, and tiny chocolate spots still gleam, crisp and intact, like jeweled wings.
How Can Kids Safely Help Decorate the Ladybug Faces and Spots?
Kids can safely help by using blunt-tipped piping bags I pre-fill, squeezing soft frosting dots, and pressing chocolate chips with clean, dry fingers—tiny hands hovering over red “shells,” giggling as shiny spots and bright eyes slowly appear.
What Drinks Pair Best With Ladybug Cupcakes at Parties?
I’d pour cold strawberry lemonade, its rosy tang echoing the frosting’s sweetness, then offer vanilla milk or chocolate milk for kids, while you sip chilled prosecco or berry spritzers, bubbles dancing against the cupcake’s rich, buttery crumb.
Can I Turn This Recipe Into a Full Ladybug-Themed Cake?
Yes, you can. I’d bake the batter in two round pans, stack them with vanilla frosting, then cloak everything in glossy red and black swirls—tiny chocolate “spots” popping like midnight stars on velvet.
How Do I Transport Decorated Ladybug Cupcakes Without Smudging the Frosting?
I nestle each cupcake in a tall lidded carrier, spacing them so they don’t kiss. I chill them first, keeping frosting firm, then carry them level, like tiny jeweled gardens gliding through still air.

Ladybug Cupcakes
Equipment
- 1 Muffin tin (12-cup)
- 12 paper cupcake liners
- 2 Mixing bowls
- 1 Electric mixer or whisk
- 1 Rubber spatula
- 1 wire cooling rack
- 3 piping bags
- 3 small round piping tips
- 1 toothpick or skewer
- 1 small offset spatula or butter knife
Ingredients
- 1 1/2 cup all-purpose flour
- 1 cup granulated sugar
- 1 1/2 teaspoon baking powder
- 1/4 teaspoon baking soda
- 1/4 teaspoon fine salt
- 1/2 cup unsalted butter softened
- 2 large eggs room temperature
- 1/2 cup whole milk room temperature
- 2 teaspoon vanilla extract
- 1 1/2 cup powdered sugar sifted
- 1/2 cup unsalted butter softened
- 1 tablespoon heavy cream or milk
- 1 teaspoon vanilla extract
- 1 1–2 drops red gel food coloring
- 1 1–2 drops black gel food coloring
- 1 1–2 drops white gel food coloring optional, for eye highlights
- 24 mini chocolate chips or candy pieces
- 12 chocolate wafer cookies or large chocolate buttons
- 2 tablespoon mini chocolate chips for spots
Instructions
- Preheat oven to 350°F (175°C) and line the muffin tin with 12 paper cupcake liners.
- In a mixing bowl whisk together flour, granulated sugar, baking powder, baking soda, and salt.
- Add softened butter, eggs, milk, and vanilla extract to the dry ingredients and beat on medium speed until smooth and just combined.
- Divide the batter evenly among the 12 liners, filling each about two-thirds full.
- Bake the cupcakes for 16–18 minutes or until a toothpick inserted in the center comes out clean.
- Transfer the pan to a wire rack for 5 minutes, then remove the cupcakes from the pan and cool completely on the rack.
- To make the buttercream, beat softened butter until creamy, then gradually add powdered sugar, vanilla, and cream, beating until light and fluffy.
- Divide the frosting into three small bowls, tinting one portion red, one black, and leaving one plain or tinting lightly white if desired.
- Fit three piping bags with small round tips and fill separately with the red, black, and white frostings.
- Pipe a smooth dome of red frosting over each cooled cupcake to form the ladybug body.
- Use black frosting to pipe a semicircle “head” at one edge of each cupcake.
- Draw a straight line of black frosting down the center of the red dome to create the wing split.
- Add small dots of black frosting or press mini chocolate chips into the red area to make the ladybug spots.
- Press one chocolate wafer cookie or large chocolate button upright at the head area for extra dimension if using.
- Pipe two small black dots on each head for eyes, then add tiny white dots on top with white frosting for highlights if desired.
- Chill the decorated cupcakes in the refrigerator for about 30 minutes to set the frosting before serving.
Notes

Cynthia Weatherford is a seasoned chef and culinary enthusiast who serves as the Recipe creator of Somonday. With decades of experience in the kitchen and a passion for exploring diverse cuisines, Cynthia brings a blend of creativity and technique to every dish. Known for transforming simple ingredients into show-stopping meals, Cynthia believes that cooking is an art form anyone can master. Dedicated to inspiring home cooks, Cynthia shares approachable recipes, pro tips, and culinary wisdom to make every meal memorable.