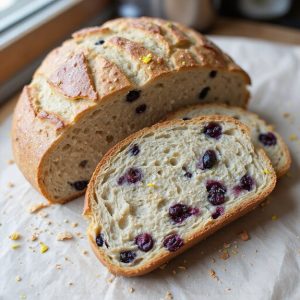
There’s something about slicing into a golden loaf and finding pockets of deep-purple berries and bright lemon that feels like pure sunshine.
This Lemon Blueberry Sourdough Bread is a cozy, naturally sweet loaf—part breakfast treat, part dessert—that looks bakery-level but comes together with gentle, unrushed steps and hands-off rise time.
It’s perfect for sourdough lovers who want something special for slow mornings, weekend bakers, sweet-tooth fans, and anyone easing into enriched sourdough bakes.
I still remember a rainy Sunday when friends popped by unannounced. I’d this dough already proofing, so I folded in blueberries, lemon zest, and a touch of sugar.
A few hours later, we were huddled around the table, tearing off warm slices, butter melting into the crumb, the room smelling of citrus and jammy fruit. It turned a gray afternoon into a small celebration.
Ideal for brunches, holiday breakfasts, or simple comfort with tea. Ready to bring this loaf to life?
Why You’ll Love It
- Delivers bright lemon tang balanced by juicy, sweet blueberries in every slice
- Elevates basic sourdough with a soft, tender, naturally leavened crumb
- Works as breakfast, snack, or dessert with simple glaze or butter
- Makes an impressive, bakery-style loaf with minimal hands-on time
- Stays moist for days and freezes beautifully for future treats
Ingredients
- 120 g active sourdough starter, 100% hydration — use recently fed and bubbly
- 300 g water, room temperature — cool but not cold for proper fermentation
- 400 g bread flour — higher protein for better gluten and rise
- 50 g whole wheat flour — adds flavor and light nuttiness
- 8 g fine sea salt — enhances flavor and strengthens gluten
- 40 g granulated sugar — balances sourness and boosts browning
- 1 tbsp lemon zest, finely grated — use fresh, fragrant lemons
- 2 tbsp lemon juice, freshly squeezed — avoid bottled for best flavor
- 150 g fresh blueberries, rinsed and patted dry — make sure fully dry to prevent gumminess
- 10 g unsalted butter, softened — for greasing loaf pan if using
- 10 g flour — for dusting work surface during shaping
Step-by-Step Method
Mix Starter & Water
Whisk the active sourdough starter and room-temperature water in a large mixing bowl.
Stir until the starter mostly dissolves and the liquid looks milky and uniform. This guarantees even fermentation throughout the dough.
Scrape down the sides of the bowl so everything stays together before adding the dry ingredients.
Combine Flours, Sugar & Lemon
Add the bread flour, whole wheat flour, sugar, lemon zest, and lemon juice to the bowl. Mix with a wooden spoon or dough whisk until no dry flour remains.
Aim for a shaggy, sticky mass rather than a smooth dough. Scrape the bowl sides to incorporate everything thoroughly and prevent dry pockets.
Autolyse the Dough
Cover the bowl with a clean kitchen towel. Let the dough rest at room temperature for about 30 minutes. Don’t add salt yet.
This rest allows the flour to hydrate fully and gluten to begin developing.
The dough will feel softer and smoother after this period, making later mixing and shaping easier.
Incorporate the Salt
Sprinkle the fine sea salt evenly over the dough’s surface. Use a pinching motion to squeeze the salt into the dough.
Then fold the dough over itself several times to distribute it thoroughly. Continue until you no longer feel salt grains.
This step strengthens gluten and balances the lemon and sugar flavors.
Begin Stretch & Folds
Start bulk fermentation at room temperature. Every 30 minutes for 2 hours, perform stretch-and-folds: grab one side of the dough, stretch it up, and fold it over.
Rotate the bowl and repeat on all sides. Keep the bowl covered between sets. These gentle folds build structure without heavy kneading.
Add the Blueberries Gently
After the first hour of bulk fermentation, sprinkle the dried, patted-dry blueberries over the dough. Gently fold them in using your hands or a dough scraper.
Avoid pressing too hard so the berries stay mostly whole. Distribute them evenly, taking care not to tear the dough or create wet blueberry streaks.
Finish Bulk Fermentation
Continue bulk fermentation until the dough rises about 50% and looks airy and puffed.
Check for small bubbles along the sides and surface, a sign of active fermentation.
This usually takes 4–6 hours total, depending on room temperature. Trust the dough’s appearance more than the clock for best results.
Pre-Shape the Dough
Lightly flour your work surface and gently turn the dough out of the bowl. Use a bench scraper to help if needed.
Shape it loosely into a round or log, depending on whether you’ll use a loaf pan or Dutch oven.
Handle it carefully to preserve gas bubbles and avoid squashing the blueberries.
Rest & Relax the Gluten
Let the pre-shaped dough rest on the counter, uncovered, for 15–20 minutes.
This short bench rest relaxes the gluten, making final shaping smoother and tighter.
The dough will gently spread and soften. Resist the urge to move or reshape it during this time so the structure can settle properly.
Shape with Good Surface Tension
Shape the dough into a tight loaf or boule. Use your hands and bench scraper to tuck and roll the dough, creating surface tension without tearing it.
Aim for a smooth, taut exterior that holds its form. Proper shaping helps support oven spring and creates an even, attractive crumb structure.
Prepare the Loaf Pan (If Using)
Grease a 9×5-inch loaf pan with softened butter, covering all interior surfaces. Line the bottom with parchment paper to prevent sticking.
Place the shaped dough seam-side down into the pan. Adjust its position so it sits centered.
This setup guarantees easy release and a nicely shaped sandwich-style loaf.
Prepare a Banneton or Bowl (If Using Dutch Oven)
Lightly flour a banneton or a clean bowl lined with a floured towel. Place the shaped dough seam-side up into the prepared vessel.
Dust the top lightly with flour if desired to prevent sticking. Cover with a clean kitchen towel. This method supports the dough during its final proofing stage.
Cold Proof in the Refrigerator
Cover the dough well and refrigerate for 8–12 hours. This slow, cold proof develops deeper flavor and a more complex sourdough character.
It also firms the dough, making it easier to score and handle. Keep the dough away from strong fridge odors, and avoid opening the container frequently.
Preheat the Oven & Dutch Oven
When ready to bake, preheat the oven to 450°F (230°C). If using a Dutch oven, place it inside to heat thoroughly.
Allow enough time, usually 30–45 minutes, for the Dutch oven and oven to reach full temperature. Proper preheating is vital for strong oven spring and a crisp crust.
Load & Score the Dough
If baking in a loaf pan, place the chilled pan on the middle oven rack. For Dutch oven baking, carefully invert the dough onto a parchment sheet seam-side down.
Score the top with a sharp knife or lame to control expansion. Use the parchment to lift the dough into the hot Dutch oven.
Steam & Bake the First Stage
Cover the Dutch oven with its lid or create steam for a loaf pan by adding a tray of hot water. Bake for 20 minutes at 450°F (230°C).
This steamy environment encourages maximum oven spring and helps the crust stay thin and flexible while the loaf rises dramatically.
Finish Baking & Check Temperature
Reduce the oven temperature to 425°F (220°C). Remove the Dutch oven lid or steam source and continue baking 20–25 minutes.
Look for a deep golden crust and check that the internal temperature reaches about 205°F (96°C).
If needed, extend baking a few minutes to avoid a gummy interior.
Cool Completely Before Slicing
Remove the bread from the oven and carefully lift it out of the pan or Dutch oven. Place it on a wire cooling rack to cool for at least 1–2 hours.
Letting it cool fully sets the crumb, prevents gumminess, and preserves the bright lemon aroma. Slice only when the loaf feels barely warm.
Ingredient Swaps
- Use all-purpose flour instead of bread flour if needed; reduce water by 10–20 g if the dough feels too sticky.
- Swap whole wheat flour with spelt or more white flour; increase hydration slightly if using spelt.
- Replace granulated sugar with honey or maple syrup (use 30–35 g and reduce water by ~5–10 g).
- Frozen blueberries work if fresh aren’t available—use from frozen, toss lightly in flour, and fold in quickly.
- For dairy-free, grease the pan with oil instead of butter.
You Must Know
– Make-Ahead • To fit baking into a busy schedule: Extend the cold proof to up to 18 hours if the dough still looks slightly domed and airy; if it starts to collapse or wrinkle on top in the fridge, bake as soon as possible to avoid an over-proofed, flat loaf.
Serving Tips
- Serve slightly warm with soft butter and a drizzle of honey.
- Pair with lemon curd or blueberry jam for extra citrus-berry flavor.
- Toast slices for breakfast and top with Greek yogurt and fresh berries.
- Plate with mascarpone and a dusting of powdered sugar for dessert.
- Use as a base for sweet brunch French toast with maple syrup.
Storage & Make-Ahead
Lemon blueberry sourdough keeps in the fridge, well-wrapped, for 4–5 days.
For make-ahead, cool completely, slice, and freeze slices up to 2 months in an airtight bag.
Toast straight from frozen or thaw at room temperature.
Avoid refrigerating uncovered, which dries the crumb and dulls lemon flavor.
Reheating
Reheat slices gently: in a 300°F (150°C) oven for 8–10 minutes.
In a covered skillet over low heat.
Or briefly in the microwave wrapped in a damp towel to prevent drying.
Sourdough in Summer Picnics
Warm weather always nudges me to pack up a blanket, a jar of lemonade, and a loaf of lemon blueberry sourdough for an easy picnic centerpiece.
I love how the crust crackles softly as I slice it on a wooden board, the crumb marbled with berries and little flecks of lemon zest catching the afternoon light.
I’ll wrap still‑slightly‑warm slices in parchment, then tuck them into a tin so they don’t dry out in the sun.
You can spread them with soft cheese, or eat them plain as the blueberries burst against the tangy crumb.
There’s something grounding about tearing off a piece with your fingers while the grass tickles your ankles and condensation slides down your glass.
Final Thoughts
Give this lemon blueberry sourdough a try and enjoy the bright citrus and juicy berries in every slice.
Once you’ve made it once, feel free to tweak the sweetness, lemon, or fruit to make it your own signature loaf.
Frequently Asked Questions
Can I Make This Lemon Blueberry Sourdough Completely Vegan?
Yes, you can. I’d simply swap the butter for a neutral oil, then mix, fold, and proof as written. I picture you slicing into a crackling loaf, steam curling around bright berries and lemon.
How Do I Adjust for High-Altitude Baking Conditions?
You’ll shorten fermentation slightly, add a touch more water, and bake a bit hotter. When I lived in Denver, I’d watch the dough like rising clouds over mountains—trust its look, not the clock.
Is It Safe to Ferment This Dough Longer Than 12 Hours?
Yes, it’s usually safe if your fridge stays cold and the dough doesn’t overproof. I’ve let mine rest overnight and beyond, waking to a softly domed, lemony pillow waiting for a slow, quiet morning bake.
Can I Freeze the Shaped, Unbaked Dough for Later?
Yes, you can freeze it, but I’d do it right after shaping. I wrap mine snugly, then later thaw in the fridge overnight, let it puff at room temp, and bake—like pausing time on a cozy morning.
How Can I Prevent Blueberries From Sinking to the Bottom?
I toss the berries in a light flour coat, then gently fold them in late, when the dough feels airy. That’s how I keep them suspended, like little midnight moons in a pale, pillowy sky.
Lemon Blueberry Sourdough Bread
Equipment
- 2 large mixing bowls
- 1 Kitchen scale
- 1 measuring cup set
- 1 measuring spoon set
- 1 wooden spoon or dough whisk
- 1 bench scraper
- 1 9×5-inch loaf pan or 1 standard sourdough Dutch oven
- 1 parchment paper sheet
- 1 clean kitchen towel
- 1 zester or fine grater
- 1 sharp knife or lame
- 1 wire cooling rack
Ingredients
- 120 gram active sourdough starter 100% hydration
- 300 gram water room temperature
- 400 gram bread flour
- 50 gram whole wheat flour
- 8 gram fine sea salt
- 40 gram granulated sugar
- 1 tablespoon lemon zest finely grated
- 2 tablespoon lemon juice freshly squeezed
- 150 gram fresh blueberries rinsed and patted dry
- 10 gram unsalted butter if using loaf pan; softened; for greasing pan
- 10 gram flour for dusting work surface
Instructions
- In a large mixing bowl, whisk together active sourdough starter and water until mostly dissolved.
- Add bread flour, whole wheat flour, sugar, lemon zest, and lemon juice to the bowl and mix until no dry flour remains to form a shaggy dough.
- Cover the bowl with a kitchen towel and let the dough rest (autolyse) for 30 minutes at room temperature.
- Sprinkle salt over the dough and gently pinch and fold it in until evenly incorporated.
- Begin bulk fermentation at room temperature and perform a set of stretch-and-folds every 30 minutes for 2 hours, keeping the bowl covered between sets.
- After the first hour of bulk fermentation, gently sprinkle the dried blueberries over the dough and fold them in carefully to avoid crushing them.
- Continue bulk fermenting the dough until it has risen by about 50%, looks puffed, and shows small bubbles on the surface, usually 4–6 hours total depending on room temperature.
- Lightly flour your work surface, turn the dough out, and gently pre-shape it into a round or log, depending on your baking vessel.
- Let the pre-shaped dough rest uncovered for 15–20 minutes to relax the gluten.
- Shape the dough tightly into a loaf or boule, creating surface tension without tearing the dough.
- If using a loaf pan, grease the pan with softened butter and line the bottom with parchment paper, then place the shaped dough seam-side down into the pan.
- If using a banneton or bowl for Dutch oven baking, lightly flour it, place the dough seam-side up, and cover with a towel.
- Cover the dough and refrigerate it for 8–12 hours for a cold final proof to develop flavor and structure.
- When ready to bake, preheat the oven to 450°F (230°C), placing the Dutch oven inside if using one.
- If baking in a loaf pan, place the pan on the middle rack; if baking in a Dutch oven, carefully transfer the dough onto parchment seam-side down, score the top, and place it into the hot Dutch oven.
- Bake for 20 minutes covered (or with steam if using a loaf pan) to encourage oven spring.
- Reduce the oven temperature to 425°F (220°C), remove the lid or steam source, and bake for an additional 20–25 minutes until the crust is deep golden and the internal temperature reaches about 205°F (96°C).
- Remove the bread from the oven, carefully take it out of the pan or Dutch oven, and place it on a wire rack to cool completely for at least 1–2 hours before slicing.
Notes

Cynthia Weatherford is a seasoned chef and culinary enthusiast who serves as the Recipe creator of Somonday. With decades of experience in the kitchen and a passion for exploring diverse cuisines, Cynthia brings a blend of creativity and technique to every dish. Known for transforming simple ingredients into show-stopping meals, Cynthia believes that cooking is an art form anyone can master. Dedicated to inspiring home cooks, Cynthia shares approachable recipes, pro tips, and culinary wisdom to make every meal memorable.