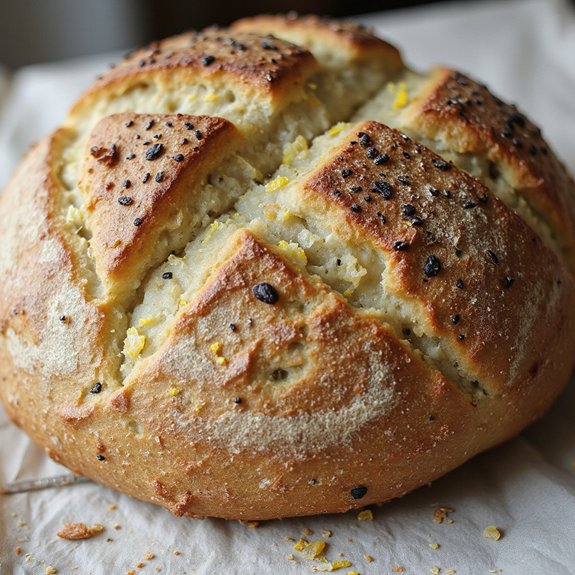
There’s something about the first slice of lemon poppyseed sourdough—its golden, crackling crust and freckled crumb—that instantly brightens the room.
This loaf is a cozy, gently sweet bread with a citrusy twist, perfect for breakfast toast, afternoon tea, or a simple dessert, and it comes together with the unhurried rhythm of an overnight sourdough, most of it hands-off.
It’s ideal for home bakers who love classic sourdough but want something a bit more special: brunch hosts, meal-preppers, and anyone who lives for that first warm slice with butter.
I first leaned on this bread before a busy weekend of hosting, when I needed something impressive yet unfussy.
One loaf turned into easy breakfasts, elegant brunch slices, and a thoughtful gift for a friend.
It shines at slow Sunday suppers, relaxed gatherings, or whenever you crave a bright, homemade treat. Ready to bring this loaf to life?
Why You’ll Love It
- Delivers bright, tangy lemon flavor with subtle sourdough complexity
- Adds crunch and nuttiness from plenty of poppy seeds inside and on top
- Balances sweet and savory, perfect for breakfast toast or cheese boards
- Uses simple sourdough technique with stretches and folds, no kneading required
- Keeps well and slices cleanly, ideal for make-ahead breakfasts and snacks
Ingredients
- 100 g active sourdough starter — 100% hydration, bubbly and recently fed
- 350 g water — room temperature to keep fermentation predictable
- 450 g bread flour — higher protein supports good structure
- 50 g whole wheat flour — adds flavor and a bit of extra nutrition
- 9 g fine sea salt — finely ground for even seasoning
- 2 tbsp poppy seeds — folded into the dough for crunch and speckling
- 1 tbsp poppy seeds — reserved for topping the loaf before baking
- 2 tbsp granulated sugar — keeps the loaf tangy rather than sweet
- 1 large lemon, zested — use fresh, unwaxed if possible for bright flavor
- 20 g fresh lemon juice — freshly squeezed so acidity doesn’t taste harsh
Step-by-Step Method
Mix Starter & Water
Whisk together the active sourdough starter and room-temperature water in a large mixing bowl.
Stir until the starter is mostly dissolved and the mixture looks milky and uniform.
This guarantees even distribution of yeast and bacteria. Make sure no thick clumps of starter remain before moving on to adding the flours.
Combine Flours & Autolyse
Add the bread flour and whole wheat flour to the bowl. Mix with your hand or a dough whisk until no dry bits remain.
The dough will be shaggy and sticky at this stage. Cover the bowl and let it rest for 30–45 minutes.
This autolyse period helps gluten develop and improves dough extensibility.
Incorporate Lemon & Seasonings
Sprinkle the salt, granulated sugar, lemon zest, lemon juice, and poppy seeds evenly over the dough.
Use your fingers to pinch the ingredients into the dough, then fold it over itself repeatedly. Work gently but thoroughly.
Continue until everything is evenly distributed and the dough feels cohesive and slightly smoother.
Rest & Begin Stretch-and-Folds
Let the dough rest for 30 minutes, covered, to relax the gluten.
Then perform a set of stretch-and-folds: grab one side of the dough, stretch it upward, and fold it over the center.
Rotate the bowl and repeat on all sides. This strengthens the dough without heavy kneading or tearing.
Continue Stretch-and-Folds
Repeat the stretch-and-folds every 30 minutes for 3–4 total sets over about 2 hours.
Keep the bowl covered between sets to prevent drying. Notice the dough becoming smoother, stronger, and more elastic.
Stop once it holds its shape better and feels airy yet resilient when you handle it.
Bulk Ferment Until Puffy
Cover the bowl and let the dough bulk ferment at room temperature. Allow it to rise until roughly doubled in volume and visibly puffy, usually 3–5 hours.
Look for small bubbles along the sides and a slight jiggle when you shake the bowl. Adjust time based on your kitchen’s temperature.
Shape the Dough Gently
Lightly flour your work surface, then gently turn the dough out. Avoid pressing out the gas.
Use a scraper and your hands to tuck and rotate the dough, creating surface tension. Shape into a tight round or oval loaf.
The dough should feel buoyant and slightly springy while still soft.
Transfer to Proofing Basket
Generously flour your proofing basket or a medium bowl lined with a clean towel. Place the shaped dough seam side up into the basket.
Adjust its shape if needed so it sits evenly. Dust the top lightly with flour to prevent sticking. This setup supports the dough during its final proofing.
Cold Proof in the Fridge
Cover the basket with plastic wrap or a towel. Refrigerate the dough for 8–12 hours for a cold proof.
Check that it feels airy and slightly springy when gently pressed.
The cold environment slows fermentation, deepens flavor, and makes the dough easier to score and handle when baking.
Preheat Dutch Oven Thoroughly
Place your Dutch oven with its lid into the oven. Preheat to 475°F (245°C) for at least 30 minutes.
This guarantees the pot is fully heated and ready to provide strong oven spring.
A properly preheated Dutch oven traps steam and helps create a crisp, well-developed crust on the loaf.
Invert & Top with Poppy Seeds
Carefully remove the cold dough from the refrigerator. Cut a piece of parchment paper and invert the dough onto it so the seam faces down.
Gently reshape if necessary without deflating. Sprinkle the top generously with the remaining poppy seeds. Press them lightly so they adhere before scoring.
Score the Loaf
Use a sharp knife or lame to score the top of the dough. Make one deep slash or several decorative cuts, holding the blade at a slight angle.
This controls how the loaf expands in the oven. Aim for confident, swift cuts to avoid dragging and tearing the dough’s delicate surface.
Load Dough into Dutch Oven
Carefully remove the preheated Dutch oven from the oven. Lift the parchment with the dough and lower it into the hot pot.
Ensure the parchment edges remain inside and not touching the heating elements.
Cover immediately with the lid to trap steam, then place the pot back into the hot oven.
Bake Covered, Then Uncovered
Bake the loaf covered at 475°F (245°C) for 20 minutes to encourage strong oven spring.
Then reduce the temperature to 450°F (230°C) and remove the lid.
Continue baking 20–25 minutes more, until the crust is deep golden and the internal temperature reaches 205–210°F (96–99°C).
Cool Fully Before Slicing
Remove the bread from the Dutch oven and place it on a wire rack. Let it cool completely for at least 1–2 hours.
This resting time allows the crumb to set and prevents gumminess. The lemon and sourdough flavors continue to develop as it cools, giving a better texture and taste.
Ingredient Swaps
- Use up to 100 g of whole wheat flour (reducing bread flour accordingly) for a heartier loaf, or swap in up to 75 g spelt or rye for a more rustic flavor—just note the dough may be slightly stickier and denser.
- For a vegan loaf, the base recipe is already vegan; just be sure your sugar is certified vegan if that’s a concern.
- Replace lemon with lime or orange (same zest and juice amounts) for a different citrus profile, or use ½–1 tsp lemon extract if fresh lemons aren’t available (reduce or omit the lemon juice to keep hydration steady).
- If poppy seeds are hard to find or an allergen concern, substitute chia seeds, sesame seeds, or finely chopped nuts; texture and flavor will change slightly but the loaf will still bake well.
You Must Know
– Flavor Boost • To intensify the lemon poppy profile: Toast the poppy seeds in a dry pan for 2–3 minutes until fragrant, then cool completely before adding, and use zest from up to 1½ lemons.
Light toasting deepens nutty notes and stronger zest keeps the bread bright, not sweet.
– Scale • For a smaller test loaf or tighter schedule: Halve all ingredients by weight (e.g., 50 g starter, 225 g water, 250 g total flour) but keep the temperatures and visual cues the same.
A smaller dough mass ferments and chills faster, so start checking bulk and cold proof readiness 30–40 minutes earlier than usual.
Serving Tips
- Serve toasted with butter and honey to highlight the lemon’s tangy sweetness.
- Pair slices with whipped goat cheese and a drizzle of olive oil.
- Use for avocado toast topped with radishes, herbs, and flaky salt.
- Plate alongside smoked salmon, cream cheese, and capers for brunch.
- Make grilled cheese with sharp cheddar and arugula for a savory contrast.
Storage & Make-Ahead
Lemon poppyseed sourdough keeps in the fridge, wrapped or in an airtight bag, for up to 5 days.
Slice as needed and toast to refresh.
For make-ahead, freeze the fully cooled, sliced loaf up to 2 months.
Reheat slices directly from frozen in a toaster or low oven.
Reheating
For best texture, reheat slices in a 300°F (150°C) oven for 8–10 minutes or in a covered skillet over low heat.
Use a brief, low‑power microwave burst only.
Lemon Breads in Celebrations
Celebration gathers easily around lemon-scented bread, the air warming with citrus and yeast as a loaf crackles out of the oven.
I love how the poppy-flecked crust shines like confetti, a quiet announcement that something worth lingering over is about to be sliced and shared.
When I’m planning a gathering, I often think of this bread in three roles:
- Centerpiece: set on a wooden board, it anchors brunch beside berries, soft butter, and honey.
- Gift: wrapped in parchment and twine, it carries a sunlit promise to a new neighbor or host.
- Ritual: thick slices at the table, steam curling up as we pass the plate, mark birthdays, homecomings, and those ordinary nights that deserve to feel special.
Final Thoughts
Ready to bake a loaf? Give this lemon poppyseed sourdough a try as written first, then have fun tweaking the zest, seeds, or sweetness to make it truly your own.
If you do experiment, jot down your changes so you can recreate your perfect version next time.
Frequently Asked Questions
Can I Convert This Sourdough Loaf Into Lemon Poppyseed Sourdough Rolls?
Yes, you can. I’d shape after bulk into 8–10 tight rolls, proof on a buttered pan, brush with butter, sprinkle poppy seeds, then bake until golden, lemony perfume curling through your warm kitchen.
How Do Altitude Changes Affect Proofing and Baking This Lemon Sourdough?
Altitude makes your dough proof faster and your loaf bake quicker, so I’d shorten rises, watch for a soft, jiggly dome, lower the oven slightly, and savor the crackling crust in thinner mountain air.
Is This Recipe Suitable for a Bread Machine or Automatic Mixer?
It isn’t ideal for a bread machine, but I’d happily use an automatic mixer: I’d knead on low, watch for a soft, silky dough, then finish the gentle folds by hand, feeling its warm, citrusy rise.
Can I Dehydrate Slices Into Lemon Poppyseed Sourdough Crisps or Rusks?
Yes, you can, and I’d love to. I’d slice thin, toast low and slow until dry and golden, so you hear a gentle crackle and taste bright lemon warmth with nutty, whispering seeds.

Lemon Poppyseed Sourdough Bread
Equipment
- 1 large mixing bowl
- 1 Medium bowl
- 1 digital kitchen scale
- 1 measuring spoon set
- 1 dough scraper or bench scraper
- 1 proofing basket or medium bowl lined with a towel
- 1 Dutch oven with lid or 1 baking stone and 1 oven-safe pan for steam
- 1 sharp knife or lame for scoring
- 1 Cooling rack
Ingredients
- 100 gram active sourdough starter 100% hydration
- 350 gram water room temperature
- 450 gram bread flour
- 50 gram whole wheat flour
- 9 gram fine sea salt
- 2 tablespoon poppy seeds
- 1 tablespoon poppy seeds for topping
- 2 tablespoon granulated sugar
- 1 large lemon zested
- 20 gram fresh lemon juice
Instructions
- In a large mixing bowl, whisk together the active sourdough starter and water until mostly dissolved.
- Add the bread flour and whole wheat flour, mix until no dry flour remains, then cover and let rest for 30–45 minutes (autolyse).
- Sprinkle the salt, sugar, lemon zest, lemon juice, and poppy seeds over the dough and mix by pinching and folding until evenly incorporated.
- Let the dough rest 30 minutes, then perform a set of stretch-and-folds by pulling each side of the dough up and folding it over the center.
- Repeat stretch-and-folds every 30 minutes for 3–4 sets total over about 2 hours, keeping the bowl covered between sets.
- After the final set, cover the bowl and let the dough bulk ferment at room temperature until roughly doubled and puffy, 3–5 hours depending on room temperature.
- Lightly flour your work surface, gently turn the dough out, and shape it into a tight round or oval loaf without deflating it too much.
- Place the shaped dough seam side up into a floured proofing basket or towel-lined bowl.
- Cover and refrigerate for a cold proof of 8–12 hours, or until the dough feels airy and slightly springy when gently pressed.
- Place the Dutch oven with its lid in the oven and preheat to 475°F (245°C) for at least 30 minutes.
- Carefully remove the hot Dutch oven from the oven, gently invert the dough onto a piece of parchment, and sprinkle the top with the remaining poppy seeds.
- Score the top of the loaf with a sharp knife or lame to allow controlled expansion.
- Transfer the dough on the parchment into the hot Dutch oven, cover with the lid, and return to the oven.
- Bake covered for 20 minutes, then reduce the temperature to 450°F (230°C) and remove the lid.
- Continue baking uncovered for 20–25 minutes more, or until the crust is deep golden and the internal temperature reaches about 205–210°F (96–99°C).
- Carefully remove the bread from the Dutch oven and cool completely on a wire rack for at least 1–2 hours before slicing.
Notes

Cynthia Weatherford is a seasoned chef and culinary enthusiast who serves as the Recipe creator of Somonday. With decades of experience in the kitchen and a passion for exploring diverse cuisines, Cynthia brings a blend of creativity and technique to every dish. Known for transforming simple ingredients into show-stopping meals, Cynthia believes that cooking is an art form anyone can master. Dedicated to inspiring home cooks, Cynthia shares approachable recipes, pro tips, and culinary wisdom to make every meal memorable.