
There’s something about the crackle of a flour-dusted crust and the warm, nutty aroma of toasted grains that makes a kitchen feel like home.
This multigrain sourdough isn’t a quick fix, but a slow, deeply satisfying loaf—perfect for relaxed weekends, Sunday suppers, and anyone who loves nourishing, wholesome bread.
It’s ideal for home bakers ready to move beyond basic loaves, meal-preppers who live on toast and sandwiches, and comfort seekers who crave something hearty and real.
I still remember one rainy afternoon when a dense, store-bought loaf let me down at a family lunch; this multigrain sourdough, with its chewy crumb and seeds that pop lightly between your teeth, became the “house bread” that finally made everyone linger at the table.
It shines for simple weeknight soups, casual gatherings, and those quiet mornings when you need a steadying slice.
Ready to bring this loaf to life?
Why You’ll Love It
- Delivers bold, nutty flavor from toasted seeds and whole grains
- Builds incredible chewy-crisp crust with soft, tender interior crumb
- Maximizes nutrition with whole wheat, rye, oats, and mixed seeds
- Improves digestion and flavor through long, natural sourdough fermentation
- Fits real life with flexible room-temperature or overnight fridge proofing
Ingredients
- 100 g active 100% hydration sourdough starter — use freshly fed and bubbly
- 350 g water, divided — keep at room temperature for consistent fermentation
- 350 g bread flour — higher protein supports good structure
- 100 g whole wheat flour — adds flavor, color, and nutrition
- 50 g rye flour — boosts fermentation and a mild tang
- 40 g rolled oats — use old-fashioned, not instant, for best texture
- 20 g sunflower seeds — use raw, unsalted for better control of flavor
- 20 g pumpkin seeds — raw pepitas give great crunch
- 10 g flaxseeds — whole seeds add nuttiness and fiber
- 10 g sesame seeds — lightly toasted deepen flavor
- 10 g honey or maple syrup — a touch of sweetness to balance tang
- 10 g fine sea salt — fine grains dissolve more evenly
- 10 g water — reserved for easier salt and honey incorporation
Step-by-Step Method
Soak the Grains and Seeds
Combine rolled oats, sunflower, pumpkin, flax, and sesame seeds in a medium bowl. Pour in 100 g room-temperature water and stir until everything is evenly hydrated.
Let the mixture soak for 30 minutes. This softens the grains and seeds so they don’t steal moisture from the dough and guarantees a tender, even crumb.
Mix the Starter and Water
Add 250 g water to a large mixing bowl. Spoon in the active sourdough starter and whisk or stir until mostly dissolved and milky.
This evenly disperses the wild yeast and bacteria. Proper mixing at this stage helps create a consistent fermentation and more reliable rise later in the dough-making process.
Combine the Flours
Add bread flour, whole wheat flour, and rye flour directly to the starter mixture. Mix with your hand or a sturdy spatula until no dry bits remain.
Scrape the sides and bottom of the bowl. The dough will feel shaggy and rough. Ensure everything is moistened, but avoid kneading. This forms the base structure for the bread.
Autolyse the Dough
Cover the bowl with a towel or plastic wrap and let the dough rest for 45–60 minutes at room temperature. Don’t add salt yet.
During this autolyse, the flour hydrates fully and gluten begins to develop naturally. This rest improves dough extensibility, flavor, and handling without extra kneading effort.
Incorporate Salt and Sweetener
Sprinkle the fine sea salt and honey or maple syrup evenly over the dough’s surface. Drizzle on the extra 10 g water.
Use your fingers to pinch and squeeze the dough repeatedly, then fold it over itself. Continue until the salt feels fully dissolved and the dough becomes smoother, more cohesive, and slightly stronger.
Fold in Soaked Seeds and Oats
Add the soaked grain and seed mixture to the dough. Gently stretch, fold, and press to distribute it evenly without tearing the dough excessively.
Rotate the bowl as you fold. Aim for a uniform mix so each slice contains seeds. This step creates the bread’s multigrain character and adds texture and flavor.
Begin Bulk Fermentation
Cover the bowl and let the dough ferment at room temperature around 75°F (24°C). This is the bulk fermentation phase.
The dough will gradually rise, become airier, and develop flavor. Keep it out of drafts and away from direct heat. Proper bulk fermentation is vital for an open crumb and good oven spring.
Perform Stretch-and-Fold Sets
During the first 2 hours, perform 3–4 sets of stretch-and-folds every 30 minutes. Wet your hand, grab one edge of the dough, stretch it up, and fold it over.
Rotate the bowl and repeat several times per set. Cover between sets. These gentle folds strengthen gluten, evenly redistribute gases, and improve dough structure.
Finish Bulk Fermentation
After the last fold, let the dough rest undisturbed. Watch for a roughly 50% increase in volume, visible bubbles around the edges, and a smooth, slightly domed surface.
This typically takes 4–6 hours total, depending on temperature. Avoid overproofing. The dough should feel light, jiggly, and airy when gently shaken.
Pre-Shape the Dough
Lightly flour your work surface. Gently turn the dough out using a dough scraper to avoid tearing.
Use a bench scraper and your hands to tuck and rotate the dough into a loose round. Focus on handling it gently to preserve gas. Let it sit in this rough shape to relax gluten before final shaping.
Rest the Pre-Shaped Dough
Leave the pre-shaped dough uncovered on the counter for 15–20 minutes. This short bench rest allows gluten to relax so the dough becomes easier to shape tightly.
The surface will slightly flatten, but the dough should still feel buoyant. Avoid covering unless your environment is very dry, to prevent forming a thick skin.
Shape into Boule or Batard
Lightly flour the surface if needed. Using your hands and bench scraper, gently stretch and fold the dough to build surface tension.
For a boule, rotate and tuck edges underneath. For a batard, roll into an oval and seal the seam. Aim for a tight, smooth outer surface without squeezing out too much gas.
Prepare and Fill the Proofing Basket
Generously flour your proofing basket, or line a medium bowl with a well-floured kitchen towel. Rice flour or a flour mix helps prevent sticking.
Carefully place the shaped dough seam-side up into the basket. Adjust to maintain its shape. Proper flouring and gentle handling guarantee the dough releases cleanly after proofing.
Proof at Room Temperature or Cold Retard
Cover the basket with a towel or plastic wrap. Proof at room temperature 1–2 hours, until slightly puffy, or refrigerate 10–14 hours for an overnight cold retard.
Cold proofing slows fermentation, deepens flavor, and firms the dough, making scoring easier. Choose based on your schedule and preferred taste complexity.
Preheat the Oven and Dutch Oven
About 45 minutes before baking, place your Dutch oven with its lid into the oven. Preheat to 475°F (245°C).
This high, stable heat and preheated vessel create strong oven spring and good crust. Ensure the Dutch oven is centered on the rack and allow ample time so both oven and pot are fully hot.
Transfer and Position the Dough
When ready to bake, carefully remove the hot Dutch oven and remove its lid. Gently invert the proofed dough onto parchment or directly into the pot so the seam faces down.
Adjust its position quickly but carefully. Work with oven mitts and caution. Proper placement helps the loaf rise evenly and bake uniformly.
Score the Loaf
Using a sharp razor or bread lame, score the top of the dough with one or more decisive slashes about 1/4 inch deep. Angle the blade slightly for an ear if desired.
Scoring controls expansion, directs oven spring, and prevents random bursting. Work swiftly to avoid losing too much heat from the hot vessel.
Steam and Start Baking
Cover the Dutch oven with its hot lid and place it back into the oven. Bake at 475°F (245°C) for 20 minutes.
The closed environment traps steam, which helps the loaf expand fully and develop a thin, glossy crust. Avoid opening the oven during this stage to maintain temperature and steam levels.
Finish Baking Uncovered
After 20 minutes, reduce the temperature to 450°F (230°C). Remove the Dutch oven lid carefully.
Continue baking for 20–25 minutes until the loaf is deep golden brown and well risen. The crust should look richly colored, not pale. If desired, rotate the pot partway for more even browning in uneven ovens.
Check Doneness and Cool Completely
Remove the loaf and check for doneness: internal temperature should be 205–210°F (96–99°C), or the bottom should sound hollow when tapped.
Transfer immediately to a wire rack. Let it cool at least 1–2 hours before slicing to set the crumb and finish moisture redistribution. Slicing too early can make the texture gummy.
Ingredient Swaps
- Use all-purpose flour for the bread flour if needed; reduce water by 10–20 g if the dough feels too slack.
- Swap honey/maple syrup 1:1 with sugar, or omit for a less sweet loaf.
- Change up the grains/seeds based on what you have: use chia, millet, or chopped nuts in place of some seeds; replace rye or whole wheat with more bread flour if those aren’t available.
- For nut-free: stick to seeds only; for gluten-free, this recipe won’t work as written—use a dedicated gluten-free sourdough formula instead.
You Must Know
– Flavor Boost • For a deeper nutty flavor and better chew: Lightly toast the seeds and oats in a dry pan until just fragrant, then cool fully before hydrating them with the 100 g water.
Gentle toasting adds roasted notes without drying the mix.
– Scale • To adjust loaf size without guesswork: Change all ingredients by the same percentage (e.g., for a smaller loaf, use 75% of every weight, including starter and salt).
Keeping ratios identical preserves dough feel, timing, and flavor balance.
Serving Tips
- Serve slightly warm with salted butter and a drizzle of honey.
- Pair with hearty soups like lentil, tomato, or vegetable minestrone.
- Slice thin for open-faced sandwiches topped with avocado, radish, and sea salt.
- Toast and serve alongside cheese, cured meats, and olives on a snack board.
- Use day-old slices for rustic croutons or a savory bread pudding.
Storage & Make-Ahead
This bread keeps in the fridge, well-wrapped, for up to 1 week.
Slice as needed and gently rewarm to refresh the crust.
For longer storage, slice and freeze in an airtight bag for up to 2 months.
Toast slices straight from frozen for best texture and flavor.
Reheating
To gently reheat multigrain sourdough, warm slices briefly in a low oven.
Lightly toast in a skillet on the stovetop, or microwave wrapped in a damp towel to retain moisture.
Sourdough in American Homebaking
Lately, I see sourdough weaving its way into American home baking like an old tradition rediscovered in a modern kitchen. I watch it happen in my own oven: that quiet bowl of dough, speckled with grains and seeds, slowly swelling like it’s breathing.
When I mix this multigrain loaf, I feel part of a bigger shift. Counters once crowded with packaged bread now hold bubbling jars of starter, flour-dusted scales, and Dutch ovens preheating like cast-iron hearths.
There’s a low hum of fermentation in fridges across the country, jars tucked behind leftovers.
You’re not just baking bread—you’re coaxing life from flour and water, shaping something deeply American: practical, resourceful, and quietly rooted in the past.
Final Thoughts
Give this multigrain sourdough a try and see how all those soaked grains and seeds transform your usual loaf.
Once you’ve baked it once, have fun tweaking the flour blend or seed mix to make it truly your own.
Frequently Asked Questions
Can I Make This Multigrain Sourdough Without a Dutch Oven or Baking Stone?
Yes, you can. I’d use a preheated inverted sheet pan or heavy skillet, add a second pan of steaming water, and bake. You’ll still hear that crackling crust sing as it cools on the rack.
How Do I Adapt This Recipe for High-Altitude Baking Conditions?
You’ll shorten fermentation slightly, add a touch more water, and bake hotter. At altitude, dough rises faster, dries quickly, and browns slower—watch its airy wobble, not the clock, and listen for that hollow, singing crust.
What’s the Best Way to Fix Dough That’s Over-Proofed?
You can gently degas, reshape, and give it a shorter final proof, watching closely. I’d tighten the surface, feel for renewed spring, then bake hot; expect a flatter loaf but deep, caramel, crackling crust.
Can I Convert This Formula to Use Commercial Yeast Instead of Starter?
You can. I’d swap starter for about 4–5 g instant yeast, add 50 g flour and 50 g water, then shorten rises. Watch the dough swell, feel it pillowy, bake when it quivers like jelly.
How Can I Scale This Recipe for Two or More Loaves?
You’ll simply multiply every ingredient by the number of loaves—two loaves, double everything, three loaves, triple. I keep times the same, just divide the silky dough into equal pieces before shaping and proofing.
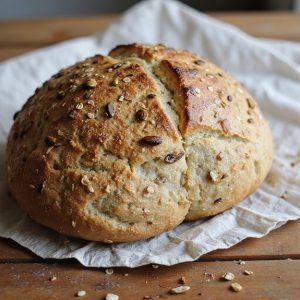
Multigrain Sourdough Bread
Equipment
- 1 digital kitchen scale
- 2 medium mixing bowls
- 1 large mixing bowl
- 1 Dough scraper
- 1 bench scraper
- 1 kitchen towel or plastic wrap
- 1 proofing basket or 1 medium bowl
- 1 Dutch oven with lid (4–5 qt) or baking stone
- 1 spray bottle with water (optional)
- 1 sharp razor or bread lame
- 1 wire cooling rack
Ingredients
- 100 gram active 100% hydration sourdough starter
- 350 gram water room temperature divided
- 350 gram bread flour
- 100 gram whole wheat flour
- 50 gram rye flour
- 40 gram rolled oats
- 20 gram sunflower seeds
- 20 gram pumpkin seeds
- 10 gram flaxseeds
- 10 gram sesame seeds
- 10 gram honey or maple syrup
- 10 gram fine sea salt
- 10 gram extra water for salt incorporation
Instructions
- In a medium bowl, combine the rolled oats, sunflower seeds, pumpkin seeds, flaxseeds, and sesame seeds with 100 g of the water, stir, and let soak for 30 minutes.
- In a large bowl, mix the sourdough starter with the remaining 250 g water until mostly dissolved.
- Add the bread flour, whole wheat flour, and rye flour to the starter mixture and mix with your hand or a spatula until no dry bits remain.
- Cover the bowl and let the dough rest (autolyse) for 45–60 minutes at room temperature.
- Sprinkle the salt and honey over the dough, add the extra 10 g water, and pinch and fold the dough until the salt is fully incorporated.
- Add the soaked seed and oat mixture to the dough and gently fold until evenly distributed.
- Cover the bowl and begin bulk fermentation at room temperature (around 75°F/24°C).
- During the first 2 hours of bulk fermentation, perform 3–4 sets of stretch-and-folds every 30 minutes, keeping the dough covered between sets.
- After the last set of folds, let the dough rest undisturbed until it has risen about 50% and shows bubbles around the edges (total bulk time 4–6 hours, depending on temperature).
- Lightly flour your work surface, gently turn the dough out, and pre-shape it into a loose round using a bench scraper.
- Let the dough rest uncovered for 15–20 minutes to relax.
- Shape the dough into a tight boule or batard by gently stretching and folding to create surface tension without deflating it.
- Generously flour your proofing basket or line a bowl with a floured kitchen towel, then place the shaped dough seam-side up in the basket.
- Cover and proof at room temperature for 1–2 hours, or place in the refrigerator for 10–14 hours for a cold retard.
- About 45 minutes before baking, place your Dutch oven (with lid) into the oven and preheat to 475°F (245°C).
- When ready to bake, carefully remove the hot Dutch oven from the oven and take off the lid.
- Turn the dough out of the basket onto a piece of parchment or directly into the hot Dutch oven so it is seam-side down.
- Score the top of the loaf with a sharp razor or lame in one or more slashes about 1/4 inch deep.
- Cover with the lid and bake for 20 minutes at 475°F (245°C).
- Reduce the oven temperature to 450°F (230°C), remove the lid, and bake for an additional 20–25 minutes until deep golden brown and well risen.
- Check that the internal temperature of the bread is around 205–210°F (96–99°C) or that the loaf sounds hollow when tapped on the bottom.
- Transfer the bread to a wire rack and let it cool completely for at least 1–2 hours before slicing.
Notes

Cynthia Weatherford is a seasoned chef and culinary enthusiast who serves as the Recipe creator of Somonday. With decades of experience in the kitchen and a passion for exploring diverse cuisines, Cynthia brings a blend of creativity and technique to every dish. Known for transforming simple ingredients into show-stopping meals, Cynthia believes that cooking is an art form anyone can master. Dedicated to inspiring home cooks, Cynthia shares approachable recipes, pro tips, and culinary wisdom to make every meal memorable.


