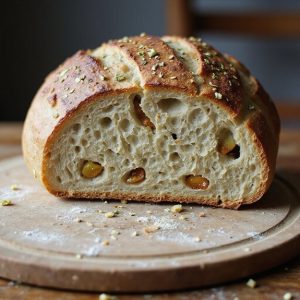
There’s something about tearing into a warm loaf of roasted garlic sourdough—the crackle of the blistered crust, the steam curling up in ribbons, and that deep, nutty garlic aroma filling your kitchen.
This is cozy comfort food at its best: a slow, artisanal bread that rewards a bit of patience, perfect alongside hearty stews, simple salads, or a rustic cheese board.
It’s ideal for weekend bakers, sourdough beginners ready to level up, and anyone who loves feeding family and friends something made by hand.
I still remember a rainy Sunday when this loaf turned a simple pot of soup into a “wow, this feels like a restaurant” dinner, calming a hectic week before it even began.
It’s wonderful for Sunday suppers, casual gatherings, or prepping slices for easy lunches all week.
Ready to bring this loaf to life and let your kitchen smell like a bakery?
Why You’ll Love It
- Delivers rich, mellow roasted garlic flavor in every chewy sourdough slice
- Builds an open, tender crumb with a deeply caramelized, crackly crust
- Relies on natural fermentation for better digestibility and complex tangy notes
- Flexes with your schedule using an overnight cold proof in the fridge
- Elevates everyday meals, from simple soups to special-occasion cheese boards
Ingredients
- 1 head garlic whole — choose a firm, heavy head
- 2 tsp olive oil — any good-tasting extra-virgin works
- 400 g bread flour — higher protein for better structure
- 100 g whole wheat flour — adds flavor and nutrition
- 100 g active sourdough starter 100% hydration — use recently peaked starter
- 350 g water room temperature — adjust slightly if dough feels very stiff
- 10 g fine sea salt — avoid iodized table salt for cleaner flavor
- 10 g olive oil for dough handling (optional) — lightly oil hands to reduce sticking
- 10 g rice flour for dusting banneton — resists sticking better than wheat flour
Step-by-Step Method
Roast the Garlic
Preheat oven to 400°F (200°C). Slice the top off the garlic head to expose cloves. Place on foil, drizzle with 2 teaspoons olive oil, and wrap tightly.
Roast 30–35 minutes until soft, fragrant, and caramelized. Cool completely. Later, squeeze out cloves and mash lightly with a fork so they disperse evenly through the dough.
Mix the Flours
Combine 400 grams bread flour and 100 grams whole wheat flour in a medium bowl. Stir until the flours are evenly blended with no streaks.
This simple step guarantees consistent hydration and gluten development later. Set the flour mixture aside while you prepare the water and starter mixture in another bowl.
Combine Water and Starter
Whisk together 350 grams room-temperature water and 100 grams active 100% hydration sourdough starter in a separate bowl.
Mix until the starter is mostly dissolved and milky. This helps distribute the yeast and bacteria uniformly.
Make sure your starter is recently fed and bubbly for predictable fermentation and good oven spring.
Hydrate the Dough (Autolyse)
Pour the water–starter mixture into the flour bowl. Mix with your hand or a dough scraper until no dry flour bits remain.
Scrape down the sides. The dough will be shaggy and sticky. Cover the bowl and let it rest 45–60 minutes.
This autolyse relaxes the dough and starts gluten development without salt interference.
Add Garlic and Salt
Spread the dough gently in the bowl. Sprinkle 10 grams fine sea salt evenly over the surface.
Add the mashed roasted garlic in small dollops across the dough. Use your fingers to pinch and squeeze the dough, then fold it over itself repeatedly until the garlic and salt are well incorporated throughout.
Perform Stretch-and-Folds
Cover the dough and rest 30 minutes. Then wet your hand, grab one edge of the dough, stretch it up, and fold it over to the opposite side.
Rotate the bowl and repeat 3–4 times for a full set. Do this every 30 minutes for 3–4 rounds, keeping the bowl covered between sets to prevent drying.
Bulk Ferment the Dough
Let the dough rest undisturbed after the final fold. Keep it covered at room temperature.
Allow it to bulk ferment 3–6 hours until roughly doubled in size, puffy, and jiggles when the bowl is gently shaken. Adjust time based on warmth and starter strength.
Avoid overproofing, which weakens structure and reduces oven spring.
Shape the Loaf
Lightly flour the work surface. Gently turn the dough out, trying not to deflate it completely.
Use a bench scraper and your hands to pre-shape, then rest briefly. Tighten into a round or oval by dragging it toward you to create surface tension.
Use a bit of olive oil on your hands if sticking is an issue.
Prepare Banneton and Proof
Dust your banneton or bowl generously with rice flour to prevent sticking. Place the shaped dough seam-side up in the banneton.
Cover with a clean towel or plastic wrap. Refrigerate 8–12 hours for a cold proof.
This slow rise develops flavor and strengthens structure while making scoring and handling easier before baking.
Preheat the Dutch Oven
Place the empty Dutch oven with its lid into your oven 45–60 minutes before baking. Preheat to 475°F (246°C).
Allow the pot to heat thoroughly for strong steam and oven spring. Use oven mitts whenever handling it.
A well-preheated Dutch oven mimics a professional steam oven and improves crust and rise markedly.
Load and Score the Dough
When ready to bake, carefully remove the hot Dutch oven. Invert the chilled dough onto parchment or directly into the pot, seam-side down.
Work quickly but safely. Use a sharp bread lame or razor blade to score the top with a decisive slash. This controlled cut directs expansion and prevents random bursting.
Bake with Steam, Then Color
Cover the Dutch oven with its lid and return to the oven. Bake 20 minutes at 475°F (246°C) to create steam and maximize oven spring.
Remove the lid, reduce temperature to 450°F (232°C), and continue baking 20–25 minutes. Aim for a deep golden-brown crust with crackling and a hollow sound when tapped.
Cool and Slice
Transfer the baked loaf carefully to a cooling rack using oven mitts. Let it cool completely for at least 1–2 hours before slicing.
Resist cutting early; the crumb finishes setting as it cools. Once cooled, slice with a sharp bread knife. Store at room temperature and refresh slices briefly in a hot oven or toaster.
Ingredient Swaps
- Use up to 50% whole wheat, spelt, or rye in place of bread flour; add 10–20 g extra water if the dough feels stiff.
- For a budget swap, all‑purpose flour works instead of bread flour; expect a slightly softer dough and a bit less chew.
- Garlic powder can stand in for roasted garlic in a pinch (start with 1–2 teaspoons); you may then need a splash more water since you’re losing the moisture from the roasted cloves.
You Must Know
– Flavor Boost • To intensify garlic without soggy pockets: Use 1½ heads garlic roasted, but press out and spread thin on a plate to cool and dry 10–15 minutes before adding.
This concentrates sweetness and prevents wet clumps that can create tunnels or gummy streaks inside the crumb.
Serving Tips
- Serve warm slices with salted butter and a sprinkle of flaky sea salt.
- Pair with creamy tomato soup, minestrone, or roasted vegetable soups.
- Use for open-faced sandwiches topped with goat cheese and roasted peppers.
- Toast slices and serve alongside charcuterie, olives, and hard cheeses.
- Make rustic grilled cheese with sharp cheddar and caramelized onions.
Storage & Make-Ahead
Roasted garlic sourdough keeps 2–3 days at room temperature in a paper bag or cut side down on a board.
It keeps up to 1 week refrigerated (though the crust softens).
It freezes very well, tightly wrapped, for 2–3 months.
Slice before freezing for easier, faster toasting.
Reheating
Reheat slices gently: in a 300°F (150°C) oven for 5–10 minutes.
Reheat briefly in a microwave with a damp towel.
Or warm in a covered skillet over low heat to restore softness.
Roasted Garlic in Folklore
Long before it ever perfumed a modern kitchen, garlic glowed in stories as both charm and shield.
I like to imagine those papery heads hanging over doorways, creaking softly as they guarded sleepers from things that slunk in the dark.
In old tales, warriors chewed cloves for courage, lovers used them as rough, honest perfume, and healers tucked them into pockets like tiny ivory talismans.
When I roast garlic for this bread, I feel that folklore rising with the steam.
The cloves slump into golden sweetness, yet still carry that ancient, stubborn edge.
As I fold them into the dough, it’s as if I’m stitching a quiet spell: protection, warmth, and a hint of mischief in every slice.
Final Thoughts
Give this roasted garlic sourdough a try and enjoy how the slow-roasted cloves transform a simple loaf into something special.
Once you’ve made it once, play around with add-ins like herbs, cheese, or olives to make it your own.
Frequently Asked Questions
Can I Adapt This Roasted Garlic Sourdough for a Bread Machine?
Yes, you can, but I’d use the machine only for mixing and kneading. Let the dough rise in a bowl, then bake in your oven so that crackling crust and caramelized aroma really bloom.
How Do Altitude Changes Affect Fermentation and Baking Times?
Altitude speeds everything up, so I’d tell you: expect faster fermentation, quicker proofs, and shorter bakes. Watch the dough, not the clock—stop when it’s airy, domed, and the crust smells deeply toasty, almost nutty.
Is This Recipe Suitable for a Low-Sodium or Heart-Healthy Diet?
It’s borderline for strict low-sodium goals, but you can coax it gentler on your heart. I’d halve the salt, savor the sweet garlic perfume, and enjoy thinner, mindful slices alongside plenty of vibrant vegetables.
Can I Freeze the Shaped Dough Before the Cold Proof Stage?
You can, but I wouldn’t. Freezing now can dull fermentation, weaken rise, and mute those deep aromas. I’d let it cold-proof first, bake, then freeze the finished loaf or thick, fragrant slices instead.
What’s the Best Way to Mill My Own Flour for This Bread?
You’ll get the best flour by stone‑milling whole berries at home, then sifting lightly. I’d grind just before mixing—warm flour in your palms, nutty aroma rising—so the dough drinks in every fresh, sweet grain note.
Roasted Garlic Sourdough Bread
Equipment
- 1 Kitchen scale
- 2 medium mixing bowls
- 1 Small bowl
- 1 Dough scraper
- 1 bench scraper
- 1 clean kitchen towel
- 1 9–10 inch (23–25 cm) banneton or bowl
- 1 Dutch oven with lid (4–6 quart)
- 1 sharp bread lame or razor blade
- 1 aluminum foil sheet
- 1 oven mitt pair
- 1 Cooling rack
Ingredients
- 1 head garlic whole
- 2 teaspoon olive oil
- 400 gram bread flour
- 100 gram whole wheat flour
- 100 gram active sourdough starter 100% hydration
- 350 gram water room temperature plus more as needed
- 10 gram fine sea salt
- 10 gram olive oil for dough handling optional
- 10 gram rice flour for dusting banneton
Instructions
- Preheat the oven to 400°F (200°C), slice the top off the garlic head to expose the cloves, drizzle with 2 teaspoons olive oil, wrap in foil, and roast for 30–35 minutes until soft and caramelized, then cool completely.
- In a medium bowl, mix 400 grams bread flour and 100 grams whole wheat flour until combined.
- In a separate bowl, whisk together 350 grams water and 100 grams active sourdough starter until mostly dissolved.
- Pour the wet mixture into the flour and mix with your hand or a dough scraper until no dry flour remains, then cover and rest (autolyse) for 45–60 minutes.
- Once the roasted garlic is cool, squeeze the soft cloves from the skins into a small bowl and lightly mash with a fork.
- Sprinkle 10 grams fine sea salt over the dough, add the mashed roasted garlic, and pinch and fold the dough until both are evenly incorporated.
- Perform a series of stretch-and-folds every 30 minutes for 3–4 rounds (over about 2 hours), keeping the dough covered between rounds.
- After the last fold, cover the bowl and let the dough bulk ferment at room temperature until roughly doubled and puffy, 3–6 hours depending on room temperature and starter strength.
- Lightly flour the work surface, gently turn the dough out, and use a bench scraper to shape it into a tight round or oval loaf.
- Dust the banneton or bowl generously with rice flour, then place the shaped dough seam-side up in the banneton.
- Cover the banneton with a towel or plastic and refrigerate for 8–12 hours for a cold proof.
- About 45–60 minutes before baking, place the Dutch oven with its lid into the oven and preheat to 475°F (246°C).
- When ready to bake, carefully remove the hot Dutch oven, invert the chilled dough onto a piece of parchment or directly into the pot seam-side down, and quickly score the top with a sharp lame.
- Cover the Dutch oven with the lid, return it to the oven, and bake for 20 minutes at 475°F (246°C).
- Remove the lid, reduce the oven temperature to 450°F (232°C), and bake for another 20–25 minutes until deep golden brown and crackling.
- Carefully transfer the bread to a cooling rack and let it cool completely for at least 1–2 hours before slicing.
Notes

Cynthia Weatherford is a seasoned chef and culinary enthusiast who serves as the Recipe creator of Somonday. With decades of experience in the kitchen and a passion for exploring diverse cuisines, Cynthia brings a blend of creativity and technique to every dish. Known for transforming simple ingredients into show-stopping meals, Cynthia believes that cooking is an art form anyone can master. Dedicated to inspiring home cooks, Cynthia shares approachable recipes, pro tips, and culinary wisdom to make every meal memorable.