There’s something about the nutty scent of sourdough mingling with fruity olive oil and piney rosemary that makes the whole kitchen feel like a tiny bakery.
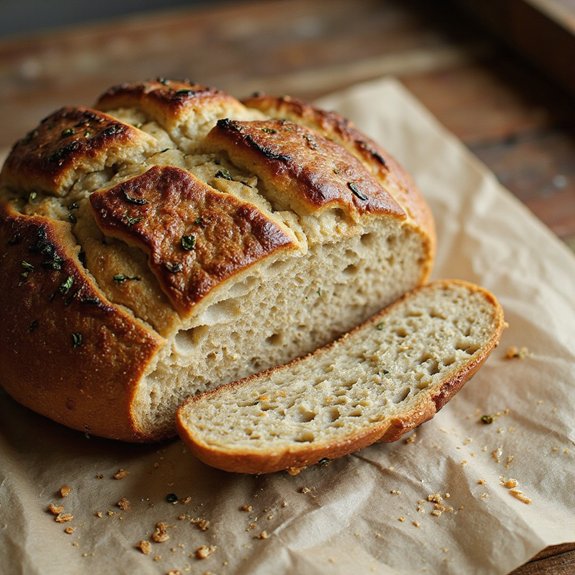
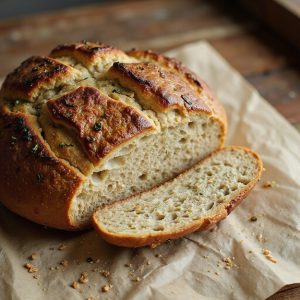
Picture a burnished, golden loaf with a crackling crust and a tender, airy crumb, still warm enough that the butter melts the second it touches the slice.
This is a cozy, artisan-style bread—slow-fermented for flavor, but surprisingly hands-off—perfect for weekend bakers, bread-loving families, and anyone ready to step beyond basic loaves.
I leaned on this rosemary olive oil sourdough one winter evening when friends dropped by unexpectedly.
A pot of soup was simmering, but it was this fragrant loaf, torn and passed around the table, that turned a simple meal into something special.
It shines at Sunday suppers, relaxed gatherings, and as make-ahead bread for easy lunches all week.
Ready to bring this loaf to life?
Why You’ll Love It
- Delivers bold, fragrant flavor from fresh rosemary and fruity olive oil
- Creates a chewy, open crumb with a beautifully crackling golden crust
- Fits easily into your schedule with flexible room-temp or cold proofing
- Pairs effortlessly with soups, pastas, cheeses, or simple olive oil dips
- Stays fresh for days and freezes well for future meals
Ingredients
- 400 g bread flour — strong white bread flour for good gluten structure
- 50 g whole wheat flour — adds nutty flavor and extra nutrients
- 350 g water — at room temperature for steady fermentation
- 100 g active sourdough starter — 100% hydration, recently fed and bubbly
- 10 g fine sea salt — dissolves evenly and seasons the crumb
- 25 g extra virgin olive oil — fruity, good-quality oil for flavor and tenderness
- 8 g fresh rosemary leaves, finely chopped — strip from stems and mince
- 5 g fresh rosemary sprigs — whole, optional for aromatic topping
- Extra olive oil — for lightly greasing the bowl during fermentation
Step-by-Step Method
Mix the Flours
Combine bread flour and whole wheat flour in a large bowl. Whisk until evenly blended with no streaks. This guarantees the whole wheat is dispersed, giving an even texture and flavor.
Keep the bowl wide enough for easy mixing and folds later, since this will be your main fermentation container.
Hydrate and Autolyse
Pour in the room-temperature water. Mix with your hand or a dough scraper until no dry bits remain. The dough will be shaggy and sticky.
Cover the bowl and let it rest for 30–45 minutes. This autolyse step hydrates the flour, begins gluten development, and improves flavor and extensibility.
Add Starter, Salt, and Oil
Add the active sourdough starter, fine sea salt, and olive oil to the hydrated dough. Squeeze and fold the mixture with your hand until the starter and oil are fully incorporated.
Continue until the dough looks smoother and more cohesive. This step evenly distributes fermentation power, seasoning, and fat throughout the dough.
Rest Before Folds
Cover the bowl loosely with a towel or plastic wrap. Let the dough rest for 30 minutes at room temperature.
This brief pause allows gluten to relax after mixing and gives the starter time to begin working. You’ll notice the dough becoming slightly more elastic and easier to stretch during the upcoming folds.
Perform First Stretch-and-Folds
Uncover the dough and perform a set of stretch-and-folds. With damp hands, lift one side of the dough, stretch it upward, and fold it over the center.
Rotate the bowl and repeat 4–6 times around. Cover again. This strengthens the gluten network without kneading and helps build structure for a well-risen loaf.
Repeat Folds and Add Rosemary
Every 30 minutes for the next 1½ hours, repeat the stretch-and-fold process for a total of 3–4 sets.
During the second set, sprinkle the finely chopped rosemary evenly over the dough. Gently fold until the herbs are distributed. Avoid tearing the dough. These folds continue strengthening while the rosemary infuses its aroma.
Bulk Ferment Until Doubled
After the final fold, cover the bowl and let the dough bulk ferment at room temperature. Wait until it has roughly doubled in size, looks bubbly, and has a slightly domed surface.
This usually takes 4–6 hours, depending on temperature. Rely on visual cues and a lighter, airy feel rather than strictly following the clock.
Shape the Dough
Lightly flour your work surface. Gently turn the dough out without deflating it sharply. Fold the edges into the center, then use your hands or a scraper to tighten the surface, forming a round or oval.
Aim for good surface tension without tearing. This shaping step organizes gluten and prepares the dough for final proofing.
Prepare Banneton and Proof
Lightly flour a banneton, or line a medium bowl with a floured kitchen towel. Place the shaped dough seam-side up into it. Cover loosely.
Proof at room temperature for 1–2 hours, or refrigerate for 8–12 hours for a cold retard. Cold proofing improves flavor, makes scoring easier, and can fit better into your schedule.
Preheat the Dutch Oven
About 45 minutes before you plan to bake, place the Dutch oven with its lid into your oven. Preheat to 475°F (245°C).
Allow the Dutch oven to heat thoroughly. This preheating step creates a hot, steamy environment that encourages strong oven spring and helps develop a crisp, beautifully colored crust.
Invert and Prepare for Baking
Cut a piece of parchment paper large enough to support the loaf. Gently invert the proofed dough onto the parchment so it’s seam-side down.
Lightly reshape if needed, preserving its airiness. This step transfers the dough from the banneton while maintaining structure, making it easy to lift into the hot Dutch oven safely.
Score and Add Rosemary Sprigs
Use a sharp lame or serrated knife to score the top of the dough with a decisive slash, about ¼–½ inch deep. This scoring guides expansion during baking and prevents random ruptures.
If desired, press a few whole rosemary sprigs gently onto the surface. They add aroma and an attractive, rustic appearance.
Load and Steam-Bake
Carefully remove the preheated Dutch oven from the oven and set it on a heatproof surface. Using the parchment as a sling, lower the dough inside.
Cover immediately with the lid and return it to the oven. Bake covered at 475°F (245°C) for 20 minutes. This covered phase traps steam and maximizes oven spring.
Finish Baking Uncovered
After 20 minutes, remove the lid and lower the oven temperature to 450°F (230°C). Continue baking uncovered for another 18–22 minutes.
Watch for a deep golden brown crust and a hollow sound when tapped on the bottom. This uncovered stage sets the crust, deepens color, and strengthens flavor and texture.
Cool Completely Before Slicing
Carefully transfer the baked loaf to a wire cooling rack. Let it cool completely for at least 1 hour before slicing.
This resting period allows the crumb to set and moisture to redistribute, preventing a gummy interior. As it cools, the rosemary aroma develops fully, giving a more pronounced, balanced flavor in every slice.
Ingredient Swaps
- Use up to 50 g of the bread flour as all-purpose if needed; avoid replacing much more or the loaf may spread.
- Substitute fresh rosemary with 2–3 g (1–1½ tsp) dried rosemary; crush it slightly to release flavor.
- For a richer flavor, swap some or all of the olive oil with another neutral or flavored oil, but avoid butter for the main fat as it can tighten the crumb.
You Must Know
- Troubleshoot • If your loaf spreads out instead of rising tall: Next time shorten bulk fermentation slightly (stop when the dough is ~60–80% bigger, jiggly, with scattered bubbles, not fully doubled) and tighten your shaping so the surface feels taut. Overproofed or loosely shaped dough can’t hold height.
- Avoid • If the crust is getting too dark before time is up: Tent the top with a loose sheet of foil and finish the last 5–10 minutes that way. This shields the rosemary and olive-oil-rich crust from scorching while the interior finishes.
- Flavor Boost • For a stronger rosemary-olive profile: Infuse the olive oil in advance by warming it gently with the chopped rosemary to just warm to the touch (no sizzling), then cooling completely before adding. This pulls more aroma into the fat, so it carries through the whole crumb.
- Scale • When doubling or halving the recipe: Change all ingredients by the same factor, but keep an eye on fermentation and proofing by look, not clock—at a similar room temperature, dough should still become bubbly, domed, and airy to the touch, even if the timing shifts by ±1–2 hours.
Serving Tips
- Serve warm slices with a small dish of extra virgin olive oil and sea salt.
- Pair with creamy soups like tomato basil, potato leek, or roasted garlic.
- Use for open-faced sandwiches topped with soft goat cheese and roasted vegetables.
- Toast slices and serve alongside a charcuterie board with olives and aged cheeses.
- Make rustic bruschetta with chopped tomatoes, basil, and a drizzle of balsamic.
Storage & Make-Ahead
This bread keeps well in the fridge for up to 4–5 days, tightly wrapped to prevent drying out.
For make-ahead, bake fully, cool, then freeze whole or sliced (separated with parchment) for up to 2 months.
Reheat from frozen in a 350°F (175°C) oven until warmed and crisp.
Reheating
For best texture, reheat slices briefly.
10–15 seconds in the microwave, 5–8 minutes in a 325°F (160°C) oven, or on a covered skillet over low heat until just warmed.
Rosemary Bread in Europe
Although rosemary sourdough feels right at home on a modern table, its roots in Europe stretch back through sun‑baked hillsides and stone ovens where bakers tucked piney sprigs into their dough.
When I think of it, I picture Mediterranean villages at dusk, the air salted by the sea and perfumed with crushed rosemary underfoot.
Across Italy and southern France, olive oil and rosemary long shared the same terraces, so it’s no wonder they met in bread.
Italian focaccia scented with rosmarino, Provençal loaves studded with herbs de Provence—these are close cousins to the loaf we’re making.
I love how every slice seems to carry that landscape: cracked earth, silvery olive leaves, warm stone, and a slow, fragrant bake.
Final Thoughts
Give this rosemary olive oil sourdough a try and enjoy the incredible aroma that fills your kitchen.
Once you’ve made it once, don’t hesitate to tweak the herbs, flour blend, or fermentation time to make the loaf completely your own.
Frequently Asked Questions
Can I Make This Rosemary Olive Oil Sourdough Without a Dutch Oven?
Yes, you can. I’d preheat a baking stone or heavy sheet, slide the dough on parchment, and add a pan of steaming water—watch the crust blister, hear it crackle, and smell rosemary bloom.
How Do Altitude and Climate Affect Fermentation and Baking Times?
Altitude speeds fermentation and baking, while dry or cool climates slow everything down. I watch dough, not clocks—seeking a billowy, softly domed rise, airy feel, and fragrant warmth before I ever think about baking.
Can I Freeze the Shaped Dough Instead of the Baked Loaf?
You can, but I wouldn’t. Freezing shaped dough often dulls oven spring and rosemary’s perfume. I’d bake it, cool until the crust whispers when pressed, then freeze slices for quick, fragrant toasting later.
How Can I Turn Leftover Rosemary Sourdough Into Breadcrumbs or Croutons?
You can, and I do it all the time: I cube or tear the bread, toss it with olive oil, salt, maybe garlic, then slowly toast until crisp—fragrant, crackling croutons or blitzed golden breadcrumbs.
Rosemary Olive Oil Sourdough Bread
Equipment
- 1 large mixing bowl
- 1 digital kitchen scale
- 1 Dough scraper
- 1 kitchen towel or plastic wrap
- 1 banneton or medium bowl
- 1 Dutch oven with lid (4–6 quart)
- 1 parchment paper sheet
- 1 sharp lame or serrated knife
- 1 wire cooling rack
Ingredients
- 400 gram bread flour
- 50 gram whole wheat flour
- 350 gram water room temperature
- 100 gram active sourdough starter 100% hydration recently fed
- 10 gram fine sea salt
- 25 gram extra virgin olive oil plus extra for greasing
- 8 gram fresh rosemary leaves finely chopped
- 5 gram fresh rosemary leaves whole sprigs for topping optional
Instructions
- In a large mixing bowl, whisk together the bread flour and whole wheat flour until well combined.
- Pour in the water and mix with your hand or a dough scraper until no dry flour remains, then cover and rest for 30–45 minutes (autolyse).
- Add the active sourdough starter, sea salt, and olive oil to the dough and squeeze and fold until fully incorporated and smooth.
- Cover the bowl and let the dough rest for 30 minutes at room temperature.
- After 30 minutes, perform a set of stretch-and-folds by lifting and folding each side of the dough toward the center 4–6 times.
- Repeat the stretch-and-folds every 30 minutes for a total of 3–4 sets during the first 2 hours of bulk fermentation.
- During the second set of folds, sprinkle in the chopped rosemary and gently fold until evenly distributed.
- After the final fold, cover the bowl and let the dough rise at room temperature until roughly doubled in size, bubbly, and slightly domed, about 4–6 hours depending on temperature.
- Lightly flour your work surface, gently turn the dough out, and shape it into a round or oval by folding the edges into the center and tightening the surface.
- Lightly flour the banneton or line a bowl with a floured kitchen towel, then place the shaped dough seam-side up into it.
- Cover the dough and proof at room temperature for 1–2 hours or refrigerate for 8–12 hours for a cold retard.
- About 45 minutes before baking, place the Dutch oven with its lid into your oven and preheat to 475°F (245°C).
- Cut a piece of parchment paper, invert the dough onto it so it is seam-side down, and gently reshape if needed.
- Score the top of the dough with a lame or sharp knife, making a 1/4–1/2 inch deep slash, and optionally press a few rosemary sprigs on top.
- Carefully remove the hot Dutch oven from the oven, lift the dough using the parchment, and place it inside, then cover with the lid.
- Bake covered for 20 minutes at 475°F (245°C).
- Remove the lid, lower the oven temperature to 450°F (230°C), and bake for another 18–22 minutes until the crust is deep golden brown.
- Carefully transfer the bread to a wire rack and let it cool completely for at least 1 hour before slicing.
Notes

Cynthia Weatherford is a seasoned chef and culinary enthusiast who serves as the Recipe creator of Somonday. With decades of experience in the kitchen and a passion for exploring diverse cuisines, Cynthia brings a blend of creativity and technique to every dish. Known for transforming simple ingredients into show-stopping meals, Cynthia believes that cooking is an art form anyone can master. Dedicated to inspiring home cooks, Cynthia shares approachable recipes, pro tips, and culinary wisdom to make every meal memorable.