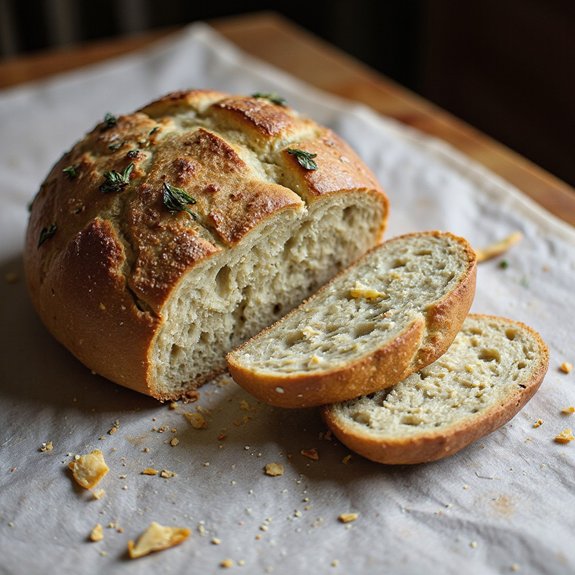
There’s something about the golden crackle of a fresh sourdough loaf, studded with rosemary leaves and bubbling pockets of melted Parmesan, that instantly makes a kitchen feel like home.
This Rosemary Parmesan Sourdough is a cozy, savory loaf—perfect alongside a hearty stew or simple salad—and it’s mostly hands-off time while the dough slowly works its magic.
It suits weekend bakers, beginners keen to stretch their sourdough skills, and anyone who loves having a special loaf ready for easy entertaining or comforting Sunday suppers.
I remember one chilly evening when friends dropped by unexpectedly; I pulled this bread from the oven, the cheese still sizzling, the rosemary scent drifting through the house.
We tore off pieces, dipped them in olive oil, and suddenly it felt like we’d planned the whole night.
This loaf shines for gatherings, slow weekends, or when you just need something warm and grounding. Ready to bring this bread to life?
Why You’ll Love It
- Delivers bold, savory flavor from fresh rosemary and nutty Parmesan cheese
- Creates a crisp, blistered crust with a soft, chewy interior crumb
- Elevates simple meals, perfect for soups, salads, and hearty sandwiches
- Ferments slowly for better digestibility and classic sourdough tanginess
- Freezes beautifully when sliced, ideal for make-ahead meal planning
Ingredients
- 100 g active sourdough starter — 100% hydration, recently fed and bubbly
- 350 g water — room temperature for easier mixing
- 450 g bread flour — high-protein for good structure
- 50 g whole wheat flour — adds flavor and nutrition
- 10 g fine sea salt — enhances flavor and gluten strength
- 2 tbsp olive oil — adds tenderness and richness
- 2 tbsp fresh rosemary, finely chopped — use pungent, fresh sprigs
- 80 g Parmesan cheese, finely grated — use real Parmigiano Reggiano if possible
- 10 g Parmesan cheese, shaved — for topping, optional but flavorful
- 1 tbsp cornmeal or flour — for dusting the basket to prevent sticking
Step-by-Step Method
Mix the Starter and Water
Whisk the active sourdough starter with room-temperature water in a large bowl.
Dissolve most of the starter so the mixture looks milky and slightly frothy. This guarantees even distribution of yeast and bacteria.
Scrape down the sides of the bowl so everything is incorporated before adding any flour.
Combine Flours into a Shaggy Dough
Add the bread flour and whole wheat flour directly into the starter mixture.
Mix with your hand or a dough scraper until no dry bits of flour remain. Aim for a rough, shaggy mass, not smooth dough.
Cover the bowl to prevent drying and prepare for the autolyse rest.
Rest the Dough for Autolyse
Cover the bowl with a towel or reusable cover and let the dough rest at room temperature for 30–45 minutes.
Allow the flour to hydrate fully. During this time gluten begins to develop naturally.
Expect the dough to feel softer and more cohesive after resting, making later mixing easier.
Incorporate Salt and Olive Oil
Sprinkle fine sea salt evenly over the dough, then drizzle in the olive oil.
Use your fingers to pinch and squeeze the dough, folding it over itself repeatedly.
Continue until the salt and oil are fully absorbed. The dough should feel slightly smoother and more elastic when you finish.
Fold in Rosemary and Parmesan
Scatter the chopped fresh rosemary and finely grated Parmesan over the dough.
Gently fold the dough several times, turning and tucking edges toward the center.
Distribute herbs and cheese as evenly as possible. Ensure there are no large clumps of cheese, which can create dense or soggy spots.
Begin Bulk Fermentation
Cover the bowl and let the dough ferment at room temperature for 3–4 hours.
Adjust time based on your kitchen’s warmth. Watch for gentle puffing and small bubbles forming along the sides.
Avoid overproofing; you’re aiming for about a 50% increase in volume by the end of this stage.
Perform Stretch-and-Fold Sets
During the first 1.5–2 hours, perform 3–4 sets of stretch-and-folds every 30 minutes.
With wet hands, grab one side of the dough, stretch it up, then fold it over to the center.
Rotate the bowl and repeat on all sides. Strengthen the dough gently without tearing it, then re-cover after each set.
Let Dough Rise Undisturbed
After the final stretch-and-fold set, leave the dough undisturbed for the remainder of bulk fermentation.
Watch for increased volume, a smoother surface, and bubbles at the edges.
The dough should feel airy yet still cohesive.
Move on to shaping once it has risen about 50% and feels light.
Pre-Shape and Rest the Dough
Lightly flour your work surface, then gently turn the dough out of the bowl.
Avoid deflating it aggressively.
Tuck the edges toward the center to form a loose round.
Let the dough rest uncovered for 10–15 minutes.
This bench rest relaxes gluten and makes final shaping easier.
Shape into a Tight Loaf
Shape the dough into a tight round or oval loaf. Fold the edges toward the center, then flip it seam-side down.
Use the counter’s friction to gently drag and tighten the surface, rotating as needed.
Aim for a smooth, taut exterior that will hold its shape during proofing and baking.
Prepare the Proofing Basket
Generously dust your proofing basket or a medium bowl lined with a clean towel using flour or cornmeal.
Guarantee the sides are well coated to prevent sticking. Place the shaped dough seam-side up into the basket.
This orientation helps the seam naturally open or support your scoring later.
Proof at Room Temperature or Overnight
Cover the basket and proof at room temperature for 1–2 hours, or refrigerate for 8–12 hours for an overnight cold proof.
Choose the fridge for better flavor and easier handling.
The dough should look slightly puffed and spring back slowly when gently pressed with a fingertip.
Preheat the Dutch Oven
About 45 minutes before baking, place the empty Dutch oven with its lid into your oven.
Preheat to 475°F (245°C). Allow the pot to heat thoroughly.
The intensely hot surface and enclosed environment help create steam, producing excellent oven spring and a blistered, crisp sourdough crust.
Transfer Dough to the Hot Pot
Carefully remove the hot Dutch oven from the oven and set it on a heat-safe surface.
Gently invert the proofed dough onto parchment or directly into the pot so it’s seam-side down.
Work quickly but cautiously.
Center the loaf to encourage even rising and prevent sticking to the sides.
Score and Top with Parmesan
Use a sharp knife or lame to score the top of the loaf with a deep slash or pattern.
This controls expansion and prevents random tearing. If desired, sprinkle shaved Parmesan over the surface.
The cheese will brown and crisp during baking, adding extra flavor and texture.
Bake with Lid On, Then Reduce Heat
Cover the Dutch oven with its lid and bake at 475°F (245°C) for 20 minutes.
Trap steam inside to help the loaf expand fully.
After 20 minutes, remove the lid, lower the oven temperature to 450°F (230°C), and continue baking 15–20 minutes until the crust is deep golden brown.
Cool Completely Before Slicing
Carefully lift the bread from the pot and place it on a wire cooling rack.
Let it cool for at least 1 hour before slicing. Allow steam to escape fully to avoid a gummy crumb.
Once cooled, slice and serve, or store and freeze as desired for later use.
Ingredient Swaps
- No sourdough starter? Use 2 tsp instant yeast plus 280 g water instead of the starter and water, and shorten bulk fermentation to 1–2 hours total.
- Flour swaps: Replace whole wheat with spelt or more bread flour; you can also use up to 30–40% rye, but expect a denser loaf.
- Cheese options: Substitute Parmesan with Pecorino Romano, Grana Padano, or a hard aged cheddar; for dairy-free, omit cheese and increase rosemary to 3 tbsp or add 1–2 tbsp nutritional yeast.
- Herb swaps: Use fresh thyme, oregano, or sage instead of rosemary; if using dried herbs, use about 1/3 the amount.
- Fat: Replace olive oil with any neutral oil or melted butter; for oil-free, omit it (crumb will be slightly less tender).
You Must Know
– Scale • For two loaves (great for freezing), multiply every ingredient by 2 and split the dough into two ~500 g pieces just before shaping; smaller loaves typically finish 3–5 minutes faster in the Dutch oven, so start checking earlier.
Serving Tips
- Serve warm slices with soft butter or garlic herb butter for dipping.
- Pair with tomato basil soup or creamy potato leek soup for a cozy meal.
- Use for grilled cheese with extra Parmesan and mozzarella, pressed until crisp and melty.
- Toast and top with ricotta, honey, and cracked pepper for a sweet-savory breakfast.
- Slice thin for crostini; top with roasted vegetables or tapenade as appetizers.
Storage & Make-Ahead
This bread keeps in the fridge, well-wrapped, for up to 4–5 days, though the crust softens.
For make-ahead, a cold overnight proof (8–12 hours) fits schedules well.
The baked, fully cooled loaf or sliced pieces freeze beautifully for 2–3 months; wrap tightly and thaw at room temperature.
Reheating
Reheat slices gently in a low oven (300°F/150°C) for 8–10 minutes, or briefly in a covered skillet.
Use the microwave sparingly, wrapped in a towel, to avoid toughening.
Rosemary Bread in Traditions
As the warm slices come back to life in the oven and perfume your kitchen again, they echo a much older story than a simple reheated snack.
Rosemary’s piney breath has wandered through so many kitchens before ours.
I think of Italian tables where rosemary bread arrives before words, torn and shared, olive oil pooling in little dishes.
In parts of Europe, sprigs tucked into loaves once whispered of remembrance, fidelity, and protection.
When I press rosemary into dough, I’m borrowing that quiet symbolism.
The Parmesan crackles on the crust, but it’s the herb that carries memory—of Sunday roasts, hillside walks, a grandmother’s garden.
Each slice feels like an invitation to slow down, break bread, and honor small, everyday rituals.
Final Thoughts
Give this Rosemary Parmesan Sourdough Bread a try and enjoy the incredible aroma it brings to your kitchen.
Feel free to tweak the herbs, cheeses, or flours to make the loaf your own signature bake.
Frequently Asked Questions
How Can I Troubleshoot a Dense or Under-Risen Rosemary Parmesan Sourdough Loaf?
I’d fix your dense loaf by feeding starter earlier, extending warm bulk rise, and gently shaping. Feel the dough: airy, jiggly, well-bubbled. Inhale rosemary, nutty cheese; let it cool completely before slicing that crackling, golden crust.
What Are Common Mistakes Beginners Make With Cheese-Filled Sourdough?
You often add cheese too early, too wet, or in big clumps. I’ll tell you: tuck drier, finely grated cheese in during later folds, keep dough cool, and watch fermentation so your loaf rises gently, like warming hearth bread.
How Do Altitude or Climate Changes Affect Fermentation and Baking Times?
They change everything: in warm, humid kitchens, I watch dough rise fast and airy; in cool, high-altitude rooms, I wait longer, lower oven temps slightly, and lengthen bakes until crusts sing and interiors set.
Can I Convert This Sourdough Recipe to a Commercial Yeast Version?
Yes, you can. I’d swap in instant yeast, shorten the rises, and still coax a tender crumb and crackling crust, so your kitchen fills with warm, nutty aromas and that familiar, oven-door fog.
How Do I Scale This Recipe for Mini Loaves or Large Boules?
You’ll scale everything by weight: halve for mini loaves, double for big boules. I watch dough temperature and rise, not the clock—aim for similar volume and jiggle, like a pillow ready for baking.
Rosemary Parmesan Sourdough Bread
Equipment
- 1 large mixing bowl
- 1 Medium bowl
- 1 digital kitchen scale (optional but recommended)
- 1 Measuring cups and spoons set
- 1 dough scraper or rubber spatula
- 1 proofing basket or medium bowl lined with a clean towel
- 1 sharp knife or lame (scoring blade)
- 1 Dutch oven with lid (4–6 quart)
- 1 wire cooling rack
Ingredients
- 100 gram active sourdough starter 100% hydration
- 350 gram water room temperature
- 450 gram bread flour
- 50 gram whole wheat flour
- 10 gram fine sea salt
- 2 tablespoon olive oil
- 2 tablespoon fresh rosemary finely chopped
- 80 gram Parmesan cheese finely grated
- 10 gram Parmesan cheese optional; shaved; for topping
- 1 tablespoon cornmeal or flour for dusting
Instructions
- In a large mixing bowl, whisk together the active sourdough starter and water until mostly dissolved.
- Add the bread flour and whole wheat flour to the bowl and mix with a dough scraper or your hand until no dry flour remains and a shaggy dough forms.
- Cover the bowl and let the dough rest (autolyse) at room temperature for 30–45 minutes.
- Sprinkle the salt and olive oil over the dough and gently pinch and fold the dough until both are fully incorporated.
- Add the chopped rosemary and grated Parmesan to the dough and fold several times to distribute them evenly.
- Begin bulk fermentation by covering the bowl and letting the dough rest at room temperature for 3–4 hours, depending on warmth.
- During the first 1.5–2 hours of bulk fermentation, perform 3–4 sets of stretch-and-folds every 30 minutes, lifting and folding each side of the dough toward the center.
- After the final stretch-and-fold, let the dough rest undisturbed until it has risen by about 50% and shows bubbles along the sides.
- Lightly flour your work surface, gently turn the dough out, and let it rest for 10–15 minutes uncovered.
- Shape the dough into a tight round or oval loaf by folding the edges toward the center and then tightening the surface against the counter.
- Generously dust the proofing basket or towel-lined bowl with flour or cornmeal and place the shaped dough seam-side up inside.
- Cover the dough and proof at room temperature for 1–2 hours, or refrigerate for 8–12 hours for a slow overnight proof.
- About 45 minutes before baking, place the Dutch oven with its lid into the oven and preheat to 475°F (245°C).
- Carefully remove the hot Dutch oven from the oven, gently invert the dough onto a piece of parchment or directly into the pot so it is seam-side down.
- Score the top of the loaf with a sharp knife or lame and, if using, sprinkle the shaved Parmesan over the top.
- Cover the Dutch oven with the lid and bake for 20 minutes at 475°F (245°C).
- Remove the lid, reduce the oven temperature to 450°F (230°C), and continue baking for 15–20 minutes until the crust is deep golden brown.
- Carefully transfer the bread to a wire rack and let it cool completely for at least 1 hour before slicing.
Notes

Cynthia Weatherford is a seasoned chef and culinary enthusiast who serves as the Recipe creator of Somonday. With decades of experience in the kitchen and a passion for exploring diverse cuisines, Cynthia brings a blend of creativity and technique to every dish. Known for transforming simple ingredients into show-stopping meals, Cynthia believes that cooking is an art form anyone can master. Dedicated to inspiring home cooks, Cynthia shares approachable recipes, pro tips, and culinary wisdom to make every meal memorable.


