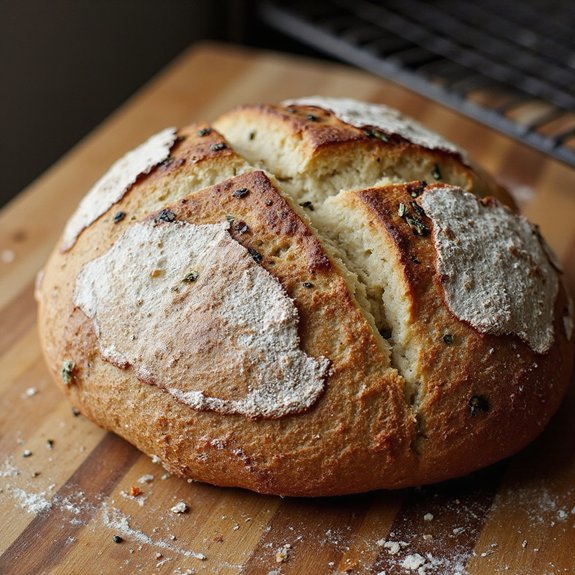
There’s something about pulling a crackling loaf of rosemary sourdough from the oven that makes the whole kitchen feel like home.
The crust is deep golden and blistered, the inside tender and airy, and the scent—warm wheat, tangy sourdough, and piney rosemary—wraps around you like a cozy blanket.
This is the kind of bread that turns a simple meal into an occasion, whether it’s a hearty stew, a humble salad, or a quick weeknight pasta.
It’s perfect for home bakers who love slow, hands-on projects, meal-preppers who enjoy baking once and feasting all week, and comfort seekers who crave real, honest food.
I still remember a chilly Sunday when a loaf of this rosemary sourdough turned leftover soup into the kind of dinner my family talked about for days.
It shines at Sunday suppers, casual gatherings, and quiet evenings in. Ready to bring this loaf to life?
Why You’ll Love It
- Delivers bold flavor from fresh rosemary and naturally fermented sourdough
- Creates a chewy, open crumb with a crisp, blistered crust
- Relies on simple ingredients you likely already have at home
- Fits into your schedule with flexible overnight cold proofing
- Pairs effortlessly with soups, pastas, cheeses, and savory breakfasts
Ingredients
- 100 g active sourdough starter, 100% hydration — use recently peaked and bubbly
- 350 g water, room temperature — filtered if your tap is heavily chlorinated
- 450 g bread flour — higher protein helps structure and oven spring
- 50 g whole wheat flour — adds flavor and a slightly heartier crumb
- 10 g fine sea salt — avoid iodized for cleaner fermentation
- 15 g fresh rosemary, finely chopped — strip leaves from tough stems first
- 10 g olive oil — a mild, fruity oil complements the rosemary
- 10 g cornmeal or rice flour — for dusting the basket to prevent sticking
Step-by-Step Method
Mix the Starter and Water
Whisk the active sourdough starter with room-temperature water in a mixing bowl.
Stir until the starter is mostly dissolved and the liquid looks milky and uniform.
This guarantees even fermentation throughout the dough. Scrape down the sides of the bowl as needed so all starter is distributed before adding any flour.
Hydrate the Flours
Add the bread flour and whole wheat flour to the bowl. Mix with your hand or a dough whisk until no dry flour remains.
Aim for a rough, shaggy mass rather than a smooth dough. Scrape the bowl to incorporate any loose bits. Cover the bowl to prevent drying while it rests.
Autolyse the Dough
Cover the bowl and let the dough rest at room temperature for 45–60 minutes. Don’t add salt or oil yet.
This rest allows the flour to hydrate fully and gluten to begin forming naturally.
The dough will become more extensible and easier to work with afterward, reducing kneading effort and improving overall texture.
Add Salt and Olive Oil
Sprinkle the fine sea salt evenly over the dough, then drizzle the olive oil on top.
Pinch the dough repeatedly between your fingers to break it up and distribute the salt and oil.
Fold the dough over itself several times. Continue until the dough comes back together and no slick oil patches remain.
Fold in the Rosemary
Scatter the finely chopped fresh rosemary over the dough’s surface. Gently stretch and fold the dough from each side toward the center.
Rotate the bowl as you go to distribute the herb evenly. Avoid tearing the dough.
Stop when the rosemary appears well spread and no large clumps remain concentrated in one area.
Begin Bulk Fermentation
Cover the bowl and leave the dough to bulk ferment at room temperature for 3–4 hours. During this time, the dough should become puffier and more airy.
Keep it away from drafts or extreme temperatures. Adjust timing slightly based on how warm your kitchen is, aiming for noticeable but not excessive rise.
Perform Stretch and Folds
During the first 2 hours of bulk fermentation, perform 3–4 sets of stretch-and-folds every 30 minutes.
To do this, wet your hand, grab one edge of the dough, stretch it upward, then fold it over the center.
Repeat around the bowl. These gentle folds strengthen gluten without intensive kneading.
Rest the Dough Before Shaping
Once bulk fermentation is complete, lightly flour your work surface. Gently turn the dough out of the bowl, trying not to deflate it.
Let it rest uncovered for 15–20 minutes. This short bench rest relaxes the gluten, making final shaping easier and helping you achieve better structure and surface tension.
Shape the Loaf Tightly
Use your hands and a bench scraper to shape the dough into a tight round or oval. Fold the edges toward the center, then flip it seam side down.
Drag the dough gently toward you on the counter to create surface tension.
Rotate and repeat until the exterior feels taut but not torn or sticky.
Prepare the Proofing Basket
Generously dust your proofing basket or a medium bowl lined with a floured towel using cornmeal or rice flour.
Guarantee the bottom and sides are well coated to prevent sticking.
Place the shaped dough seam side up into the basket. Adjust its shape slightly so it fits snugly and evenly against the sides.
Cold Proof the Dough
Cover the proofing basket with a towel or plastic wrap. Refrigerate the dough for 8–12 hours for a slow, cold proof.
This extended chill time deepens flavor and improves structure.
The dough will rise slowly and firm up, making it easier to score cleanly and transfer to the hot Dutch oven later.
Preheat the Dutch Oven
About 45 minutes before baking, place your Dutch oven with its lid into the oven. Preheat to 475°F (245°C).
Allow the Dutch oven to heat fully so it can create strong initial steam and oven spring.
Keep the lid on while heating, and don’t add the dough until everything is thoroughly hot.
Invert and Score the Loaf
Remove the dough from the refrigerator. Invert it carefully onto a piece of parchment or a cornmeal-dusted board, so it’s now seam side down.
Using a sharp lame or serrated knife, score the top with a deep, confident cut. This score guides expansion and helps prevent random bursting during baking.
Bake Covered for Steam
Using oven mitts, carefully transfer the scored dough into the preheated Dutch oven. Lift it by the parchment if using. Cover immediately with the hot lid to trap steam.
Bake for 20 minutes at 475°F (245°C). This covered phase encourages strong oven spring and helps the crust develop properly.
Finish Baking Uncovered
Remove the lid and reduce the oven temperature to 450°F (230°C). Continue baking the loaf uncovered for 18–22 minutes.
Watch for a deep golden-brown crust and listen for a hollow sound when tapped on the bottom.
This uncovered stage crisps the exterior and finalizes color and flavor.
Cool Completely Before Slicing
Carefully remove the loaf from the Dutch oven and place it on a cooling rack. Let it cool completely for at least 1 hour before slicing.
This rest allows the crumb to set and moisture to redistribute. Cutting too soon can result in a gummy texture, so resist the urge to slice early.
Ingredient Swaps
- Use up to 30–40 g dried rosemary instead of fresh (about 3x less by weight than fresh since it’s stronger) or swap in thyme, oregano, or a mixed Italian herb blend.
- Replace bread flour with all‑purpose in a pinch; reduce water by 10–20 g if the dough feels too loose.
- For whole‑wheat, you can use rye, spelt, or more bread flour; adjust water slightly if the dough seems dry or very sticky.
- For dairy‑free/vegan diets, this recipe is already compliant—just keep the olive oil, or omit it for an even leaner loaf.
You Must Know
– Make-Ahead – To fit this into a busy schedule, extend the cold proof up to 18 hours in the fridge; the dough should look slightly puffed with small bubbles along the surface, giving a tangier, more complex flavor without overproofing.
Serving Tips
- Serve warm slices with salted butter and a drizzle of extra-virgin olive oil.
- Pair with creamy tomato soup or butternut squash soup for a cozy meal.
- Use as the base for grilled cheese or mozzarella, tomato, and basil sandwiches.
- Toast and top with smashed avocado, lemon, and chili flakes for breakfast.
- Serve alongside roast chicken, lamb, or beef stew to soak up juices.
Storage & Make-Ahead
Rosemary sourdough keeps 3–4 days at room temperature, cut-side down on a board or in a paper bag.
For longer storage, refrigerate sliced bread up to 1 week, well wrapped.
It also freezes very well: wrap tightly and freeze up to 2–3 months; thaw at room temperature and refresh in a warm oven.
Reheating
Reheat slices gently.
In the oven at 325°F wrapped in foil for 8–10 minutes.
Briefly in the microwave with a damp towel.
Or on a covered skillet over low heat.
Rosemary Sourdough in Traditions
I reach for this loaf on days that matter—quiet Sundays, small celebrations, the first chilly night of fall.
I’ve brought it, still faintly warm, to friends who needed company more than conversation.
We broke pieces by hand, dipped them in olive oil, and let the silence soften.
When you bake this bread, you’re not just feeding people; you’re weaving them into your own, evolving tradition.
Final Thoughts
Ready to give this rosemary sourdough a try? Start with the base recipe as written, then tweak the herbs, flours, or hydration next time to make a signature loaf that’s perfectly your own.
Frequently Asked Questions
How Do I Convert This Rosemary Sourdough Recipe for a Bread Machine?
You’ll mix everything except rosemary and oil on “dough” mode, add those mid-knead, then let the machine finish fermenting. I still bake in the oven—my loaves rise higher and taste wonderfully rustic that way.
Can I Freeze the Unbaked Dough for Later Baking?
Yes, you can, but I don’t recommend it for sourdough; freezing stalls fermentation strangely. I’d bake, cool, then freeze slices instead—I’ve done that often, and the reheated bread still sings with flavor.
What Are Common Mistakes Specific to Baking Rosemary Sourdough?
You’ll most often over-ferment, add too much rosemary, or under-salt. I’ve baked loaves that tasted like pine cleaner—trust me, weigh the herb, watch dough strength, and don’t fear a slightly darker crust.
How Can I Adapt This Recipe for High-Altitude Baking?
I shorten bulk ferment, proof a bit less, and add 10–15 g extra water. I sometimes bump oven heat 10–15°F. When I lived in Denver, these tweaks turned dense, dry loaves into airy, fragrant bread.

Rosemary Sourdough Bread
Equipment
- 2 Mixing bowls
- 1 Kitchen scale
- 1 measuring spoon set
- 1 Dough scraper
- 1 bench scraper
- 1 proofing basket or 1 medium bowl lined with a floured towel
- 1 Dutch oven with lid
- 1 sharp lame or serrated knife
- 1 Cooling rack
Ingredients
- 100 gram active sourdough starter 100% hydration
- 350 gram water room temperature
- 450 gram bread flour
- 50 gram whole wheat flour
- 10 gram fine sea salt
- 15 gram fresh rosemary finely chopped
- 10 gram olive oil plus extra for greasing
- 10 gram cornmeal or rice flour for dusting
Instructions
- In a mixing bowl, whisk together the active sourdough starter and water until mostly dissolved.
- Add the bread flour and whole wheat flour to the bowl and mix until no dry flour remains and a shaggy dough forms.
- Cover the bowl and let the dough rest (autolyse) for 45–60 minutes at room temperature.
- Sprinkle the salt and olive oil over the dough and pinch and fold the dough until both are fully incorporated.
- Add the chopped rosemary and gently fold and stretch the dough until the herb is evenly distributed.
- Cover the bowl and let the dough bulk ferment for 3–4 hours at room temperature, performing 3–4 sets of stretch-and-folds every 30 minutes during the first 2 hours.
- After bulk fermentation, lightly flour your work surface, gently turn out the dough, and rest it uncovered for 15–20 minutes.
- Perform a final shape by folding the dough into a tight round or oval loaf, using a bench scraper to create surface tension.
- Generously dust a proofing basket or towel-lined bowl with cornmeal or rice flour and place the shaped dough seam side up into the basket.
- Cover the basket and refrigerate for 8–12 hours for a slow cold proof.
- About 45 minutes before baking, place a Dutch oven with its lid into your oven and preheat to 475°F (245°C).
- Remove the dough from the refrigerator, carefully invert it onto a piece of parchment or a cornmeal-dusted board so it is seam side down.
- Score the top of the loaf with a sharp lame or serrated knife to allow for controlled expansion.
- Carefully transfer the dough into the preheated Dutch oven, cover with the lid, and bake for 20 minutes.
- Remove the lid, reduce the oven temperature to 450°F (230°C), and bake for an additional 18–22 minutes until deep golden brown.
- Remove the loaf from the Dutch oven and let it cool completely on a cooling rack for at least 1 hour before slicing.
Notes

Cynthia Weatherford is a seasoned chef and culinary enthusiast who serves as the Recipe creator of Somonday. With decades of experience in the kitchen and a passion for exploring diverse cuisines, Cynthia brings a blend of creativity and technique to every dish. Known for transforming simple ingredients into show-stopping meals, Cynthia believes that cooking is an art form anyone can master. Dedicated to inspiring home cooks, Cynthia shares approachable recipes, pro tips, and culinary wisdom to make every meal memorable.