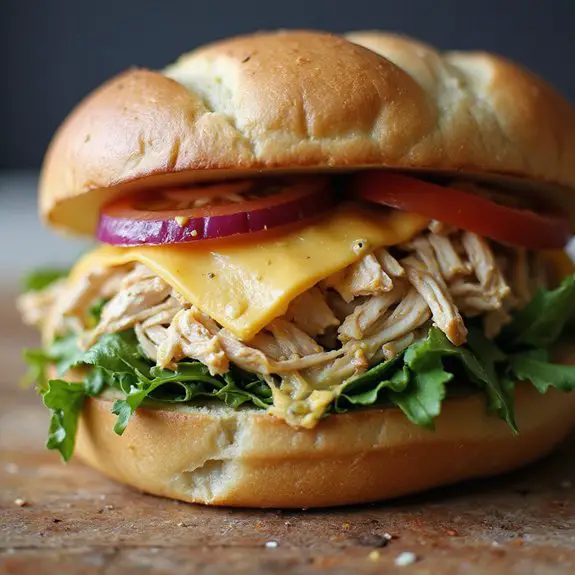
Picture a warm, golden sandwich roll embracing tender, savory rotisserie chicken mingled with a creamy, tangy sauce.
There’s something about the way the cheese melts gently over the chicken that feels like a hug in sandwich form.
This Rotisserie Chicken Sandwich is delightfully simple to make, offering coziness and indulgence with each bite.
As the ingredients meld together, they transform into a satisfying delight.
Let’s bring this comforting dish to life.
Kitchen Tools Required
- 1 Knife
- 1 Cutting board
- 1 Mixing bowl
- 1 Skillet
- 1 Spatula
- 1 Baking sheet
Ingredients
- 2 cups shredded rotisserie chicken
- 4 tablespoons mayonnaise
- 1 tablespoon Dijon mustard
- 1 teaspoon lemon juice
- 1/2 teaspoon salt
- 1/4 teaspoon black pepper
- 4 sandwich rolls
- 4 slices cheddar cheese
- 1 cup mixed greens
- 1 tomato, sliced
- 1/4 cup red onion, thinly sliced
Cook & Prep Time
To efficiently manage your time while preparing and cooking the Rotisserie Chicken Sandwich, follow this timeline:
- Reading the Recipe (5 minutes)
- Begin by thoroughly reading through the entire recipe to understand the steps and gather all necessary ingredients and equipment.
- Preparation (15 minutes)
- 0:00 – 5:00: Gather and prepare all ingredients:
- Shred 2 cups of rotisserie chicken.
- Slice the tomato and red onion.
- Measure out mayonnaise, Dijon mustard, lemon juice, salt, and black pepper.
- 5:00 – 10:00: Mix the chicken mixture:
- In a mixing bowl, combine shredded rotisserie chicken, mayonnaise, Dijon mustard, lemon juice, salt, and black pepper.
- 10:00 – 15:00: Prepare the sandwich rolls:
- Slice the sandwich rolls in half and lay them open on the cutting board.
- Place a slice of cheddar cheese on the bottom half of each roll.
- Cooking (10 minutes)
- 15:00 – 18:00: Assemble sandwiches:
- Evenly distribute the chicken mixture on top of the cheese slices.
- Add mixed greens, tomato slices, and red onion slices over the chicken.
- Close the sandwiches with the top half of the rolls.
- 18:00 – 28:00: Cook the sandwiches:
- Preheat the skillet over medium heat.
- Place sandwiches on a baking sheet and transfer them to the skillet.
- Press down slightly with a spatula and cook for about 3-5 minutes on each side until the cheese melts.
- Resting (5 minutes)
- 28:00 – 33:00: Remove sandwiches from the skillet and let them rest for 5 minutes before serving.
Adjust the timing as needed based on your pace and any additional garnishes you might want to add.
Recipe Instructions
Preheat your skillet over medium heat.
In a mixing bowl, combine shredded rotisserie chicken, mayonnaise, Dijon mustard, lemon juice, salt, and black pepper.
Slice the sandwich rolls in half and lay them open on the cutting board.
Place a slice of cheddar cheese on the bottom half of each roll.
Evenly distribute the chicken mixture on top of the cheese slices.
Add mixed greens, tomato slices, and red onion slices over the chicken.
Close the sandwiches with the top half of the rolls.
Place sandwiches on a baking sheet and transfer them to the skillet.
Press down slightly with a spatula and cook for about 3-5 minutes on each side until the cheese melts.
Remove from the skillet and let rest for 5 minutes before serving.
Serving Tips
- Potato Chips: A classic and crispy side that complements the softness of the sandwich.
- Coleslaw: Adds a revitalizing crunch and tangy flavor that pairs well with the savory chicken.
- Pickles: A tangy and crunchy addition that enhances the sandwich’s flavors.
- Fruit Salad: Offers a sweet and juicy contrast to the savory sandwich.
- Sweet Potato Fries: A slightly sweet and hearty side that balances the savory elements of the meal.
Storage
To store leftover rotisserie chicken sandwiches, wrap each sandwich individually in plastic wrap or foil.
Refrigerate for up to 2 days.
Reheat in a skillet for ideal texture.
Freezing
To freeze rotisserie chicken sandwiches, individually wrap each sandwich in plastic wrap.
Place them in airtight containers, and label with the date.
Thaw in the refrigerator before reheating.
Reheating
To reheat a rotisserie chicken sandwich, wrap it in foil and place it in a preheated oven at 350°F for 10-15 minutes.
Make certain the filling is thoroughly warmed.
Final Thoughts
Creating a rotisserie chicken sandwich is a quick and delicious way to enjoy a satisfying meal.
The combination of tender chicken, creamy mayonnaise, and tangy Dijon mustard creates a rich flavor profile.
Adding fresh mixed greens, juicy tomato slices, and crunchy red onion enhances the sandwich’s texture and taste.
For an extra kick, consider incorporating your favorite hot sauce or a sprinkle of smoked paprika.
Toasting the sandwich rolls beforehand can also add a delightful crunch.
Enjoy this American classic with friends and family, and savor each bite as the flavors meld together perfectly.
Frequently Asked Questions
Can I Use a Different Type of Cheese in This Sandwich?
Absolutely, you can swap the cheese! Try Swiss for a nutty twist or pepper jack for a spicy kick. Each cheese brings unique flavors, transforming your sandwich into an exciting and personalized culinary experience. Enjoy experimenting!
How Can I Make This Recipe Gluten-Free?
Swap regular sandwich rolls for gluten-free ones. Make certain your mayonnaise and Dijon mustard are gluten-free. You can also use lettuce leaves as a wrap instead of bread for a fresh, crisp alternative that’s naturally gluten-free.
What Can I Substitute for Mayonnaise in the Chicken Mixture?
You can swap mayonnaise with Greek yogurt for a tangy twist or use mashed avocado for a creamy, healthy alternative. Each substitute maintains flavor while adding a unique texture, perfect for your chicken mixture. Enjoy experimenting!
Is There a Vegetarian Alternative to Rotisserie Chicken for This Sandwich?
You can swap the rotisserie chicken for chickpeas or jackfruit for a vegetarian twist. Mash chickpeas or shred jackfruit, then mix with the same mayo and spices. It’ll deliver a satisfying texture and delightful flavor.
How Can I Make This Sandwich Spicier?
To spice up your creation, mix in hot sauce or finely chopped jalapeños with the chicken mixture. Consider adding a sprinkle of cayenne pepper or a dash of chili powder for an extra fiery kick. Enjoy!

Rotisserie Chicken Sandwich
Equipment
- 1 Knife
- 1 Cutting board
- 1 Mixing bowl
- 1 Skillet
- 1 Spatula
- 1 Baking sheet
Ingredients
- 2 cups shredded rotisserie chicken
- 4 tablespoons mayonnaise
- 1 tablespoon Dijon mustard
- 1 teaspoon lemon juice
- 1/2 teaspoon salt
- 1/4 teaspoon black pepper
- 4 sandwich rolls
- 4 slices cheddar cheese
- 1 cup mixed greens
- 1 tomato sliced
- 1/4 cup red onion thinly sliced
Instructions
- Preheat your skillet over medium heat.
- In a mixing bowl, combine shredded rotisserie chicken, mayonnaise, Dijon mustard, lemon juice, salt, and black pepper.
- Slice the sandwich rolls in half and lay them open on the cutting board.
- Place a slice of cheddar cheese on the bottom half of each roll.
- Evenly distribute the chicken mixture on top of the cheese slices.
- Add mixed greens, tomato slices, and red onion slices over the chicken.
- Close the sandwiches with the top half of the rolls.
- Place sandwiches on a baking sheet and transfer them to the skillet.
- Press down slightly with a spatula and cook for about 3-5 minutes on each side until the cheese melts.
- Remove from the skillet and let rest for 5 minutes before serving.
Notes

Cynthia Weatherford is a seasoned chef and culinary enthusiast who serves as the Recipe creator of Somonday. With decades of experience in the kitchen and a passion for exploring diverse cuisines, Cynthia brings a blend of creativity and technique to every dish. Known for transforming simple ingredients into show-stopping meals, Cynthia believes that cooking is an art form anyone can master. Dedicated to inspiring home cooks, Cynthia shares approachable recipes, pro tips, and culinary wisdom to make every meal memorable.