There’s something about pulling a crackling, golden loaf from the oven on the very same day you mixed the dough.
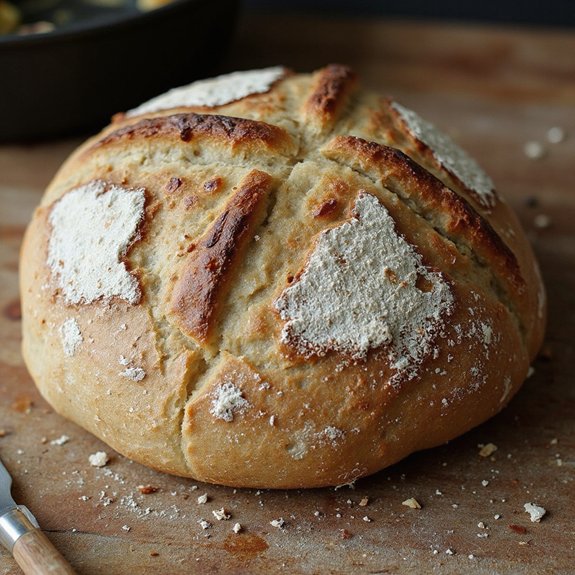
Picture a rustic round of sourdough, its blistered crust deep amber, the kitchen filled with the tangy, toasty aroma of fresh bread.
This is a cozy, everyday loaf—perfect for tearing into with soup, piling with sandwich fillings, or simply swiping through soft butter—and it’s ready in an afternoon instead of over several days.
This same day sourdough is ideal for busy weeknights, impatient beginners, and anyone who loves homemade bread but struggles with long timelines.
I still remember a chilly Sunday when friends dropped by unexpectedly; this recipe saved the day, turning a simple pot of stew into a slow, comforting meal that felt planned instead of improvised.
It shines for Sunday suppers, last-minute gatherings, or when a bread craving hits hard. Ready to bring this loaf to life?
Why You’ll Love It
- Bakes in one day, no overnight proofing or complex schedule needed
- Delivers chewy crust and soft, open crumb with classic sourdough tang
- Uses simple, accessible ingredients and basic equipment most kitchens already have
- Flexible timing so you can extend rises if your kitchen’s cool
- Perfect for beginners learning sourdough without long, multi-day commitments
Ingredients
- 100 g active sourdough starter, 100% hydration — use freshly fed starter, doubled and bubbly
- 350 g warm water — about 30°C to keep fermentation active
- 450 g bread flour — higher protein helps gluten strength
- 50 g whole wheat flour — adds flavor and a bit more nutrition
- 10 g fine sea salt — enhances flavor and dough strength
- 10 g olive oil (optional) — for a slightly softer crust and crumb
- 10 g rice flour — for dusting the banneton to prevent sticking
Step-by-Step Method
Mix Starter and Water
Whisk the active sourdough starter and warm water in a bowl until mostly dissolved.
Aim for an even, milky mixture with just a few bits of starter remaining. That helps distribute the wild yeast throughout the dough.
Use water around 30°C so fermentation starts quickly and the dough stays pleasantly warm.
Combine Flours and Form Shaggy Dough
Add the bread flour and whole wheat flour to the bowl. Mix with your hand or a dough scraper until no dry bits remain. Scrape the sides and bottom so everything hydrates evenly.
The dough will look rough and shaggy, not smooth. That’s fine at this stage; you’re just bringing everything together.
Autolyse the Dough
Cover the bowl with a clean kitchen towel. Let the dough rest at warm room temperature for 30 minutes. During this time, the flour fully hydrates and gluten begins to form on its own.
This rest improves dough strength and handling, making later folding easier and helping the bread develop better structure.
Incorporate Salt and Olive Oil
Sprinkle the fine sea salt evenly over the dough. Add the olive oil if using for a softer crust.
Use your hand to squeeze and pinch the dough, then fold it over itself repeatedly. Continue until the salt grains are no longer visible and the oil is fully absorbed, leaving the dough slightly smoother and more cohesive.
Perform First Stretch and Fold
Grip one edge of the dough, stretch it upward gently, and fold it over the center. Rotate the bowl a quarter turn and repeat.
Continue for about one minute, completing several folds around the dough. This technique develops gluten without kneading. When finished, the dough should feel a bit tighter and more elastic.
Rest and Repeat Folds
Cover the bowl and let the dough rest for 30 minutes at warm room temperature. After the rest, repeat the stretch-and-fold process.
Do this cycle of resting and folding three more times at 30-minute intervals. In total, you’ll complete four rounds of folds over about two hours, gradually strengthening and smoothing the dough.
Bulk Ferment Until Puffy
After the final set of folds, cover the dough again. Let it rise at warm room temperature for 1 to 1.5 hours.
Watch for it to become puffy and roughly doubled in volume. Look for small bubbles on the surface and a lighter, airy feel when you gently jiggle the bowl. Adjust time based on your kitchen’s warmth.
Turn Out and Pre‑Shape
Lightly flour your work surface to prevent sticking. Gently turn the dough out of the bowl, trying not to deflate it.
Use a bench scraper to tuck the edges underneath, rotating the dough as you go. Form a loose round while creating some surface tension. Keep movements gentle to preserve the gas bubbles inside.
Bench Rest the Dough
Leave the pre-shaped dough uncovered on the counter for 15–20 minutes. Allow it to relax so shaping is easier and the gluten loosens slightly.
Watch for the dough to spread just a bit and lose some tightness. This rest also lets any small tears seal up, giving you a smoother surface for the final shaping.
Shape into Final Loaf
Lightly flour the top of the dough and gently flip it over. Stretch the bottom edge up and over to the center.
Fold each side in toward the middle. Roll the dough up, tightening as you go, to form a firm boule or batard. Use your hands or a bench scraper to build surface tension without tearing the dough.
Prepare the Banneton
Mix rice flour with a little wheat flour. Generously dust your banneton or a medium bowl lined with a clean towel.
Coat all sides to prevent sticking during proofing. Rice flour is less likely to absorb moisture, which helps the dough release cleanly. Tap out any big clumps so the coating is light and even.
Proof the Shaped Dough
Place the shaped dough seam side up in the prepared banneton or bowl. Cover it loosely with a towel.
Let it proof at warm room temperature for 45–75 minutes. Check readiness by gently pressing a fingertip into the dough; it should spring back slowly, leaving a slight indentation. Avoid overproofing so the loaf still rises well in the oven.
Preheat the Dutch Oven
About 30 minutes before baking, place your Dutch oven with its lid into the oven. Preheat to 250°C (480°F).
Heating the pot thoroughly ensures strong oven spring and a crisp crust. Keep the lid on while preheating so both parts get equally hot. Use oven mitts and caution when handling the heavy, very hot pot.
Invert and Score the Dough
Cut a piece of parchment paper slightly larger than the loaf. Gently invert the banneton so the dough turns out onto the parchment, now seam side down.
Use a sharp razor or lame to score one long slash about 1 centimeter deep, or create a pattern. Scoring controls expansion and helps prevent random ruptures.
Load and Steam in Dutch Oven
Carefully remove the hot Dutch oven from the oven and take off the lid. Lift the dough using the parchment and lower it into the pot. Cover immediately with the lid to trap steam.
Return the pot to the oven and bake at 250°C (480°F) for 20 minutes. This covered phase encourages maximum oven spring and crust expansion.
Finish Baking and Cool
After 20 minutes, remove the lid and reduce the oven temperature to 230°C (450°F). Continue baking 18–22 minutes until the loaf is deep golden brown.
Remove the bread from the Dutch oven and place it on a wire rack. Let it cool completely for at least one hour before slicing, allowing the crumb to set properly.
Ingredient Swaps
- Use up to 30–40% whole wheat, spelt, or rye in place of bread flour, adding 10–20 g extra water if the dough feels stiff.
- For gluten-free needs, this specific formula won’t work; use a tested gluten-free sourdough blend and recipe instead.
- Olive oil is optional—swap with melted butter or omit entirely for a chewier, crisper crust.
- Fine sea salt can be replaced 1:1 with kosher salt by weight; avoid iodized table salt if possible for better flavor.
- If you don’t have rice flour for dusting, use a 50/50 mix of all-purpose and cornstarch or just plain all-purpose, dusting extra generously.
You Must Know
– Flavor Boost • For a tangier, more complex taste same day – After the first 2 hours of folds, chill the dough in the fridge for 45–90 minutes, then continue with shaping and proofing.
The short cold period slows rise slightly but increases acid development and aroma.
Serving Tips
- Serve warm slices with salted butter, honey, or your favorite jam.
- Pair with hearty soups, stews, or creamy tomato basil soup for dipping.
- Use for gourmet grilled cheese with sharp cheddar, gruyère, or brie.
- Make bruschetta: toasted slices topped with tomatoes, basil, garlic, and olive oil.
- Build open-faced sandwiches with avocado, soft-boiled eggs, and flaky sea salt.
Storage & Make-Ahead
Same-day sourdough stays fresh at room temperature for 2–3 days in a paper or bread bag.
Then up to 5–6 days in the fridge, well wrapped.
For make-ahead, slice and freeze the cooled loaf up to 2 months.
Toast straight from frozen for best texture.
Reheating
Reheat slices gently: in a 150°C (300°F) oven for 8–10 minutes.
In a covered skillet over low heat.
Or briefly in the microwave with a damp towel to prevent drying.
Sourdough in San Francisco
Fog and wild yeast give San Francisco sourdough its quiet magic, and they’re the same forces you’re tapping into with your own starter at home.
When I walk near the Bay, the air feels slightly salted, cool against my cheeks, and I always imagine invisible microbes swirling, ready to colonize a bowl of flour and water.
San Francisco loaves crackle when you tear them, their blistered crusts smelling faintly of toasted grain and sea air.
Inside, the crumb is tender, almost custardy, with a tang that’s bright but not harsh, like a squeeze of lemon over butter.
When you bake your same-day loaf, you’re chasing that balance too—deep caramel crust, lively acidity, and a gentle, lingering sweetness in every warm slice.
Final Thoughts
Give this same day sourdough recipe a try and see just how doable delicious homemade bread can be in an afternoon.
Once you’ve made it once, have fun tweaking the flours, hydration, and scoring patterns to make the loaf completely your own.
Frequently Asked Questions
Can I Make This Sourdough Without a Dutch Oven or Banneton?
Yes, you can. I’d nestle the dough in a well-floured bowl instead of a banneton, then bake on a preheated tray or stone with a pan of hot water, filling your kitchen with crackling, toasty aroma.
How Do I Adjust the Recipe for High-Altitude Baking?
You’ll shorten rises, add 10–15 g flour, and lower hydration slightly; I’d also reduce oven temperature ~10°C. Watch the dough’s feel—soft, airy, and gently domed—like a pillow rising slowly in thin mountain light.
Is It Possible to Mix and Knead This Dough in a Stand Mixer?
Yes, you can, and I often do. I’d mix on low just until a soft, sticky dough forms, then finish with a few gentle hand folds, feeling the dough turn silky, warm, and alive.
How Can I Tell if My Starter Is Too Weak for This Same-Day Recipe?
I know it’s too weak when it doesn’t double in 4–8 hours, smells flat not tangy, and feels pasty instead of airy; your jar should look lively, webbed with tiny bubbles, almost softly fizzing.
Can I Add Inclusions Like Cheese, Herbs, or Seeds to This Dough?
Yes, you can, and I’d add them after the last fold. I’d gently tuck in shredded cheese, torn herbs, or toasted seeds, feeling the soft dough cradle those fragrant, warm flecks like a cozy blanket.

Same Day Sourdough Bread
Equipment
- 2 Mixing bowls
- 1 digital kitchen scale
- 1 measuring jug
- 1 Dough scraper
- 1 bench scraper
- 1 clean kitchen towel
- 1 banneton or 1 medium bowl
- 1 Dutch oven with lid
- 1 sharp razor or lame
- 1 wire cooling rack
Ingredients
- 100 gram active sourdough starter 100% hydration
- 350 gram warm water about 30°C
- 450 gram bread flour
- 50 gram whole wheat flour
- 10 gram fine sea salt
- 10 gram olive oil optional; for softer crust
- 10 gram rice flour for dusting banneton
Instructions
- In a mixing bowl whisk together the warm water and active sourdough starter until mostly dissolved.
- Add the bread flour and whole wheat flour to the bowl and mix with your hand or a dough scraper until no dry flour remains and a shaggy dough forms.
- Cover the bowl with a towel and let the dough rest (autolyse) for 30 minutes at warm room temperature.
- Sprinkle the salt over the dough, add the olive oil if using, and squeeze and fold the dough until the salt and oil are fully incorporated.
- Perform 1 minute of stretch-and-folds in the bowl by pulling one side of the dough up and folding it over, rotating the bowl and repeating.
- Cover the dough and let it rest 30 minutes at warm room temperature (around 24–27°C).
- Repeat the stretch-and-fold process three more times every 30 minutes for a total of 4 rounds over 2 hours.
- After the final set of folds, cover the bowl and let the dough rise at warm room temperature for 1 to 1.5 hours, or until roughly doubled and puffy.
- Lightly flour your work surface and gently turn the dough out onto it, trying not to deflate it too much.
- Use a bench scraper to pre-shape the dough into a loose round by tucking the edges underneath and creating surface tension.
- Let the dough rest uncovered on the counter for 15–20 minutes to relax.
- For the final shape, gently flip the dough over, stretch the bottom edge up and over to the center, then fold the sides in and roll it up to form a tight boule or batard.
- Dust the banneton or bowl generously with a mix of rice flour and a little wheat flour to prevent sticking.
- Place the shaped dough seam side up into the prepared banneton or bowl.
- Cover and let the dough proof at warm room temperature for 45–75 minutes, or until it looks noticeably risen and springs back slowly when gently pressed.
- About 30 minutes before baking, place the Dutch oven with its lid into the oven and preheat to 250°C (480°F).
- When ready to bake, carefully remove the hot Dutch oven from the oven and take off the lid.
- Gently invert the dough onto a piece of parchment paper so it is seam side down.
- Use a razor or lame to score the top of the dough with one long slash about 1 cm deep, or a pattern of your choice.
- Lift the dough using the parchment and place it into the hot Dutch oven, then cover with the lid.
- Return the Dutch oven to the oven and bake covered at 250°C (480°F) for 20 minutes to create steam and oven spring.
- After 20 minutes remove the lid, reduce the temperature to 230°C (450°F), and bake for another 18–22 minutes until deep golden brown.
- Carefully remove the loaf from the Dutch oven and place it on a wire rack.
- Let the sourdough cool completely for at least 1 hour before slicing to allow the crumb to set.
Notes

Cynthia Weatherford is a seasoned chef and culinary enthusiast who serves as the Recipe creator of Somonday. With decades of experience in the kitchen and a passion for exploring diverse cuisines, Cynthia brings a blend of creativity and technique to every dish. Known for transforming simple ingredients into show-stopping meals, Cynthia believes that cooking is an art form anyone can master. Dedicated to inspiring home cooks, Cynthia shares approachable recipes, pro tips, and culinary wisdom to make every meal memorable.