
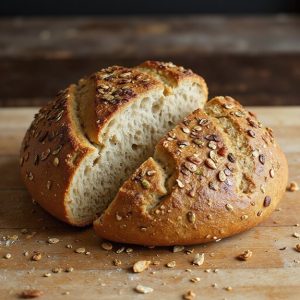
There’s something about pulling a burnished, seed-flecked sourdough from the oven that never gets old.
The crust crackles as it cools, sesame and sunflower seeds turning deeply golden, and a warm, tangy aroma drifts through the kitchen.
This is everyday bread with a little extra magic—perfect for hearty sandwiches, simple toast-and-butter breakfasts, or a rustic side to soup. It takes time to rise, but most of it’s hands-off, so it fits easily into busy days.
Seeded sourdough is ideal for beginners ready to move beyond basic loaves, meal-preppers stocking the freezer, and anyone who loves wholesome, homemade comfort.
I still remember a winter week when work felt overwhelming; slicing into a freshly baked seeded loaf for simple cheese toast made dinners feel calm and grounding again.
It shines at slow Sunday suppers, for make-ahead lunches, or when guests drop by.
Ready to bring this loaf to life?
Why You’ll Love It
- Delivers bold flavor from toasted sunflower, pumpkin, sesame, and flax seeds.
- Builds a hearty, chewy crumb with just-right crunch in every slice.
- Relies on natural fermentation for better digestibility and subtle, complex tang.
- Offers flexible timing with room-temperature or overnight cold-proof options.
- Stays fresh for days and slices cleanly for sandwiches and toast.
Ingredients
- 100 g active sourdough starter — 100% hydration, bubbly and recently peaked
- 375 g water — room temperature for easier mixing and fermentation
- 450 g bread flour — higher protein for better gluten structure
- 50 g whole wheat flour — adds flavor, color, and nutrition
- 10 g fine sea salt — dissolves evenly and seasons the crumb
- 25 g raw sunflower seeds — toast lightly to deepen flavor
- 25 g raw pumpkin seeds — toast for nuttiness and crunch
- 20 g sesame seeds — toast until fragrant but not burnt
- 10 g flaxseeds — add fiber and light nuttiness
- 10 g rolled oats — soften in the dough and add texture
- 10 g honey (optional) — gently boosts fermentation and sweetness
- 10 g olive oil — for greasing bowl and hands to prevent sticking
- 10 g mixed seeds — extra for topping the loaf before baking
Step-by-Step Method
Mix Starter and Water
Whisk the active sourdough starter with room-temperature water in a large bowl. Break up any clumps until the mixture looks mostly uniform and milky.
This guarantees the starter is evenly dispersed, leading to consistent fermentation and better rise. Scrape down the sides of the bowl so everything stays together.
Combine Flours and Autolyse
Add the bread flour and whole wheat flour to the bowl. Mix with a spoon or hands until no dry bits remain; the dough will look rough and shaggy.
Cover the bowl and rest for 30–45 minutes. This autolyse hydrates the flour, starts gluten development, and makes the dough easier to handle later.
Incorporate Salt and Honey
Sprinkle the salt and honey evenly over the dough’s surface. Use wet hands or a spatula to squeeze, fold, and pinch the dough until everything is fully combined.
Make certain no pockets of salt remain. This step strengthens the dough, regulates fermentation, and adds subtle sweetness and flavor complexity.
Toast the Seeds
Warm a dry skillet over low heat. Add the sunflower seeds, pumpkin seeds, and sesame seeds. Stir frequently and toast until fragrant and lightly golden, watching closely to prevent burning.
Transfer the seeds to a plate to cool completely. Toasting deepens flavor and reduces chewiness, making the seeds stand out in the finished loaf.
Fold in Seeds and Oats
Scatter the cooled toasted seeds, flaxseeds, and rolled oats over the dough. Gently fold by lifting and turning the dough from the edges toward the center.
Rotate the bowl and repeat until everything is evenly distributed. Avoid tearing the dough. This keeps the gluten network intact while loading the bread with texture.
Bulk Ferment and Stretch-Fold
Cover the bowl and let the dough bulk ferment at room temperature for 3–4 hours. During the first 2 hours, perform 3–4 sets of stretch-and-folds every 30–45 minutes.
Gently lift one edge of the dough and fold it over itself. Rotate the bowl and repeat. This builds strength without kneading and improves structure.
Pre-Shape the Dough
Lightly oil your hands and work surface. Gently turn the dough out of the bowl.
Using a scraper and your hands, round it into a loose ball by tucking edges underneath. Handle it softly to preserve gas. Let it hold a rough shape rather than a tight one. This organizes the gluten for final shaping.
Bench Rest and Relax
Cover the pre-shaped dough with a bowl or towel. Let it rest at room temperature for 20–30 minutes.
During this bench rest, the dough relaxes, making it easier to shape without tearing. The surface will smooth slightly, and the dough will spread a bit. This pause improves final structure and handling.
Shape into Final Loaf
Use lightly oiled hands to shape the dough into a tight round or oval. Gently stretch the surface and tuck the dough underneath to create tension without ripping.
Rotate and repeat until the loaf feels taut and holds its form. This tension is vital for good oven spring and an attractive, controlled rise.
Prepare Basket and Proof
Dust a proofing basket or a medium bowl lined with a floured kitchen towel. Place the dough inside seam side up.
Cover with a towel or plastic. Proof at room temperature for 1–2 hours, or refrigerate 8–12 hours for a cold proof. Watch for a softer, slightly puffy feel rather than relying only on time.
Preheat Dutch Oven
Place the empty Dutch oven and lid into your oven. Preheat to 475°F (245°C) about 45 minutes before baking.
Allow the pot to heat thoroughly so it stores plenty of thermal energy. This high, enclosed heat mimics a professional oven’s steam and helps achieve strong oven spring and a crisp, blistered crust.
Transfer Dough and Add Seeds
Carefully remove the hot Dutch oven. Gently invert the dough onto parchment or directly into the pot so it’s seam side down.
Lightly mist or brush the top with water. Sprinkle extra mixed seeds evenly over the surface. Press them gently so they stick. The moisture helps seeds adhere and boosts crust color.
Score and Steam-Bake Covered
Use a sharp lame or serrated knife to score the loaf’s top with a decisive slash or pattern. Cut about ¼ inch deep to guide expansion.
Cover the Dutch oven with its lid. Bake at 475°F (245°C) for 20 minutes. The covered environment traps steam, allowing maximum oven spring and a thinner, glossy crust.
Finish Baking Uncovered
Remove the lid and lower the oven temperature to 450°F (230°C). Continue baking uncovered for 18–22 minutes.
Watch for a deeply golden-brown crust and listen for a hollow sound when tapping the bottom. This uncovered phase drives off moisture, sets the crust, and finishes caramelizing the seeds and surface.
Cool Completely Before Slicing
Carefully lift the bread from the Dutch oven and place it on a wire cooling rack. Let it cool for at least 1 hour before slicing.
This resting time allows the crumb to set and steam to escape, preventing a gummy texture. Slice with a sharp serrated knife once fully cooled for clean, even pieces.
Ingredient Swaps
- Use up to 100 g whole wheat or rye flour in place of part of the bread flour for a heartier, tangier loaf; add 10–15 g extra water if the dough feels stiff.
- Swap seeds based on what you have: sunflower ↔ pumpkin, sesame ↔ poppy, or use chopped nuts (walnut, pecan, hazelnut) for up to half the seed mix.
- For a vegan loaf, omit honey or replace it 1:1 with maple syrup or barley malt; for a nut-free version, avoid tree nuts and stick to seeds and oats.
You Must Know
– Scale – To make two loaves, double everything except the Dutch oven: divide the dough into two equal pieces after bulk fermentation (about 490–500 g each for medium loaves) and proof in separate baskets.
This keeps handling manageable and helps both loaves bake evenly in separate rounds.
Serving Tips
- Serve slightly warm with salted butter, soft goat cheese, or herbed cream cheese.
- Pair slices with smoked salmon, capers, red onion, and a squeeze of lemon.
- Use for open-faced sandwiches topped with avocado, radish, and flaky sea salt.
- Cube for hearty croutons in green salads or roasted vegetable soups.
- Plate alongside a cheese and charcuterie board with olives, nuts, and fruit.
Storage & Make-Ahead
Seeded sourdough stays fresh at room temperature for 2–3 days in a paper bag or bread box; refrigerating can dry it out.
For make-ahead, slice, then freeze well-wrapped up to 2 months.
Toast slices straight from frozen.
You can also cold-proof the shaped dough overnight to bake fresh next day.
Reheating
Reheat sliced bread gently: in a 300°F (150°C) oven for 8–10 minutes.
Briefly in a covered skillet over low heat.
Or 5–10 seconds in the microwave wrapped in a damp towel.
Scandinavian Rye Sourdough Traditions
Once you’ve enjoyed your loaf warm again, it’s hard not to imagine what other sourdough traditions smell like fresh from the oven, and Scandinavian rye is one of the most enthralling.
I think of it as sourdough’s darker, moodier cousin: dense, fragrant, and almost black with rye. When I slice into a good Scandinavian-style loaf, the crumb feels damp and velvety, packed with seeds that pop under your teeth.
The scent’s different from wheat: deeper, malty, with hints of molasses, coffee, and forest honey. That long, slow sourdough fermentation tames rye’s sharpness and turns it earthy and complex.
It’s the kind of bread that begs for cold butter, smoked fish, sharp cheese—bold toppings that can stand beside its character.
Final Thoughts
Give this seeded sourdough a try and enjoy the contrast of its crunchy crust, tender crumb, and nutty mix of grains and seeds.
Once you’ve baked it once, feel free to tweak the seed mix, hydration, or proofing schedule to make it your own signature loaf.
Frequently Asked Questions
How Can I Troubleshoot a Sourdough That Consistently Bakes up Dense and Flat?
I’d first strengthen your starter, then extend bulk fermentation until the dough feels airy and billowy. Handle it gently, build tight surface tension, proof slightly less, bake hotter, and use a preheated Dutch oven for lift.
What Are the Best Knives and Techniques for Slicing Seeded Sourdough Cleanly?
I reach for a long, sharp serrated bread knife, slice with gentle sawing motions, and let the blade’s weight work. I cool the loaf completely, flip it crust‑side down, and cut straight, no pressing.
How Do Altitude or Very Dry Climates Affect Fermentation and Baking Times?
They’ll speed everything up. At altitude and in dry air, I find dough ferments faster, proofs quicker, and bakes sooner. I watch dough volume, feel its airy softness, and shorten bake times to prevent dryness.
Can I Convert This Seeded Sourdough Into a Sandwich Loaf for a Tin?
Yes, you can. I’d tighten the dough slightly, shape it log-style, nestle it into a greased tin, proof to about ¾ risen, then bake uncovered until the crust turns deeply bronzed and fragrant.
How Should I Adjust Timing if Using a Young, Less Mature Starter?
You’ll want to add 2–4 hours to bulk, maybe 1–2 to proof, and watch the dough, not the clock—wait for a 75% rise, domed surface, and jiggly, airy feel before baking.
Seeded Sourdough Bread
Equipment
- 1 digital kitchen scale
- 2 medium mixing bowls
- 1 large mixing bowl
- 1 Dough scraper
- 1 Wooden spoon or spatula
- 1 proofing basket or 1 medium bowl lined with a floured kitchen towel
- 1 cast-iron Dutch oven with lid (4–5 qt)
- 1 sharp lame or serrated knife
- 1 clean spray bottle (optional)
- 1 wire cooling rack
Ingredients
- 100 gram active sourdough starter 100% hydration
- 375 gram water room temperature
- 450 gram bread flour
- 50 gram whole wheat flour
- 10 gram fine sea salt
- 25 gram raw sunflower seeds toasted
- 25 gram raw pumpkin seeds toasted
- 20 gram sesame seeds toasted
- 10 gram flaxseeds
- 10 gram rolled oats
- 10 gram honey optional
- 10 gram olive oil for bowl and hands
- 10 gram mixed seeds extra for topping
Instructions
- In a large mixing bowl, whisk together the active sourdough starter and water until mostly dissolved.
- Add the bread flour and whole wheat flour to the bowl and mix until no dry flour remains, then cover and rest for 30–45 minutes (autolyse).
- Sprinkle the salt and honey over the dough and mix with wet hands or a spatula until fully incorporated.
- In a dry skillet over low heat, lightly toast the sunflower seeds, pumpkin seeds, and sesame seeds until fragrant, then let them cool.
- Add the cooled toasted seeds, flaxseeds, and rolled oats to the dough and gently fold until evenly distributed.
- Cover the bowl and let the dough bulk ferment at room temperature for 3–4 hours, performing 3–4 sets of stretch-and-folds every 30–45 minutes during the first 2 hours.
- After bulk fermentation, lightly oil your hands and work surface, then turn the dough out and gently pre-shape it into a loose round.
- Let the pre-shaped dough rest on the counter, covered, for 20–30 minutes to relax.
- Shape the dough into a tight round or oval loaf, creating surface tension without tearing the skin.
- Lightly flour the proofing basket or towel-lined bowl, then place the dough seam side up into the basket.
- Cover the basket and proof at room temperature for 1–2 hours, or refrigerate for 8–12 hours for a slow cold proof.
- About 45 minutes before baking, place the Dutch oven with its lid into the oven and preheat to 475°F (245°C).
- When ready to bake, carefully remove the hot Dutch oven, gently invert the dough onto a piece of parchment or directly into the pot so it is seam side down.
- Lightly mist or brush the top of the dough with water and sprinkle the extra mixed seeds evenly over the surface, pressing gently so they adhere.
- Score the top of the loaf with a lame or sharp knife to allow controlled expansion.
- Cover the Dutch oven with its lid and bake for 20 minutes at 475°F (245°C).
- Remove the lid, reduce the oven temperature to 450°F (230°C), and continue baking for 18–22 minutes or until the crust is deeply golden and the loaf sounds hollow when tapped.
- Carefully transfer the baked bread to a wire rack and let it cool completely for at least 1 hour before slicing.
Notes

Cynthia Weatherford is a seasoned chef and culinary enthusiast who serves as the Recipe creator of Somonday. With decades of experience in the kitchen and a passion for exploring diverse cuisines, Cynthia brings a blend of creativity and technique to every dish. Known for transforming simple ingredients into show-stopping meals, Cynthia believes that cooking is an art form anyone can master. Dedicated to inspiring home cooks, Cynthia shares approachable recipes, pro tips, and culinary wisdom to make every meal memorable.


