
There’s something about the smell of warm banana bread that makes a kitchen feel like home.
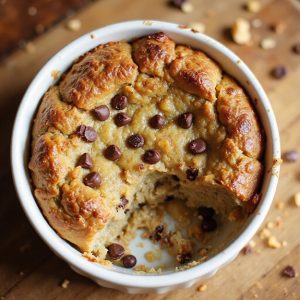
Picture a single, golden-brown mini loaf or mug cake, its top just cracked, steam curling up and carrying notes of caramelized banana, vanilla, and cozy spice.
This is a quick, small-batch dessert—soft, tender, and cake-like—that bakes up fast, perfect when you’re craving comfort but don’t want a full pan tempting you all week.
It’s ideal for sweet-tooth fans, solo cooks, beginners, and anyone needing a fast treat on a busy day.
I first leaned on this single serve version late one Sunday night, when a rough week had left me tired but restless.
One overripe banana on the counter turned into a warm, five-minute dessert that felt like a hug in a bowl.
It’s just right for last-minute cravings, quiet evenings, or a simple “just for me” moment.
Ready to bring this dish to life?
Why You’ll Love It
- Satisfies sweet cravings fast with a warm, fresh-baked treat
- Uses one banana and basic pantry staples—no fancy ingredients needed
- Bakes in a ramekin for easy portion control and minimal cleanup
- Delivers moist, tender texture with rich banana and vanilla flavor
- Easily customized with chocolate chips, nuts, or warm spices
Ingredients
- 1 medium ripe banana, mashed — very spotty skin for best sweetness
- 1 tbsp unsalted butter, melted — cool slightly so it doesn’t scramble the banana
- 1 tbsp milk, any type — dairy or unsweetened plant milk both work
- 1 tbsp brown sugar, packed — adds moisture and caramel flavor
- 1 tsp granulated sugar — balances banana and boosts browning
- 1 tsp vanilla extract — real vanilla gives better flavor than imitation
- 1/4 cup all-purpose flour, leveled — spoon and level so batter isn’t dense
- 1/4 tsp baking powder — check it’s fresh so the bread rises properly
- 1/8 tsp ground cinnamon (optional) — warm spice that complements banana
- 1 pinch salt — sharpens sweetness and overall flavor
- 1 tbsp chocolate chips (optional) — semisweet or dark melt nicely
- 1 tbsp chopped walnuts (optional) — lightly toasted for extra crunch and aroma
Step-by-Step Method
Preheat the Oven & Prep the Ramekin
Preheat your oven to 350°F (175°C). Lightly grease an 8-ounce oven-safe ramekin or mini loaf pan with butter or nonstick spray.
Make sure the entire interior is coated, including the corners and sides. This helps the banana bread release easily and promotes even browning while it bakes.
Mash the Banana Thoroughly
Peel a medium, very ripe banana and place it in a small mixing bowl. Use a fork to mash it until mostly smooth with only small lumps remaining.
Break up any large chunks so the banana distributes evenly. A well-mashed banana guarantees consistent moisture and sweetness throughout the bread.
Combine the Wet Ingredients
Stir in the melted butter, milk, brown sugar, granulated sugar, and vanilla extract. Mix until the sugars dissolve and the mixture looks uniform.
Scrape the sides of the bowl to incorporate any banana bits. This wet base should be smooth and cohesive before adding the dry ingredients for the best texture.
Add Dry Ingredients Gently
Sprinkle the flour, baking powder, cinnamon, and a pinch of salt over the wet mixture. Gently stir or whisk until just combined and no dry streaks of flour remain.
Avoid vigorous mixing, which can develop gluten and make the bread dense. The batter should be thick but still easy to stir.
Fold in Chocolate & Nuts
Add the chocolate chips and chopped walnuts, if using. Use a spoon or spatula to fold them gently through the batter.
Distribute them evenly so every bite has some mix-ins. Don’t overmix at this stage. Overworking the batter can knock out air and result in a tougher, less tender crumb.
Fill the Ramekin & Smooth the Top
Pour the batter into the prepared ramekin or mini loaf pan. Use the back of a spoon to smooth the surface and push batter into the edges.
Leveling the top helps the bread bake evenly and rise nicely. Tap the ramekin lightly on the counter to release any large air bubbles.
Bake Until Just Done
Place the ramekin directly in the oven, or set it on a baking sheet for stability. Bake for 18–22 minutes.
Check doneness by inserting a toothpick into the center; it should come out mostly clean with a few moist crumbs. Avoid overbaking, which can dry the bread and reduce its tenderness.
Rest Briefly Before Serving
Remove the ramekin from the oven and place it on a heat-safe surface. Let the banana bread rest for about 5 minutes.
This short cooling time allows the crumb to set and the steam to dissipate slightly. Serve warm straight from the ramekin, optionally with butter, honey, or yogurt on top.
Ingredient Swaps
- Use vegetable oil or melted coconut oil instead of butter for a dairy-free version; swap milk with any plant-based milk.
- Replace all-purpose flour with a 1:1 gluten-free blend; oat flour also works but may make it slightly denser.
- Skip granulated sugar and use all brown sugar, coconut sugar, or honey/maple syrup (reduce milk slightly if using liquid sweeteners).
- Trade chocolate chips for raisins, chopped dates, or other dried fruit; swap walnuts with pecans, almonds, or seeds (sunflower, pumpkin) for a nut-free option.
You Must Know
- Doneness • If the top looks set but you’re unsure inside: Insert a toothpick or knife in the very center; it should come out with a few moist crumbs, not wet batter, at around 18–22 minutes. This keeps it soft, not gummy or underdone.
- Troubleshoot • If the bread sinks in the middle: Use a slightly smaller ramekin (about 8 oz, filled no more than ¾ full) and check that your baking powder is fresh (it should foam in water instantly). Too-deep batter or weak leavening causes collapse as it cools.
- Troubleshoot • If it’s dense or rubbery: Stir the dry ingredients into the wet just until you no longer see streaks of flour, then stop. Overworking the batter develops gluten, which toughens the crumb in this small, single-serve portion.
- Scale • For two servings: Double everything and divide between two 8 oz ramekins, or use one larger dish and extend the time by about 3–5 minutes. Use the same toothpick-with-moist-crumbs cue to decide when to pull it.
- Flavor Boost • For deeper banana and caramel notes: Use a very spotty banana and add 1 extra teaspoon brown sugar, then keep it in the oven until the edges turn a deep golden brown. Slightly darker edges (not burnt) mean more toasty, caramelized flavor.
Serving Tips
- Serve warm in the ramekin with a pat of butter melting on top.
- Add a scoop of vanilla ice cream and drizzle with honey or caramel sauce.
- Top with Greek yogurt, sliced banana, and a sprinkle of cinnamon or nuts.
- Dust with powdered sugar and serve alongside coffee or hot tea.
- Crumble over yogurt or oatmeal for a cozy breakfast parfait.
Storage & Make-Ahead
This single-serve banana bread keeps in the fridge for up to 3 days, tightly covered.
Rewarm briefly in the microwave or toaster oven before serving for best texture.
You can also bake, cool completely, wrap well, and freeze up to 2 months.
Thaw at room temperature, then warm.
Reheating
Reheat gently in the microwave at 50% power for 10–20 seconds.
In a 300°F oven wrapped in foil for 5–10 minutes.
Or on a covered skillet over low heat.
Banana Bread Cravings Worldwide
Some nights I can almost feel banana bread cravings humming in kitchens all over the world, like we’re all reaching for the same comforting sweetness at once.
I picture you standing over your counter, banana in hand, while somewhere else I’m doing the exact same thing, peeling back that speckled skin and breathing in that warm, fruity scent.
Those shared cravings tie us together, even if we’ll never see each other’s tiny ramekins or toaster ovens.
I love imagining how you might shape your own single serve moment:
- A quiet midnight slice, still steaming, eaten by fridge light
- A rainy afternoon break, cinnamon drifting through the room
- A quick dessert after dinner, chocolate chips melting into soft crumbs
Final Thoughts
Give this single-serve banana bread a try the next time you have one ripe banana hanging around—you’ll have a warm, cozy treat in minutes.
Don’t hesitate to tweak it with your favorite add-ins or spices to make it your own.
Frequently Asked Questions
Can I Cook This Single Serve Banana Bread in the Microwave Instead of Oven?
Yes, you can microwave it. I’d pour the batter into a mug, cook on high 60–90 seconds, then let it rest. You’ll get a soft, steamy, cake-like treat instead of classic oven crust.
How Do I Scale This Recipe to Make Two or More Servings?
You can simply multiply everything by the number of servings, but I’d stop at four per bowl. I’d then divide the batter into separate ramekins so each bakes evenly, smelling warmly sweet and caramelized.
Is This Recipe Suitable for Kids to Make With Minimal Supervision?
Yes, it’s kid‑friendly with light guidance. I’d have you handle the oven, but let them mash the soft banana, whisk the cozy batter, and smell that warm, sweet scent curl through the kitchen.
Can I Make This Banana Bread Gluten-Free Without Affecting the Texture Too Much?
Yes, you can. I’d swap in a 1:1 gluten-free baking blend, then stir gently. It’ll still bake up soft and fragrant, with steamy banana sweetness and melty chocolate pockets under a golden, crackly top.
What Are Some Creative Toppings to Turn This Into a Special Occasion Dessert?
You could crown it with warm caramel, toasted pecans, and vanilla ice cream. I’d also swirl in Nutella, add whipped cream, sliced bananas, and a dusting of cinnamon—like a tiny, candlelit sundae in a ramekin.
Single Serve Banana Bread
Equipment
- 1 Small mixing bowl
- 1 Fork
- 1 tablespoon
- 1 teaspoon
- 1 small whisk or spoon
- 1 8-ounce oven-safe ramekin or mini loaf pan
- 1 baking sheet (optional, for stability)
- 1 Oven or toaster oven
Ingredients
- 1 medium ripe banana mashed
- 1 tablespoon unsalted butter melted
- 1 tablespoon milk any type
- 1 tablespoon brown sugar packed
- 1 teaspoon granulated sugar
- 1 teaspoon vanilla extract
- 1/4 cup all-purpose flour leveled
- 1/4 teaspoon baking powder
- 1/8 teaspoon ground cinnamon optional
- 1 pinch salt
- 1 tablespoon chocolate chips optional
- 1 tablespoon chopped walnuts optional
Instructions
- Preheat the oven to 350°F (175°C) and lightly grease the ramekin or mini loaf pan.
- In the small mixing bowl, mash the banana thoroughly with a fork until mostly smooth.
- Stir in the melted butter, milk, brown sugar, granulated sugar, and vanilla extract until well combined.
- Add the flour, baking powder, cinnamon, and salt to the wet ingredients and gently mix until just combined without overmixing.
- Fold in chocolate chips and walnuts if using, distributing them evenly through the batter.
- Pour the batter into the prepared ramekin or pan and smooth the top with the back of a spoon.
- Place the ramekin on a baking sheet if desired and bake for 18–22 minutes, or until a toothpick inserted in the center comes out mostly clean with a few moist crumbs.
- Let the banana bread rest for 5 minutes before serving to set the texture and cool slightly.
Notes

Cynthia Weatherford is a seasoned chef and culinary enthusiast who serves as the Recipe creator of Somonday. With decades of experience in the kitchen and a passion for exploring diverse cuisines, Cynthia brings a blend of creativity and technique to every dish. Known for transforming simple ingredients into show-stopping meals, Cynthia believes that cooking is an art form anyone can master. Dedicated to inspiring home cooks, Cynthia shares approachable recipes, pro tips, and culinary wisdom to make every meal memorable.


