
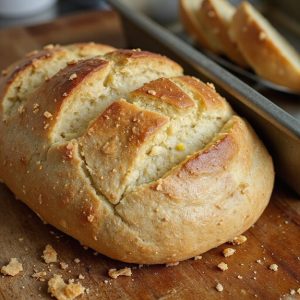
There’s something about pulling a loaf of soft sourdough bread from the oven that makes your whole kitchen feel like home.
The crust is a gentle golden brown, crackling softly as you slice through to reveal a tender, cloud-like interior.
This isn’t the super-chewy artisan loaf for fancy cheese boards; it’s an everyday, sliceable bread—perfect for sandwiches, toast, or buttered alongside a cozy bowl of soup.
While sourdough takes time to rise, most of it’s hands-off, making it ideal for busy home bakers, beginners, and anyone who loves make-ahead comfort food.
I still remember one hectic week when a loaf of this soft sourdough turned rushed, mismatched dinners into simple, satisfying meals—grilled cheese one night, breakfast toast the next.
It shines at Sunday suppers, easy entertaining, and even last-minute cravings when you’ve planned ahead.
Ready to bring this bread to life?
Why You’ll Love It
- Delivers soft, fluffy slices with that classic sourdough tang.
- Uses simple pantry ingredients plus your favorite active starter.
- Stays fresh and tender for days when stored airtight.
- Adapts easily to variations like honey, tangzhong, or more whole grains.
- Makes an everyday sandwich loaf that still feels bakery-special.
Ingredients
- 120 g active sourdough starter (100% hydration) — use bubbly, recently fed starter for best rise
- 260 g water, room temperature — cool to the touch but not cold aids gluten development
- 40 g whole milk, room temperature — adds richness and helps keep the crumb soft
- 30 g unsalted butter, softened — let it sit out so it blends easily into the dough
- 25 g granulated sugar — just enough to boost browning and fermentation
- 8 g fine sea salt — balances flavor and strengthens gluten
- 420 g bread flour — higher protein flour gives better structure and chew
- 20 g whole wheat flour — adds light nutty flavor without making the loaf dense
- 10 g neutral oil or softened butter, for greasing pan — prevents sticking and helps crust stay tender
Step-by-Step Method
Mix the Wet Ingredients
Whisk the active sourdough starter, water, and milk in a large mixing bowl. Break up any lumps of starter until the mixture looks mostly smooth and milky.
Make certain everything is at room temperature so fermentation starts efficiently.
Set the bowl aside briefly while you prepare the remaining ingredients.
Incorporate Butter and Sugar
Add the granulated sugar and softened butter to the wet mixture.
Mix with a whisk or your hand until the butter breaks into small, soft pieces.
Don’t worry if some tiny chunks remain. Aim for even distribution of fat and sugar so the dough enriches and softens uniformly.
Combine Flours and Salt
Add the bread flour, whole wheat flour, and fine sea salt to the bowl. Mix with your hand or a dough scraper until a shaggy dough forms.
Scrape down the sides and bottom to make certain no dry flour patches remain.
Stop mixing once all ingredients are just combined and hydrated.
Rest for Autolyse
Cover the bowl with a towel or plastic wrap. Let the dough rest for 20–30 minutes at room temperature.
Allow the flour to hydrate fully and the gluten to start forming on its own.
Avoid disturbing the dough during this rest so it softens and becomes easier to knead.
Knead Until Smooth and Elastic
Knead the dough in the bowl or on a lightly oiled surface for 5–8 minutes.
Use a push-and-fold motion and keep movements gentle but steady. Add only a very thin film of oil if the dough sticks excessively.
Stop when the dough feels smoother, more elastic, and slightly springy.
Coat and Prepare for Bulk Fermentation
Shape the dough into a smooth ball. Lightly oil a clean bowl, then place the dough inside and turn it once to coat all sides.
Create a thin, even layer of oil to prevent drying.
Cover the bowl securely with a towel or plastic wrap to retain moisture during fermentation.
Bulk Ferment and Stretch-and-Fold
Let the dough bulk ferment at warm room temperature, around 75–78°F (24–26°C), for 2–3 hours.
During the first 1.5 hours, perform 2–3 sets of gentle stretch-and-folds every 30–45 minutes.
Lift and fold each side toward the center to strengthen gluten without deflating entirely.
Assess Fermentation Progress
Check the dough when bulk fermentation nears completion. Look for a 60–80% rise in volume and a noticeably airier feel.
Inspect the edges of the dough for small bubbles showing fermentation activity.
Proceed when the dough feels light, jiggly, and well-aerated but not collapsed.
Pre-Shape into a Rectangle
Gently turn the dough onto a lightly floured surface. Avoid tearing or aggressively degassing it.
Pat it softly into a rough rectangle with your fingertips. Keep an even thickness so shaping is easier and the crumb stays uniform.
Dust off any excess flour before folding.
Roll and Form a Tight Log
Fold the long sides of the rectangle toward the center slightly. Start at the short end and roll the dough up tightly into a log.
Maintain even tension without squeezing out all the gas.
Pinch the final seam closed firmly to keep the shape intact during proofing and baking.
Pan the Dough for Final Proof
Tuck the ends of the log under to create a neat, even loaf. Grease a 9×5-inch loaf pan with oil or softened butter.
Place the dough seam-side down into the pan, centering it. Cover loosely with a towel or plastic wrap.
Let it proof at room temperature until puffy and risen.
Proof Until Crowned and Puffy
Allow the dough to proof 1–2 hours, or until it crowns 1–2 cm above the pan rim.
Check that it feels puffy and springs back slowly when gently pressed. Avoid overproofing, which can cause collapse.
Adjust time based on room temperature and your starter’s activity level.
Preheat the Oven
About 30 minutes before the loaf finishes proofing, preheat your oven to 375°F (190°C).
Position an oven rack in the middle. Make certain the oven reaches full temperature before baking.
Stable heat helps the loaf achieve good oven spring and an even, well-colored crust.
Brush for a Soft Golden Crust
Optional: Brush the top of the proofed loaf lightly with milk or melted butter.
Use a soft pastry brush and avoid deflating the dough. Create a thin, even coating.
This step encourages a softer, more tender crust and a warm golden color during baking.
Score the Loaf Cleanly
Use a sharp knife or lame to score one long, confident slash down the center of the loaf.
Angle the blade slightly and cut about ¼ inch deep. Make the cut in one smooth motion.
Scoring directs oven spring and helps prevent random splitting of the crust.
Bake Until Deep Golden
Place the loaf pan in the preheated oven. Bake for 35–40 minutes.
Look for a deep golden-brown top and sides.
Check doneness with an instant-read thermometer inserted in the center; it should read 195–200°F (90–93°C).
Extend baking slightly if the temperature is low.
Finish with a Buttery Glaze
Remove the baked loaf from the oven. Immediately brush the hot top with melted butter if desired.
Apply a thin, even layer to soften the crust further and add flavor.
Let the butter absorb as the loaf cools slightly in the pan before unmolding.
Cool and Slice Properly
Let the bread cool in the pan for 10 minutes. Carefully remove it and transfer to a wire rack.
Allow the loaf to cool completely for at least 1 hour. Resist slicing early, as steam must escape and crumb must set.
Slice with a serrated knife into even slices when fully cooled.
Ingredient Swaps
- Use all-purpose flour instead of bread flour if needed; reduce water by 10–20 g if the dough feels too loose.
- Swap whole milk with any plant milk (soy/oat/almond) and replace butter with neutral oil or vegan butter for a dairy-free loaf.
- Replace sugar with honey or maple syrup (use about 30 g and reduce water by ~5 g).
- Increase whole wheat flour up to 30–40% of total flour, adding 10–20 g extra water and expecting a slightly denser crumb.
- If you don’t have sourdough starter, this specific recipe won’t work as written; you’d need to convert it to a yeasted sandwich bread formula.
You Must Know
– Scale • To make two loaves → Multiply every ingredient by 2, then divide the dough evenly by weight (~450–470 g per pan for similarly sized tins).
Equal weights help both loaves ferment and brown at the same rate.
Serving Tips
- Serve warm with salted butter and a drizzle of honey for breakfast.
- Pair slices with soft scrambled eggs and smoked salmon for a hearty brunch.
- Use for grilled cheese sandwiches; the mild tang complements sharp cheddar beautifully.
- Toast and top with avocado, tomato, and flaky salt for a simple lunch.
- Cube for rustic sourdough croutons to garnish salads or creamy soups.
Storage & Make-Ahead
Soft sourdough keeps well at room temperature in an airtight bag or container for 3–4 days.
Refrigeration tends to dry it out, so avoid it.
For make-ahead, slice the fully cooled loaf, freeze well-wrapped up to 2–3 months.
Toast or warm slices straight from the freezer.
Reheating
To reheat soft sourdough, warm slices briefly in a low oven.
Lightly toast in a covered skillet on the stovetop.
Or microwave 10–15 seconds wrapped in a slightly damp towel.
Sourdough in American Kitchens
Once you’ve warmed a slice and felt that tender crumb spring back under your fingers, it’s easy to see why sourdough has claimed such a steady place on American counters.
I see it everywhere now—next to slow cookers, air fryers, and jars of cold brew—quietly bubbling away like a little house pet.
In my kitchen, a soft sourdough loaf bridges worlds: diner-style toast, school-lunch sandwiches, midnight grilled cheese.
You might hear the faint crackle of the crust as you slice, then feel the warm, cloudlike crumb give beneath the knife. That gentle tang cuts through butter, hugs jam, soaks up soup.
Sourdough isn’t just “artisan” anymore; it’s everyday bread, woven into weekday breakfasts and lazy Sunday afternoons.
Final Thoughts
Give this soft sourdough bread a try and see how it fits into your weekly baking rotation—you might find it quickly becomes a household favorite.
Once you’re comfortable with the process, have fun tweaking it with different flours, sweeteners, or add-ins to make the loaf truly your own.
Frequently Asked Questions
Can I Make This Soft Sourdough Bread Entirely by Hand Without Special Equipment?
Yes, you can, and I do. With just your hands, a bowl, and time, you’ll feel the dough soften, warm, and stretch under your palms, transforming slowly into a pillowy, fragrant loaf.
How Do I Troubleshoot a Gummy or Underbaked Sourdough Crumb?
You fix that gummy crumb by baking longer to 205°F, letting the loaf cool fully, and slightly reducing hydration. I’d also strengthen gluten with better kneading and extend fermentation until the dough feels airy, almost whisper-light.
Is It Possible to Freeze the Dough Before Baking for Later Use?
Yes, you can freeze it, but I’d do it right after shaping. I wrap the pan tightly, freeze, then thaw in the fridge overnight, letting it finish proofing until pillowy before baking.
How Can I Adapt This Recipe for a Stand Mixer or Bread Machine?
You can. I’d mix wet, then dry on low in your stand mixer, knead 6–8 minutes, then follow bulk, shaping, proofing as written. Bread machine: use “dough” cycle only, bake in your oven.
What Adjustments Are Needed for Baking at High Altitude?
You’ll add 5–10% more water, reduce bulk and proof slightly, and bake hotter (385–400°F) with a bit less time. I watch the dough, not the clock, feeling for airy lightness before it hits the oven.
Soft Sourdough Bread
Equipment
- 1 digital kitchen scale
- 2 medium mixing bowls
- 1 large mixing bowl
- 1 Dough scraper
- 1 bench scraper
- 1 9×5 inch loaf pan (or similar)
- 1 kitchen towel or plastic wrap
- 1 wire cooling rack
- 1 Oven
- 1 serrated bread knife
Ingredients
- 120 gram active sourdough starter 100% hydration
- 260 gram water room temperature
- 40 gram whole milk room temperature
- 30 gram unsalted butter softened
- 25 gram granulated sugar
- 8 gram fine sea salt
- 420 gram bread flour
- 20 gram whole wheat flour
- 10 gram neutral oil or softened butter for greasing pan
Instructions
- In a large mixing bowl, whisk together the active sourdough starter, water, and milk until mostly smooth.
- Add the sugar and softened butter to the bowl and mix until the butter is broken into small pieces.
- Add the bread flour, whole wheat flour, and salt, then mix with your hand or a dough scraper until a shaggy dough forms and no dry flour remains.
- Cover the bowl and let the dough rest for 20–30 minutes to allow for autolyse.
- After resting, knead the dough in the bowl or on a lightly oiled surface for 5–8 minutes until it becomes smooth and elastic, adding only a light film of oil if it sticks.
- Shape the dough into a ball and place it in a lightly oiled bowl, turning once to coat.
- Cover the bowl and let the dough bulk ferment at warm room temperature (75–78°F / 24–26°C) for 2–3 hours, performing 2–3 sets of gentle stretch-and-folds every 30–45 minutes during the first 1.5 hours.
- When the dough has risen by about 60–80% and feels airy with small bubbles visible at the edges, gently turn it out onto a lightly floured surface.
- Pat the dough into a rough rectangle, then fold the sides toward the center and roll it up tightly from the short end to form a log.
- Pinch the seam closed and tuck the ends under, then place the dough seam-side down into a greased 9×5-inch loaf pan.
- Cover the pan loosely with a kitchen towel or plastic wrap and let the dough proof at room temperature for 1–2 hours, or until it crowns 1–2 cm above the rim and feels puffy.
- About 30 minutes before baking, preheat the oven to 375°F (190°C).
- Optionally brush the top of the loaf with a little milk or melted butter for a softer, more golden crust.
- Using a sharp knife or lame, score one long slash down the center of the loaf.
- Place the loaf in the preheated oven and bake for 35–40 minutes, or until the top is deep golden brown and the internal temperature reaches about 195–200°F (90–93°C).
- Remove the pan from the oven and immediately brush the top with a little melted butter for extra softness if desired.
- Let the bread cool in the pan for 10 minutes, then carefully remove it and transfer to a wire rack.
- Allow the loaf to cool completely for at least 1 hour before slicing with a serrated knife.
Notes

Cynthia Weatherford is a seasoned chef and culinary enthusiast who serves as the Recipe creator of Somonday. With decades of experience in the kitchen and a passion for exploring diverse cuisines, Cynthia brings a blend of creativity and technique to every dish. Known for transforming simple ingredients into show-stopping meals, Cynthia believes that cooking is an art form anyone can master. Dedicated to inspiring home cooks, Cynthia shares approachable recipes, pro tips, and culinary wisdom to make every meal memorable.


