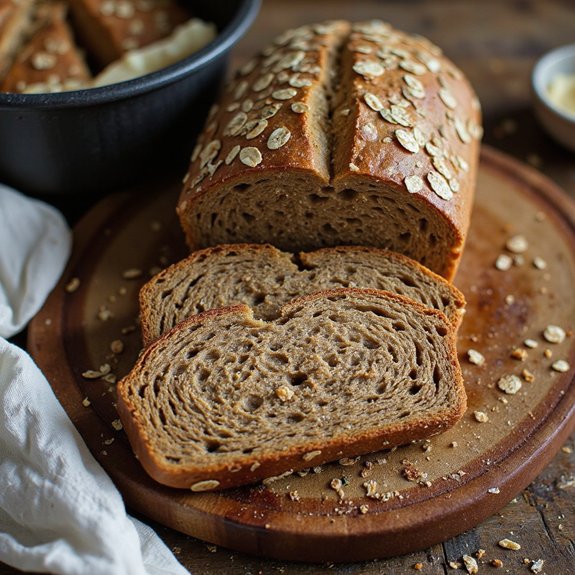
There’s something about the deep, nutty aroma of freshly baked sourdough brown bread that makes a kitchen feel like home.
Picture a burnished loaf with a crackly crust, warm steam curling up as you slice into its tender, mocha-colored crumb. This is cozy, everyday bread—perfect alongside a hearty stew, a simple salad, or just thickly buttered as an afternoon snack—and it’s surprisingly hands-off once the dough is mixed and resting.
Sourdough brown bread suits comfort seekers, curious beginners, and seasoned bakers who need a reliable “house loaf.”
When a rough week left me drained, I mixed the dough in minutes on Friday night, baked it Saturday morning, and that first slice—slathered with jam—turned a rushed weekend into something slower and calmer.
It’s ideal for Sunday suppers, easy entertaining, and make-ahead lunches all week long.
Ready to bring this loaf to life in your own kitchen?
Why You’ll Love It
- Delivers deep, slightly sweet, complex flavor from whole grains and molasses
- Creates a hearty, tender crumb that’s perfect for sandwiches or toast
- Relies on natural sourdough fermentation for better digestion and keeping quality
- Fits easily into your schedule with mostly hands-off rise time
- Freezes beautifully, so you can bake once and enjoy all week
Ingredients
- 150 g active sourdough starter — 100% hydration and very bubbly
- 300 g warm water — about 80–85°F to gently wake the starter
- 200 g whole wheat flour — fresh-milled if possible for best flavor
- 150 g bread flour — high-protein for better structure
- 100 g rye flour — fine or medium grind for easier mixing
- 25 g brown sugar, packed — light or dark both work
- 20 g unsalted butter, melted — cooled slightly so it doesn’t cook the starter
- 10 g molasses — unsulfured for smoother flavor
- 9 g fine sea salt — avoid iodized if you can
- 15 g rolled oats — optional topping for rustic look and texture
- 5 g neutral oil — for greasing pan or bowl
Step-by-Step Method
Mix the Starter and Water
Whisk the active sourdough starter and warm water in a large bowl until mostly dissolved.
Break up any thick bits of starter with the whisk or your fingers. Aim for a smooth, milky mixture. This guarantees the wild yeast and bacteria are evenly distributed before you add the flours and other ingredients.
Combine the Flours and Add-Ins
Add whole wheat flour, bread flour, rye flour, brown sugar, melted butter, molasses, and salt to the bowl.
Mix with a wooden spoon or dough whisk until no dry patches remain. Scrape down the sides of the bowl as you go. The dough will look shaggy and sticky at this stage, which is normal.
Rest the Dough to Hydrate
Let the dough rest uncovered for 20–30 minutes. Don’t knead during this time.
This autolyse period lets the flour fully hydrate and gluten begin to form on its own. The dough will feel softer and slightly smoother afterward, making it easier to stretch, fold, and handle in the next steps.
Stretch and Fold the Dough
Wet your hands lightly to prevent sticking. Perform a series of stretches and folds in the bowl: grab one side, stretch it up, then fold it over the center.
Rotate the bowl and repeat 4–6 times. Continue until the dough feels smoother and more elastic. This gentle method strengthens gluten without heavy kneading.
Bulk Ferment and Build Strength
Cover the bowl with a towel or lid and let the dough bulk ferment at room temperature for 6–8 hours.
During the first 2 hours, perform 3–4 sets of stretch and folds every 30–45 minutes. After that, let the dough rise undisturbed. Watch for bubbles and a roughly 50% increase in volume as signs of readiness.
Turn Out and Pre-Shape the Dough
When the dough looks airy and risen, lightly flour your work surface. Gently turn the dough out, trying not to deflate it completely.
Use a bench scraper to tuck the edges under, forming a loose round. Handle it gently to preserve gas. Let this pre-shaped round rest uncovered for 15–20 minutes to relax the gluten.
Shape into a Tight Loaf
After resting, shape the dough into its final form. For a loaf pan, roll or fold into a tight, even log.
For a boule, pull the dough toward you on the counter to build surface tension. Aim for a smooth, taut surface without tearing. Proper shaping helps the bread rise upward instead of spreading.
Place in Basket or Pan
Dust a proofing basket with flour if using, or lightly oil your loaf pan. Place the shaped dough seam-side up in the basket, or seam-side down in the pan.
Adjust the dough so it sits centered and level. This positioning supports the loaf during proofing and encourages an even final shape when baked.
Proof and Chill for Flavor
Cover the dough with a towel, lid, or plastic. Proof at room temperature for 1–2 hours, until slightly puffy.
Then refrigerate for 4–8 hours if possible. The cold rest develops deeper flavor, strengthens the dough, and makes scoring easier. Watch the dough so it doesn’t overproof and collapse.
Preheat the Oven and Dutch Oven
About 45 minutes before baking, preheat your oven to 450°F (230°C). If using a Dutch oven, place it inside to heat fully.
A thoroughly preheated pot and oven encourage strong oven spring and a well-developed crust. Make sure your rack is positioned near the middle for even baking.
Top with Oats if Desired
If baking in a loaf pan, lightly brush the top of the dough with water. Sprinkle rolled oats evenly over the surface, pressing gently so they adhere.
This step is optional but adds a rustic look and extra texture. Avoid soaking the dough with too much water to prevent a gummy surface.
Score the Loaf for Expansion
If using a Dutch oven, turn the dough out onto a piece of parchment seam-side down. Keep loaf-pan dough in the pan.
Use a sharp knife or lame to make one or more deliberate slashes on top. Score about ¼ inch deep. These cuts direct expansion, preventing random bursting and improving the final appearance.
Bake at High Heat First
For a Dutch oven, carefully transfer the dough with parchment into the preheated pot and cover. Place in the oven. Bake at 450°F (230°C) for 20 minutes, covered in the Dutch oven or uncovered in the loaf pan.
This initial high heat helps oven spring and sets the structure of the rising loaf.
Finish Baking and Check Doneness
Reduce the oven temperature to 400°F (200°C) and continue baking for 15–20 minutes. Look for a deep brown crust.
Check that the internal temperature reaches about 205–210°F (96–99°C). Tap the bottom of the loaf; it should sound hollow. Remove from the pan or pot as soon as it’s done.
Cool Completely Before Slicing
Transfer the baked bread to a cooling rack. Let it cool for at least 1 hour before slicing.
This cooling period allows the crumb to set and moisture to redistribute. Cutting too early can compress the structure and create a gummy texture. Once fully cooled, slice and enjoy, then store at room temperature.
Ingredient Swaps
- Use all-purpose flour in place of bread flour; reduce water by 10–20 g if the dough feels too loose.
- Substitute additional whole wheat flour for rye if rye is hard to find (flavor will be less earthy).
- For dairy-free, replace butter with an equal amount of neutral oil or melted coconut oil.
- Replace brown sugar + molasses with 30–35 g dark brown sugar or 20–25 g honey or maple syrup (slightly different flavor, same sweetness).
You Must Know
– Doneness • If the loaf looks done but you’re unsure: Use a thermometer and sound check: aim for 205–210°F (96–99°C) internal, plus a firm crust that sounds hollow when tapped on the bottom.
This prevents cutting too early into an underdone, gummy center.
– Troubleshoot • If your loaf spreads flat instead of rising tall: Next time, shorten the warm rise so bulk is closer to a 40–50% increase in volume (not doubled) and keep the shaped proof on the shorter side (1–1.5 hours at ~75°F / 24°C).
Rye and whole wheat can over-ferment fast, weakening structure and causing a pancake loaf.
- Scale • To double or halve the recipe confidently: Multiply or divide every ingredient, including salt and starter, by the same factor (e.g., ×2 gives 300 g starter, 600 g water, etc.), then watch dough cues instead of time—bulk may speed up or slow down by 1–2 hours depending on dough size and bowl geometry.
- Flavor Boost • For more tang and deeper grain flavor: Use cooler dough and longer, colder proofing—aim for the full 8 hours in the fridge after shaping, and keep bulk at the lower temp range (~70°F / 21°C).
Longer, cool fermentation sharpens acidity and enhances the nutty notes of rye and whole wheat.
– Avoid • If your dough feels very sticky and tears easily during shaping: Gently add small dustings of flour only on the outside (no more than 10–15 g extra total) and give it an extra 15–20 minutes to relax.
Overworking or dumping in lots of flour can toughen the crumb and mute flavor.
Serving Tips
- Serve warm with salted butter and a drizzle of honey or molasses.
- Pair slices with sharp cheddar, apple slices, and wholegrain mustard for a simple lunch.
- Use for hearty sandwiches: roast turkey, cranberry spread, and crisp lettuce.
- Toast and top with smashed avocado, radish slices, and flaky sea salt.
- Serve alongside soups or stews; ideal with tomato, lentil, or beef barley.
Storage & Make-Ahead
This sourdough brown bread keeps 3–4 days at room temperature wrapped in a towel or paper bag, or up to 1 week in the fridge (well-wrapped to prevent drying).
It freezes very well: slice, wrap tightly, and freeze up to 2–3 months.
Reheat by toasting or warming in the oven.
Reheating
Reheat slices gently: in a 300°F (150°C) oven for 8–10 minutes.
In a covered skillet over low heat.
Or briefly in the microwave wrapped in a damp towel.
Brown Bread in New England
Steam and molasses define what I think of as true New England brown bread, a cousin to our sourdough loaf that once steamed in coffee cans alongside pots of baked beans.
I still picture my grandmother lifting a lid off a rattling pot, a cloud of sweet, dark fragrance rushing out, the bread glossy and damp, almost pudding-soft.
When I bake this sourdough version, I’m chasing that same coziness. The rye, whole wheat, and molasses echo the dense loaves I grew up with, but the long fermentation brings a gentle tang that feels like my own twist on a regional ritual.
I love serving it warm with baked beans or thick chowder, a small, old New England comfort on a plate.
Final Thoughts
Give this sourdough brown bread a try and see how the blend of whole wheat, rye, and molasses fits your taste.
Once you’ve made it once, have fun tweaking the flours, sweetness, or toppings to make it your own signature loaf.
Frequently Asked Questions
Can I Convert This Sourdough Brown Bread Into a Gluten-Free Version?
Yes, you can, but it’ll need big changes. I’d swap in a trusted gluten‑free sourdough blend, add psyllium husk for structure, and expect a softer dough—more like thick batter than the rustic loaf you’re used to.
How Can I Troubleshoot a Gummy or Underbaked Crumb in This Bread?
I fix gummy, underbaked crumbs by baking longer until 205–210°F inside, letting it cool completely, tightening hydration slightly, ensuring full fermentation, and preheating my oven well—like giving the loaf one last cozy push toward perfection.
What Are Good Ways to Use Stale Sourdough Brown Bread Creatively?
I turn stale slices into garlicky croutons, cinnamon-sugar French toast, or olive-oil–tossed breadcrumbs. When it’s really dry, I simmer cubes in tomato soup—my grandmother’s trick—for a silky, comforting bowl you’ll remember.
How Do Altitude or Climate Changes Affect Fermentation and Baking Times?
Altitude and climate shift fermentation and baking times: higher elevations and warmth speed fermentation, cooler or humid kitchens slow it. I watch dough, not clocks—like reading weathered pages by lamplight, waiting for bubbles and softness.
Is This Sourdough Brown Bread Suitable for Diabetics or Low-Glycemic Diets?
It’s only somewhat suitable; I’d tell a diabetic friend to enjoy a thin slice with protein and fat, then test blood sugar. I picture a small, warm piece with butter, savored slowly, not mindlessly.
Sourdough Brown Bread
Equipment
- 1 large mixing bowl
- 1 medium mixing bowl
- 1 digital kitchen scale
- 1 wooden spoon or dough whisk
- 1 bench scraper
- 1 proofing basket or 1 medium bowl with towel
- 1 8×4-inch loaf pan or 1 Dutch oven
- 1 Oven
- 1 sharp knife or lame
- 1 Cooling rack
- 1 clean kitchen towel
Ingredients
- 150 gram active sourdough starter 100% hydration
- 300 gram warm water
- 200 gram whole wheat flour
- 150 gram bread flour
- 100 gram rye flour
- 25 gram brown sugar packed
- 20 gram unsalted butter melted
- 10 gram molasses
- 9 gram fine sea salt
- 15 gram rolled oats optional topping
- 5 gram neutral oil for greasing pan
Instructions
- In a large mixing bowl, whisk together the active sourdough starter and warm water until mostly dissolved.
- Add the whole wheat flour, bread flour, rye flour, brown sugar, melted butter, molasses, and salt to the bowl and mix with a wooden spoon until a rough dough forms.
- Let the dough rest uncovered for 20–30 minutes to hydrate (autolyse).
- After resting, use damp hands to perform a series of stretches and folds in the bowl until the dough feels smoother and more elastic.
- Cover the bowl with a towel or lid and let the dough bulk ferment at room temperature for 6–8 hours, performing 3–4 sets of stretch and folds every 30–45 minutes in the first 2 hours.
- When the dough has risen by about 50% and looks airy with bubbles, lightly flour your work surface and gently turn the dough out.
- Use a bench scraper to pre-shape the dough into a loose round, then let it rest for 15–20 minutes uncovered.
- Shape the dough into a tight loaf suitable for your loaf pan or into a boule for a Dutch oven, creating surface tension without tearing the dough.
- Place the shaped dough seam-side up in a floured proofing basket or seam-side down in a lightly oiled loaf pan.
- Cover and proof at room temperature for 1–2 hours, then refrigerate for 4–8 hours for improved flavor and easier scoring (optional but recommended).
- About 45 minutes before baking, preheat the oven to 450°F (230°C), placing the Dutch oven inside if using.
- If using a loaf pan, lightly brush the top of the dough with water and sprinkle rolled oats on top if desired.
- Turn the dough out onto parchment (if using a Dutch oven) or keep it in the loaf pan, then score the top with a sharp knife or lame.
- For a Dutch oven, carefully transfer the dough with parchment into the preheated pot, cover, and place in the oven.
- Bake at 450°F (230°C) for 20 minutes covered (Dutch oven) or uncovered (loaf pan), then reduce the temperature to 400°F (200°C) and bake another 15–20 minutes until deep brown.
- Check that the internal temperature of the bread reaches about 205–210°F (96–99°C) and the bottom sounds hollow when tapped.
- Remove the bread from the pan or Dutch oven and cool on a cooling rack for at least 1 hour before slicing.
Notes

Cynthia Weatherford is a seasoned chef and culinary enthusiast who serves as the Recipe creator of Somonday. With decades of experience in the kitchen and a passion for exploring diverse cuisines, Cynthia brings a blend of creativity and technique to every dish. Known for transforming simple ingredients into show-stopping meals, Cynthia believes that cooking is an art form anyone can master. Dedicated to inspiring home cooks, Cynthia shares approachable recipes, pro tips, and culinary wisdom to make every meal memorable.


