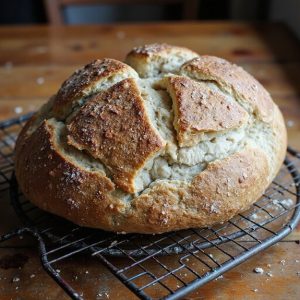
There’s something about tearing into a still-warm slice of sourdough—the crackle of the golden crust, the tender, airy crumb releasing a gentle steam that smells of toasted wheat and butter.
Sourdough isn’t a quick skillet dinner; it’s a cozy, slow-crafted staple that fits beautifully into relaxed weekends and unhurried evenings.
It’s ideal for beginners who love the idea of baking but feel nervous about yeast, for comfort seekers who crave thick slices with soup, and for meal-preppers who like having sturdy, flavorful bread on hand all week.
When I first started baking sourdough, a lopsided loaf turned a gloomy Sunday into something quietly triumphant. I sliced it, spread on butter, and suddenly dinner—simple soup and warm bread—felt special.
This bread shines at Sunday suppers, casual gatherings, or whenever a last-minute craving for “real” homemade comfort hits. Ready to bring this loaf, and your own starter, to life?
Why You’ll Love It
- Delivers classic tangy flavor with a crisp, bakery-style crust
- Builds baking confidence with a simple, step-by-step sourdough method
- Uses just four basic ingredients and minimal specialized equipment
- Fits into your schedule with flexible room-temperature or overnight proofing
- Produces a versatile loaf perfect for sandwiches, toast, or serving with dinner
Ingredients
- 100 g active sourdough starter — bubbly and recently fed (should at least double after feeding)
- 350 g water — room temperature (adjust slightly if dough feels very dry or very sticky)
- 500 g bread flour — higher protein for better gluten strength
- 10 g fine sea salt — distributes evenly and dissolves easily
- Extra flour for dusting — use as needed to prevent sticking during shaping
Step-by-Step Method
Mix Starter and Water
Whisk the active, bubbly starter with room-temperature water in a medium bowl.
Break up any clumps until the mixture looks mostly smooth and milky. This step evenly distributes the wild yeast and bacteria.
Proper mixing helps guarantee even fermentation later, so take a minute to dissolve the starter thoroughly before adding flour.
Combine Flour and Form Shaggy Dough
Add the bread flour to the bowl all at once. Mix with a spoon or your hand until no dry bits remain.
Scrape the sides and bottom so everything is incorporated. The dough will look rough and shaggy at this stage.
Don’t knead yet; just guarantee all flour is hydrated and clumped together.
Rest the Dough (Autolyse)
Cover the bowl with a clean kitchen towel. Let the dough rest at room temperature for 30–45 minutes.
During this autolyse, the flour absorbs water and gluten begins forming on its own. This simple pause makes the dough easier to handle and improves flavor and texture without extra work from you.
Add Salt and Incorporate Fully
Sprinkle the fine sea salt evenly over the dough. Use your fingers to pinch the dough and fold it over itself repeatedly.
Turn the bowl as you work so the salt distributes throughout. Continue until the grains of salt are no longer visible.
Proper salt incorporation strengthens gluten and balances flavor.
Begin Bulk Fermentation
Cover the bowl again and let the dough rest at room temperature for 3–4 hours. This is bulk fermentation, where the dough rises and flavor develops.
Keep the bowl away from drafts and extreme temperatures. During this time, the starter’s yeast produces gas, and the dough slowly becomes lighter and more elastic.
Perform Stretch-and-Folds Regularly
During the first 2 hours of bulk fermentation, perform 3–4 sets of stretch-and-folds every 30 minutes. To do this, gently grab one side of the dough, stretch it up, then fold it over the center.
Rotate the bowl and repeat around. This strengthens gluten without kneading and helps create structure and an open crumb.
Watch for Rise and Bubbles
After the final stretch-and-fold, let the dough rest undisturbed. Watch for a 50% increase in volume, a puffier look, and bubbles along the sides and top.
This may take the remaining 1–2 hours. Rely on these visual signs more than the clock. Properly fermented dough will feel airy and jiggly when the bowl is moved.
Pre-Shape the Dough Gently
Lightly flour your work surface. Gently turn the dough out of the bowl using a dough scraper.
Try not to deflate it completely. Use the scraper to tuck and turn the dough, forming a loose round shape. This pre-shape organizes the gluten and prepares the dough for a tighter final shaping later.
Let the Dough Relax
Leave the pre-shaped dough on the counter, uncovered, for 15–20 minutes. This rest allows the gluten to relax, making final shaping easier and smoother.
The dough will slightly spread but should still hold some shape. Avoid moving or handling it during this time so you don’t disturb the developing structure.
Final Shape the Loaf
Use your dough scraper and hands to tighten the dough into a taut ball or oval. Gently pull the dough toward you on the counter to create surface tension.
Rotate and repeat until the outside feels smooth and tight. Shape according to your proofing basket—round for a boule or oval for a batard.
Prepare the Proofing Basket
Generously flour your proofing basket or line a medium bowl with a well-floured kitchen towel. Make sure the sides and bottom are coated so the dough doesn’t stick.
Place the shaped dough seam side up into the basket. The floured surface will become the loaf’s exterior during baking.
Proof at Room Temperature or Cold
Cover the basket loosely. Let the dough proof at room temperature for 1–2 hours, or refrigerate it for a slower 6–10 hour cold proof.
At room temperature, look for a noticeable puff and slight jiggle. In the fridge, the rise will be slower but flavor deepens. Don’t overproof; the dough should still feel springy.
Preheat the Oven and Dutch Oven
About 45 minutes before baking, place your Dutch oven with its lid into your oven. Preheat to 475°F (245°C).
Heating the pot thoroughly helps create strong oven spring. The enclosed space traps steam from the dough, which improves crust and volume.
Allow enough time for both oven and pot to fully heat.
Transfer Dough to Hot Pot
Carefully remove the hot Dutch oven from the oven and set it on a heat-safe surface. Gently invert the proofed dough onto parchment paper or directly into the pot so it ends up seam side down.
Work confidently but gently to avoid deflating the dough. Adjust its position if needed before scoring.
Score the Top of the Loaf
Use a sharp knife or lame to cut a ½-inch deep slash across the top of the dough. This score controls where the bread expands during baking.
Angle the blade slightly for a more pronounced ear. Make the cut in one swift motion to avoid dragging or tearing the dough’s surface.
Bake Covered for Steam
Cover the Dutch oven with its lid and place it back into the hot oven. Bake at 475°F (245°C) for 20 minutes.
The covered environment traps steam released from the dough. This steam keeps the crust soft initially, allowing maximum oven spring and helping the loaf develop a glossy, blistered exterior.
Finish Baking Uncovered
Remove the lid carefully to avoid steam burns. Reduce the oven temperature to 450°F (230°C).
Continue baking the loaf uncovered for another 20–25 minutes. Watch for a deep golden-brown crust and a hollow sound when tapped on the bottom. Adjust time slightly depending on your oven and desired darkness.
Cool Completely Before Slicing
Use oven mitts to lift the loaf from the Dutch oven and place it on a wire cooling rack. Let it cool completely for at least 1 hour.
This resting time allows the crumb to set and moisture to redistribute. Slicing too early can make the interior gummy, so wait for best texture and flavor.
Ingredient Swaps
– Flour: You can swap up to half the bread flour for whole wheat or rye; if using 100% whole grain, add 10–20 g more water and expect a denser loaf.
All‑purpose flour works in place of bread flour, though the bread may rise a bit less and have a softer crust.
- Salt: Any fine salt (kosher, sea, or table) is fine—if using coarse salt, measure by weight (10 g), not spoons.
- Starter type: A whole‑wheat or rye starter can replace a white starter 1:1; it may ferment faster, so keep an eye on dough rise instead of strictly following times.
- Hydration tweaks: In very dry climates or with very strong bread flours, you may need 10–20 g extra water; with lower‑protein or very soft flours, reduce water by 10–20 g to avoid overly sticky dough.
You Must Know
– Doneness • If your loaf sounds “thuddy” instead of hollow: Leave it in the oven (uncovered) 5–10 minutes longer, aiming for a deep brown crust and an internal temp around 205–210°F (96–99°C).
A hollow knock on the bottom and strong toasty smell signal the crumb has set.
– Troubleshoot • When your dough seems too loose and spreads: Add a light extra dusting of flour (5–10 g at a time) during handling and focus on tighter shaping until the dough holds a soft, smooth ball that only slowly relaxes over 5–10 minutes.
This prevents a flat, “pancake” loaf.
– Troubleshoot • If your bread turns out dense with few holes: Next time, let the dough rise longer in the first rise until it’s about 50% bigger with visible bubbles along the sides, even if this takes 1–2 extra hours.
Under-fermented dough looks smooth and tight and bakes up heavy.
– Flavor Boost • For a more tangy, complex flavor: Keep the shaped dough in the fridge for a long chill of 8–10 hours (or overnight) instead of a short room-temp rise.
The cool, slow rise builds acidity and aroma without over-inflating the dough.
– Scale • To make two loaves instead of one: Double every ingredient (e.g., 200 g starter, 700 g water, 1000 g flour, 20 g salt) and divide the dough into two equal pieces by weight before the final shaping.
Each portion should be about 850–900 g for similarly sized loaves.
Serving Tips
- Serve warm slices with salted butter and a drizzle of honey.
- Pair with soft cheeses, olives, and cured meats for a simple appetizer board.
- Toast and top with avocado, cherry tomatoes, and flaky salt for breakfast.
- Use thick slices for grilled cheese or panini-style sandwiches.
- Cube leftovers for crunchy homemade croutons in soups and salads.
Storage & Make-Ahead
Sourdough keeps at room temperature for 2–3 days.
Then store sliced in the fridge up to 5 days, well wrapped.
For true make-ahead, freeze tightly wrapped (whole or sliced) up to 2 months.
Thaw at room temperature, then refresh in a 350°F (175°C) oven for 5–10 minutes.
Reheating
Reheat slices gently: wrap in foil and warm in a 300°F (150°C) oven.
Briefly microwave with a cup of water to avoid toughness.
Or toast in a covered skillet on low.
Gold‑Rush Campfire Loaves
Under an open sky and the glow of coals, I love turning this simple sourdough into a rugged “gold‑rush” campfire loaf, the kind you tear apart with your hands while the crust crackles in the cold air.
Out there, your Dutch oven becomes a frontier oven: I tuck the shaped, proofed dough onto a round of parchment, nestle it in the pot, then bury the lid under a shovel’s worth of embers.
The night smells of smoke and tangy starter.
I listen for the faint hiss of steam inside the pot and watch the lid blacken with soot.
When I finally lift it, heat rushes out, carrying that deep, caramel, wilderness‑bread aroma that makes everyone go quiet for a moment.
Final Thoughts
Now it’s your turn to bake a loaf—follow the recipe once as written, then start tweaking the hydration, fermentation time, or scoring to make it truly your own.
Have fun experimenting and enjoying each bake along the way.
Frequently Asked Questions
How Do I Troubleshoot a Starter That Smells Unpleasant or Shows Pink/Orange Streaks?
If your starter smells rotten or shows pink‑orange streaks, I’d toss it—those colors whisper spoilage. I’d scrub the jar, start fresh, then feed regularly; you’ll soon smell clean tang, apples, and warm, floury air again.
Can I Safely Freeze My Sourdough Starter for Long-Term Storage, and How?
Yes, you can. I thicken my starter, spread it like soft clay in a thin layer, freeze it flat, then break it into shards and store them airtight; later, I revive pieces with warm floury feeds.
What Common Beginner Mistakes Cause Gummy or Underbaked Sourdough Interiors?
You’ll usually get gummy sourdough when you cut too soon, underbake, or rush fermentation. I watch for a bold, crackling crust, a hollow thump underneath, and a loaf completely cooled before my knife whispers through.
How Do High Altitude or Very Humid Climates Affect Sourdough Fermentation and Baking?
They speed fermentation and change texture: at altitude, dough rises faster, dries sooner, and bakes quicker; in humidity, it feels tacky, needs less water, and often proofs faster. I watch dough’s look, smell, and feel, not clocks.
Is Sourdough Easier to Digest or Lower in Gluten Than Regular Yeast Bread?
Yes, it’s often easier to digest, but it’s not truly low‑gluten. I imagine you tasting a tangy, chewy slice; long fermentation softens the dough, breaks down some gluten, and tames that bready bloat.
Sourdough For Beginners
Equipment
- 2 Mixing bowls
- 1 digital kitchen scale
- 1 Dough scraper
- 1 Dutch oven or lidded heavy pot (4–5 quart)
- 1 proofing basket or medium bowl
- 1 clean kitchen towel
- 1 measuring cup
- 1 Spoon
- 1 sharp knife or lame
- 1 wire cooling rack
Ingredients
- 100 gram active sourdough starter bubbly and recently fed
- 350 gram water room temperature
- 500 gram bread flour
- 10 gram fine sea salt
- 1 Extra flour for dusting
Instructions
- In a mixing bowl, whisk together the active sourdough starter and water until mostly dissolved.
- Add the bread flour to the bowl and mix with a spoon or your hand until no dry flour remains and a shaggy dough forms.
- Cover the bowl with a towel and let the dough rest (autolyse) for 30–45 minutes at room temperature.
- Sprinkle the salt over the dough, then pinch and fold the dough until the salt is fully incorporated.
- Begin bulk fermentation by covering the bowl and letting the dough rest at room temperature for 3–4 hours.
- During the first 2 hours of bulk fermentation, perform 3–4 sets of stretch-and-folds every 30 minutes by gently stretching a side of the dough up and folding it over itself.
- After the final stretch-and-fold, let the dough rest undisturbed until it has risen by about 50% and looks airy with bubbles along the sides.
- Lightly flour your work surface, gently turn the dough out, and shape it into a loose round using your dough scraper.
- Let the dough rest on the counter for 15–20 minutes, uncovered, to relax.
- Perform a final shape by tightening the surface of the dough into a taut ball or oval, depending on your proofing basket.
- Generously flour your proofing basket or line a bowl with a floured kitchen towel, then place the dough seam side up inside.
- Cover the dough and let it proof at room temperature for 1–2 hours, or refrigerate for 6–10 hours for a slower, cold proof.
- About 45 minutes before baking, place your Dutch oven with its lid into the oven and preheat to 475°F (245°C).
- When ready to bake, carefully remove the hot Dutch oven, gently invert the dough onto a piece of parchment or directly into the pot so it is seam side down.
- Use a sharp knife or lame to score the top of the dough with a ½-inch deep cut to allow expansion.
- Cover the Dutch oven with its lid and bake for 20 minutes at 475°F (245°C).
- Remove the lid, reduce the oven temperature to 450°F (230°C), and bake for another 20–25 minutes until deep golden brown.
- Carefully remove the loaf from the Dutch oven and place it on a wire rack to cool completely for at least 1 hour before slicing.
Notes

Cynthia Weatherford is a seasoned chef and culinary enthusiast who serves as the Recipe creator of Somonday. With decades of experience in the kitchen and a passion for exploring diverse cuisines, Cynthia brings a blend of creativity and technique to every dish. Known for transforming simple ingredients into show-stopping meals, Cynthia believes that cooking is an art form anyone can master. Dedicated to inspiring home cooks, Cynthia shares approachable recipes, pro tips, and culinary wisdom to make every meal memorable.