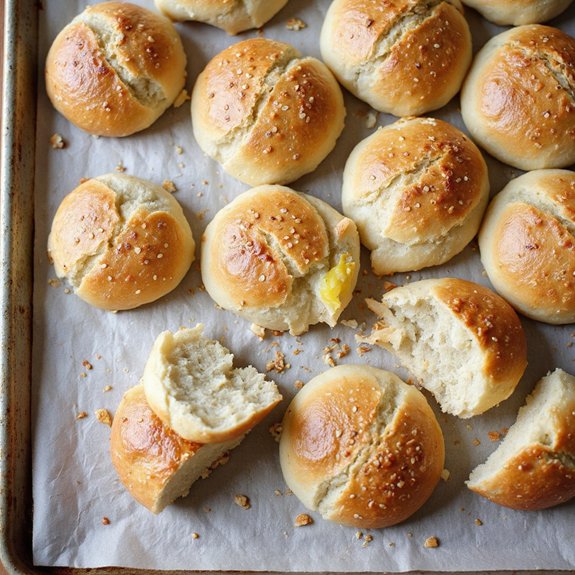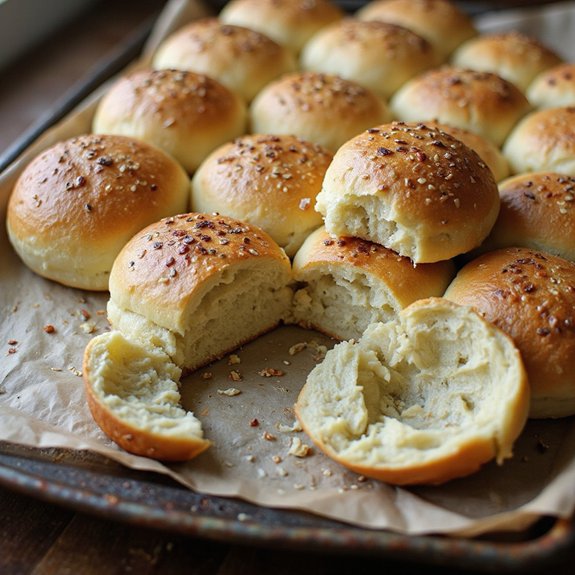
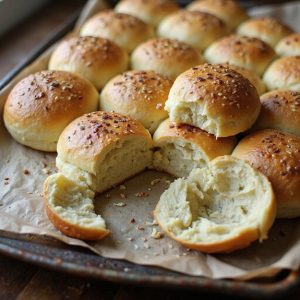
There’s something about a tray of golden sourdough slider buns coming out of the oven—steam curling up, crusts softly glistening, and that gentle, tangy aroma filling the kitchen.
These little rolls are tender inside with a delicate chew, perfect for piling high with pulled pork, mini burgers, or simple ham and cheese.
They’re a cozy, slow-rise bake that fits beautifully into your day: active time is short, and the dough does most of the work.
These buns are ideal for families, beginners keen to use their starter, and anyone who loves to prep ahead for easy meals.
I still remember a rainy Sunday when unexpected guests dropped by; a batch of these sliders, split and stuffed with leftovers, turned into an effortless, cheerful dinner.
They shine at casual gatherings, game days, or make-ahead lunches through the week.
Ready to bring this small-but-mighty bake to life?
Why You’ll Love It
- Delivers rich, tangy flavor you don’t get from commercial yeast rolls
- Stays soft and tender, perfect for pulled pork, burgers, and sandwiches
- Uses simple pantry ingredients plus starter—no specialty flours or conditioners needed
- Schedules easily with flexible rise times to fit your baking day
- Freezes beautifully, so you can prep slider buns well ahead of time
Ingredients
- 150 g active sourdough starter 100% hydration — use recently fed and bubbly
- 250 g warm water — about 80–85°F to avoid shocking the starter
- 40 g granulated sugar — adds light sweetness and boosts browning
- 60 g unsalted butter melted and cooled — cool so it doesn’t cook the egg
- 1 large egg room temperature — helps with rise and tenderness
- 500 g bread flour — higher protein for good structure
- 9 g fine sea salt — enhances flavor; don’t skip
- 30 g whole milk room temperature — enriches the dough for softness
- 1 large egg for egg wash — gives shiny, golden tops
- 10 g water for egg wash — thins egg wash for easier brushing
- 10 g sesame seeds optional topping — add nutty flavor and crunch
Step-by-Step Method
Mix the Wet Ingredients
Whisk the active sourdough starter, warm water, sugar, melted butter, and room-temperature egg in a large mixing bowl. Beat until the mixture is smooth and slightly frothy.
Make certain the butter is cooled so it doesn’t cook the egg or weaken the starter. Scrape down the bowl as needed to fully combine everything.
Form the Shaggy Dough
Add the bread flour and fine sea salt to the bowl. Mix with a dough scraper or sturdy spoon until no dry flour remains.
Aim for a rough, shaggy mass rather than a smooth dough. Scrape the sides and bottom of the bowl to incorporate all ingredients evenly before moving on to kneading.
Knead Until Smooth and Elastic
Knead the dough by hand for 8–10 minutes or in a stand mixer on low for 6–8 minutes. Work until the dough becomes smooth, elastic, and slightly tacky but not sticky.
Avoid adding excessive flour. The dough should stretch without tearing easily and feel soft yet structured when you handle it.
Bulk Ferment the Dough
Shape the kneaded dough into a ball and place it in a lightly oiled bowl. Cover tightly with plastic wrap or a reusable cover.
Let it bulk ferment at warm room temperature for 2–3 hours. Watch for the dough to puff noticeably and roughly double in size, showing bubbles and a light, airy feel.
Shape and Divide the Dough
Lightly flour your work surface and gently turn out the dough. Pat or roll it into an even rectangle about ¾–1 inch thick.
Use a kitchen scale or visual estimates to divide the dough into 12 equal portions, around 70–75 grams each. Keep pieces covered lightly to prevent drying as you work.
Round the Slider Buns
Shape each piece into a tight ball by gently tucking the edges underneath. Roll the dough against the counter with cupped hands to build surface tension.
Aim for smooth tops and sealed bottoms. Proper shaping helps the buns rise evenly and maintain a nice dome during proofing and baking.
Proof the Shaped Buns
Line two rimmed baking sheets with parchment. Arrange six dough balls on each sheet, leaving at least two inches of space around them.
Cover lightly with plastic wrap or a clean kitchen towel. Proof at warm room temperature for 60–90 minutes until puffy, slightly jiggly, and noticeably larger.
Prepare the Egg Wash
About 20 minutes before baking, preheat the oven to 400°F (200°C) with racks in the upper and lower thirds. In a small bowl, whisk together one egg and the milk until perfectly smooth.
Make sure there are no streaks of yolk or white. This egg wash will create glossy, deeply golden tops.
Brush, Top, and Bake
Gently brush a thin, even layer of egg wash over each proofed bun, taking care not to deflate them. Sprinkle sesame seeds on top if you like.
Bake for 15–18 minutes, rotating the pans halfway through. Look for deep golden color and an internal temperature of about 200°F (93°C).
Cool and Serve the Buns
Transfer the buns from the baking sheets to a cooling rack immediately. Let them cool for at least 20–30 minutes before slicing.
This rest helps set the crumb and keeps them tender. Serve as slider buns for mini burgers or sandwiches, or freeze once fully cooled for future meals.
Ingredient Swaps
- Flour: You can swap up to half the bread flour with all-purpose; for softer buns use 100% all-purpose (they may spread a bit more). For whole grain, replace 20–30% of the bread flour with whole wheat and add 10–20 g extra water if the dough feels stiff.
- Butter & milk: Use an equal amount of neutral oil instead of butter, and any unsweetened plant milk (oat, soy, almond) in place of dairy milk for a dairy-free version.
- Sugar: Replace granulated sugar 1:1 with light brown sugar, coconut sugar, or honey (by weight); with liquid sweeteners, be ready to add a spoonful of extra flour if the dough is very sticky.
- Eggs: For egg-free dough, substitute the egg in the dough with 45–50 g additional warm water or plant milk; for the egg wash, use plant milk or a mix of plant milk and a little oil for color.
- Topping: Use poppy seeds, everything bagel seasoning, flaky salt, or leave plain instead of sesame seeds.
You Must Know
- Doneness – If you’re unsure the buns are ready, use both thermometer and touch: pull them when the center hits 195–205°F (90–96°C) and the tops are a rich, even brown; they should feel light and hollow when gently tapped, not dense or doughy.
- Troubleshoot – If the dough barely rises in 3 hours, extend bulk fermentation in 30-minute intervals and check for volume and feel instead of clock time: aim for ~75–100% increase and a softly domed, aerated dough that jiggles slightly when the bowl is shaken.
- Avoid – Avoid adding lots of flour on the counter if the dough feels sticky; instead, lightly oil your hands and surface so the dough stays soft and slightly tacky, which keeps the buns tender rather than dry or tough.
- Flavor Boost – For a deeper sourdough tang, keep bulk fermentation a bit cooler (70–72°F / 21–22°C) and slightly longer (up to 4–5 hours) and use a starter that was fed 6–8 hours before, so more organic acids develop without overproofing.
- Make-Ahead – To spread the work over 2 days, refrigerate the shaped buns tightly covered for 8–16 hours; let them warm and puff at room temperature for 45–90 minutes before egg wash so they finish proofing and bake up tall instead of flat.
Serving Tips
- Serve with mini smash burgers, cheddar, pickles, and caramelized onions for classic sliders.
- Fill with pulled pork, coleslaw, and pickled onions for a BBQ-inspired slider.
- Make breakfast sliders with soft-scrambled eggs, bacon or sausage, and melty cheese.
- Pair with grilled chicken, avocado, tomato, and chipotle mayo for a spicy option.
- Serve as party sandwich platters: assorted meats, cheeses, and spreads on sliced buns.
Storage & Make-Ahead
Sourdough slider buns keep in the fridge, well wrapped, for up to 4 days.
Warm briefly in a low oven to refresh.
For make-ahead, fully bake, cool completely, then freeze up to 2 months.
Thaw at room temperature, then rewarm before serving for best texture and flavor.
Reheating
For best texture, reheat buns briefly.
10–15 seconds in the microwave, 5–7 minutes in a 325°F oven wrapped in foil, or warm cut sides on a covered skillet.
Tailgate & Game-Day Culture
Once those buns are warm and fluffy again, they’re ready for the real fun: game day.
I picture you lifting the foil, a little cloud of steam rising, that buttery, toasty scent cutting through the chill of the parking lot. This is the moment everyone drifts toward your tailgate.
I treat sourdough sliders as my anchor: compact, sturdy, soft enough to tear with gloved hands, but strong enough to cradle saucy pulled pork or smashed burger patties.
I set them out in a lined pan, wrapped along one edge so they stay warm between plays. You can build a mini slider bar—cheese, pickles, onions, sauces—and let people stack their own, plate in one hand, team flag in the other.
Final Thoughts
Give these sourdough slider buns a try and see how much flavor homemade bread brings to your next meal.
Don’t be afraid to tweak the toppings, fillings, or seed mix to make them your own.
Frequently Asked Questions
Can I Adapt These Slider Buns for Gluten-Free Sourdough Baking?
Yes, you can, but you’ll need a gluten‑free bread blend and psyllium husk gel. I’d skip kneading, treat it like thick batter, proof once, then bake in a snug pan for tender, pillowy bites.
How Do High-Altitude Conditions Affect Fermentation and Baking Times?
High altitude speeds fermentation and shortens baking time, so I watch the dough’s rise, not the clock. I’d proof cooler, reduce hydration slightly, and bake hotter, guarding against over-proofing and pale, underdeveloped crust.
Can I Cold-Proof the Shaped Buns Overnight in the Refrigerator?
Yes, you can. I’d shape them, cover snugly, then chill 8–16 hours. In the morning, let them warm until pillowy and jiggly, glaze gently, and bake—flavor deepens like a slow, quiet overnight snowfall.
How Should I Adjust Hydration for Whole Wheat or Rye Variations?
I’d increase hydration about 5–10% for whole wheat, 10–15% for rye. Add water gradually, stopping when the dough feels soft, supple, and slightly tacky—like a warm pillow that just barely clings to your fingers.
What’s the Best Way to Scale This Recipe for Large Party Batches?
I’d scale everything by weight, keep batches under double to avoid sluggish fermentation, and stagger mixing times. I’d proof on multiple trays, rotate racks, and watch dough volume, not the clock, for truly consistent, cozy party rolls.
Sourdough Slider Buns
Equipment
- 1 Kitchen scale
- 2 medium mixing bowls
- 1 large mixing bowl
- 1 Dough scraper
- 1 stand mixer with dough hook (optional)
- 1 plastic wrap roll or 1 reusable bowl cover
- 2 rimmed baking sheets
- 2 sheets parchment paper
- 1 pastry brush
- 1 small whisk or fork
- 1 Cooling rack
Ingredients
- 150 gram active sourdough starter 100% hydration
- 250 gram warm water about 80–85°F
- 40 gram granulated sugar
- 60 gram unsalted butter melted and cooled
- 1 large egg room temperature
- 500 gram bread flour
- 9 gram fine sea salt
- 30 gram whole milk room temperature
- 1 large egg for egg wash
- 10 gram water for egg wash
- 10 gram sesame seeds optional topping
Instructions
- In a large mixing bowl whisk together the active sourdough starter, warm water, sugar, melted butter, and egg until smooth.
- Add the bread flour and salt to the bowl and mix with a dough scraper or spoon until a shaggy dough forms.
- Knead the dough by hand for 8–10 minutes or in a stand mixer on low speed for 6–8 minutes until it is smooth, elastic, and slightly tacky but not sticky.
- Shape the dough into a ball, place it in a lightly oiled bowl, cover, and let it bulk ferment at warm room temperature for 2–3 hours until puffed and about doubled.
- Lightly flour your work surface, gently turn out the dough, and pat or roll it into an even rectangle about ¾–1 inch thick.
- Use a scale or visual estimate to divide the dough into 12 equal pieces, about 70–75 g each.
- Shape each piece into a tight ball by tucking the edges underneath and rolling against the counter to create surface tension.
- Line two rimmed baking sheets with parchment paper and arrange 6 dough balls on each sheet with at least 2 inches of space between them.
- Lightly cover the shaped buns with plastic wrap or a clean towel and let them proof at warm room temperature for 60–90 minutes until noticeably puffy and slightly jiggly.
- About 20 minutes before baking, preheat the oven to 400°F (200°C) with racks in the upper and lower thirds.
- In a small bowl whisk together the egg and milk to make the egg wash until fully combined and smooth.
- Gently brush the tops of the proofed buns with a thin, even layer of egg wash, taking care not to deflate them.
- If using, sprinkle sesame seeds evenly over the tops of the buns.
- Bake the buns for 15–18 minutes, rotating the pans halfway through, until deep golden brown and an instant-read thermometer in the center reads about 200°F (93°C).
- Transfer the buns to a cooling rack and let them cool at least 20–30 minutes before slicing and serving.
Notes

Cynthia Weatherford is a seasoned chef and culinary enthusiast who serves as the Recipe creator of Somonday. With decades of experience in the kitchen and a passion for exploring diverse cuisines, Cynthia brings a blend of creativity and technique to every dish. Known for transforming simple ingredients into show-stopping meals, Cynthia believes that cooking is an art form anyone can master. Dedicated to inspiring home cooks, Cynthia shares approachable recipes, pro tips, and culinary wisdom to make every meal memorable.