There’s something about the smell of warm cinnamon and butter spiraling through the kitchen that makes everything feel slower and softer.
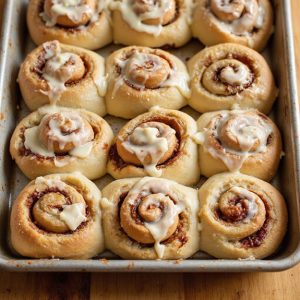
These sourdough cinnamon rolls are a cozy, from-scratch treat: tender, golden swirls with a tangy-sweet crumb and velvety icing that melts into every crease.
They’re not “instant,” but they’re surprisingly low-effort—most of the magic happens while the dough rests—making them perfect for relaxed weekends, holiday mornings, or any time sweet-tooth fans and comfort seekers gather.
I first leaned on this recipe during a hectic week when nothing went as planned.
I prepped the dough the night before, and by Sunday morning the house was filled with the scent of caramelizing sugar and toasted spices.
Everyone slowed down, wrapped their hands around mugs of coffee, and suddenly the week ahead felt manageable.
These rolls shine for brunch spreads, cozy Sunday suppers, or late-night baking therapy. Ready to bring this dish to life?
Why You’ll Love It
- Delivers deep, complex flavor from long-fermented sourdough and rich filling
- Makes extra-soft, fluffy rolls with irresistibly gooey, tender centers
- Simplifies timing with an overnight chill for easy morning baking
- Uses basic pantry ingredients and your existing sourdough starter discard
- Elevates brunch, holidays, or gatherings into a bakery-style, crowd-pleasing treat
Ingredients
- 240 g active sourdough starter — at peak and very bubbly for best rise
- 240 ml whole milk, lukewarm — gently warmed, not hot, to keep starter happy
- 100 g granulated sugar — adds sweetness and helps browning
- 100 g unsalted butter, melted & slightly cooled — avoid adding while piping hot
- 2 large eggs, room temperature — cold eggs can slow fermentation
- 8 g fine sea salt — balances sweetness and strengthens gluten
- 520–600 g all-purpose flour — start low, add only if dough is too sticky
- 120 g unsalted butter, very soft — should be easily spreadable for filling
- 180 g light brown sugar, packed — gives caramel-like, gooey centers
- 2 tbsp ground cinnamon — use fresh, aromatic cinnamon for fullest flavor
- 1 tsp ground vanilla or 2 tsp vanilla extract — vanilla deepens the filling
- 120 g cream cheese, softened — room temp for a smooth icing
- 60 g unsalted butter, softened — combines easily with cream cheese
- 180 g powdered sugar, sifted — sifting prevents lumpy icing
- 1 tsp vanilla extract — classic bakery-style frosting flavor
- 15–30 ml milk or cream — adjust to reach a thick, spreadable icing
- 1 pinch fine sea salt — a tiny bit keeps the icing from tasting flat
Step-by-Step Method
Mix the wet ingredients
Whisk the active sourdough starter, lukewarm milk, sugar, melted butter, and eggs in a large bowl. Mix until smooth with no streaks of egg or starter.
Make certain the milk is just warm, not hot, so it doesn’t harm the yeast in the starter. Set aside briefly while you prepare to add the dry ingredients.
Bring together a soft shaggy dough
Add the salt and 520 g of flour to the bowl. Stir with a spoon or use a stand mixer on low.
Mix until a shaggy, uneven dough forms and no dry flour remains. Scrape down the sides as needed. The dough should look rough but cohesive and slightly sticky at this point.
Knead until smooth and elastic
Knead the dough by hand or with a dough hook for 7–10 minutes. Add only small sprinkles of the remaining flour if the dough is extremely sticky.
Aim for a soft, slightly tacky, very stretchy dough. Stop once it feels smooth, elastic, and pulls away from the bowl or counter cleanly.
Let the dough rise until puffy
Shape the dough into a smooth ball. Lightly grease a large bowl and place the dough inside. Cover tightly with plastic wrap or a clean towel.
Let it rise at room temperature for 6–8 hours, or until roughly doubled in size and noticeably puffy. Warmer kitchens may shorten the rise time markedly.
Mix the cinnamon filling
Combine very soft butter, brown sugar, cinnamon, and vanilla in a medium bowl. Mash and stir until you have a smooth, spreadable paste with no dry sugar pockets.
Adjust texture with a tiny bit more softened butter if it seems too stiff. Keep at room temperature so it spreads easily later.
Deflate and shape the dough rectangle
Lightly flour your work surface. Turn out the risen dough and gently press out the air with your hands.
Pat it into a rough rectangle. Avoid tearing or aggressively punching the dough. This gentle handling keeps the structure intact and makes the next rolling step easier and more even.
Roll into a large even sheet
Use a rolling pin to roll the dough into a rectangle about 40 x 30 cm (16 x 12 inches). Keep the thickness uniform across the surface.
Lightly flour the pin and counter only as needed to prevent sticking. Rotate the dough occasionally to maintain shape and avoid an overly thick center.
Spread the cinnamon filling
Dollop the cinnamon filling over the dough. Use an offset spatula or the back of a spoon to spread it into an even layer.
Leave a 1 cm (½ inch) clean border along one long edge. This bare strip helps the roll seal properly. Make certain every other area is fully covered for consistent flavor.
Roll up the log tightly
Start from the long edge opposite the clean border. Roll the dough up into a tight, even log, keeping tension as you go.
Tug gently as you roll to avoid gaps inside the spiral. When you reach the bare edge, pinch along the seam to seal the log closed. Turn the seam-side down.
Slice into individual rolls
Trim the uneven ends of the log if desired. Mark the log into 12 equal sections, then cut using a sharp knife or dough scraper.
Press straight down rather than sawing to avoid squashing the spirals. If the dough is very soft, chill briefly to firm up before slicing for neater rolls.
Arrange and proof the rolls
Grease a 9×13-inch baking pan. Place the rolls cut-side up, spacing them evenly. Cover tightly with plastic wrap or a clean towel.
Let them rise at room temperature for 2–4 hours until puffy, or refrigerate overnight. If chilled, allow 45–60 minutes at room temperature before baking to finish proofing.
Preheat the oven and bake
Preheat the oven to 180°C (350°F) while the rolls finish rising. Bake the rolls for 22–28 minutes, until lightly golden on top.
Check the centers with a thermometer if you like; they should reach about 88–93°C (190–200°F). Tent loosely with foil if the tops brown too quickly.
Whisk the cream cheese icing
Beat softened cream cheese and butter together in a bowl until completely smooth. Add the sifted powdered sugar, vanilla, and a pinch of salt.
Whisk well, then slowly add milk or cream, a little at a time, until you reach a thick, spreadable consistency. Adjust sweetness or salt slightly to taste.
Cool briefly and ice the rolls
Let the baked rolls cool in the pan for 10–15 minutes. Spread or drizzle the cream cheese icing over the warm rolls so it softens slightly and seeps into the spirals.
Serve the rolls warm for the best texture. Store leftovers covered at room temperature for one day, or refrigerate for up to three days.
Ingredient Swaps
- Milk: Use any unsweetened non-dairy milk (oat, almond, soy) 1:1 for dairy-free; evaporated milk works if fresh milk isn’t available.
- Butter: Swap with vegan butter or refined coconut oil (same weight) for dairy-free; salted butter is fine—just slightly reduce added salt.
- Flour: Bread flour can replace all-purpose (start at the lower end of the range); for partial whole wheat, substitute up to 25–30% and add a splash more milk if the dough feels stiff.
- Sugar: Use white sugar or coconut sugar in place of brown sugar in the filling; any fine granulated sugar works in the dough.
- Cream cheese icing: Use vegan cream cheese and vegan butter for dairy-free; or replace with a simple glaze (powdered sugar + milk/plant milk + vanilla) if cream cheese isn’t available.
You Must Know
- Doneness – If the centers look puffy but you’re unsure they’re cooked, use a thermometer and pull them at 88–93°C (190–200°F); the tops should be lightly golden and the very center roll should spring back slowly when pressed, not leave a deep dent.
- Troubleshoot – If the dough hasn’t doubled after 8–10 hours and still feels dense, move it somewhere warmer (around 24–27°C / 75–80°F) and give it another 1–3 hours; a sluggish rise usually means the starter or room is cool, not that you need more flour.
- Avoid – Avoid adding more than about 80 g extra flour beyond the lower range (520 g) unless the dough is truly sticky like glue; a very soft, slightly tacky feel and smooth surface means enough structure, and adding extra flour leads to tight, dry spirals.
- Flavor Boost – For deeper flavor, chill the formed rolls covered for 8–16 hours in the fridge; this slower fermentation heightens the sourdough tang and spices, and the cold dough slices more cleanly into even spirals.
- Scale – To serve a crowd, double all ingredients and use two 9×13 pans; keep rise and bake times essentially the same, but start checking for doneness around 20 minutes since some ovens brown faster with multiple pans.
Serving Tips
- Serve warm with extra cream cheese icing drizzled tableside for indulgent customization.
- Pair with hot coffee, chai, or cold brew to balance the rolls’ sweetness.
- Add fresh berries or sliced fruit on the side for color and brightness.
- Plate individually with a dusting of powdered sugar and a light cinnamon sprinkle.
- For brunch, serve in the baking pan center-table with small plates and shareable utensils.
Storage & Make-Ahead
These rolls keep well covered in the fridge for up to 3 days; rewarm gently before serving so they stay soft.
For make-ahead, chill shaped rolls overnight, then bake in the morning.
Baked, unfrosted rolls also freeze well for about 2 months; thaw, warm, then add fresh icing.
Reheating
Reheat rolls gently to keep them soft.
In the oven at 300°F (150°C), covered, 8–10 minutes.
Or in the microwave 10–20 seconds.
A lidded skillet on low also works.
Cinnamon Rolls in Holiday Traditions
When I think about the holidays, I always picture a pan of cinnamon rolls rising on the counter overnight, promising a slow, sweet morning.
The house is quiet, but that gentle yeasty smell already feels like company.
I love knowing that while we sleep, the sourdough is slowly puffing, building flavor and anticipation.
Final Thoughts
Give these sourdough cinnamon rolls a try and enjoy how the slow rise builds incredible flavor and softness.
Once you’ve made them once, have fun tweaking the spices, fillings, or icing to make the recipe your own.
Frequently Asked Questions
Can I Convert This Sourdough Cinnamon Roll Recipe to a Vegan Version?
Yes, you can. I swap whole milk for creamy oat milk, butter for vegan butter, eggs for aquafaba, and cream cheese for tangy vegan cream cheese—my kitchen still smells like a warm, spiced bakery.
How Do I Troubleshoot Dense or Gummy Sourdough Cinnamon Rolls?
I fix dense, gummy rolls by feeding my starter well, extending the first rise, and keeping the dough soft, not stiff. I also slightly underbake; your kitchen’s warmth and patience often decide how tender they’ll be.
What’s the Best Way to Freeze Unbaked Sourdough Cinnamon Rolls?
I freeze them right after shaping and slight proofing: arrange snugly, wrap the pan in double plastic and foil, then freeze. When you’re ready, thaw overnight in the fridge, proof until pillowy, then bake.
How Do Altitude Changes Affect Proofing and Baking These Rolls?
Altitude makes your rolls proof faster and bake quicker, so I’d watch dough, not clocks. When I bake in the mountains, I shorten proofs, lower yeastiness, and tent early to keep them tender and plush.
Can I Make Mini Sourdough Cinnamon Rolls Using This Same Recipe?
Yes, you can. I’d roll the dough thinner, slice 24–30 smaller spirals, and start checking doneness around 14 minutes. I love serving these bite-sized; they vanish from my breakfast table every time.
Sourdough Starter Cinnamon Rolls
Equipment
- 1 stand mixer with dough hook (optional)
- 2 large mixing bowls
- 1 medium mixing bowl
- 1 9×13 inch baking pan
- 1 Rolling Pin
- 1 dough scraper or knife
- 1 Measuring cups set
- 1 Measuring spoons set
- 1 Small saucepan
- 1 Whisk
- 1 Rubber spatula
- 1 pastry brush
- 1 plastic wrap or clean kitchen towel
Ingredients
- 240 gram active sourdough starter 100% hydration
- 240 milliliter whole milk warmed to lukewarm
- 100 gram granulated sugar
- 100 gram unsalted butter melted and cooled slightly
- 2 large eggs room temperature
- 8 gram fine sea salt
- 1 520–600 g all-purpose flour plus more for dusting
- 120 gram unsalted butter very soft
- 180 gram light brown sugar packed
- 2 tablespoon ground cinnamon
- 1 teaspoon ground vanilla or 2 tsp vanilla extract
- 120 gram cream cheese softened
- 60 gram unsalted butter softened
- 180 gram powdered sugar sifted
- 1 teaspoon vanilla extract
- 1 15–30 ml milk or cream as needed
- 1 pinch fine sea salt
Instructions
- In a large mixing bowl, whisk together the active sourdough starter, lukewarm milk, granulated sugar, melted butter, and eggs until smooth.
- Add the salt and 520 g of flour to the bowl and mix with a spoon or in a stand mixer on low speed until a shaggy dough forms.
- Knead by hand or with the dough hook for 7–10 minutes, adding small amounts of the remaining flour only if needed, until the dough is soft, slightly tacky, and elastic.
- Shape the dough into a ball, place it in a lightly greased large bowl, cover tightly, and let it rise at room temperature for 6–8 hours or until roughly doubled and puffy.
- In a medium bowl, combine the soft butter, brown sugar, cinnamon, and vanilla for the filling and mix into a smooth, spreadable paste.
- Lightly flour your work surface, turn out the risen dough, and gently deflate it by pressing it into a rectangle with your hands.
- Using a rolling pin, roll the dough into a large rectangle about 40 x 30 cm (16 x 12 inches), keeping the thickness even.
- Spread the cinnamon filling evenly over the surface of the dough, leaving a 1 cm (½ inch) border along one long edge.
- Starting from the opposite long edge, roll the dough up tightly into a log, pinching the seam to seal.
- Trim the ends if desired, then cut the log into 12 equal slices using a sharp knife or dough scraper.
- Arrange the rolls cut-side up in a greased 9×13-inch baking pan, spacing them evenly.
- Cover the pan tightly with plastic wrap or a clean towel and let the rolls rise at room temperature for 2–4 hours, or refrigerate overnight for a slower rise.
- When ready to bake, remove the pan from the refrigerator (if chilled) and let the rolls sit at room temperature until noticeably puffy, about 45–60 minutes.
- Preheat the oven to 180°C (350°F) while the rolls finish proofing.
- Bake the rolls for 22–28 minutes, until lightly golden on top and the centers read about 88–93°C (190–200°F) if checked with a thermometer.
- While the rolls bake, make the icing by whisking together the cream cheese and butter until smooth, then adding powdered sugar, vanilla, salt, and just enough milk or cream to reach a thick, spreadable consistency.
- Let the baked rolls cool in the pan for 10–15 minutes, then spread or drizzle the cream cheese icing over the warm rolls.
- Serve the cinnamon rolls warm and store any leftovers covered at room temperature for 1 day or refrigerated for up to 3 days.
Notes

Cynthia Weatherford is a seasoned chef and culinary enthusiast who serves as the Recipe creator of Somonday. With decades of experience in the kitchen and a passion for exploring diverse cuisines, Cynthia brings a blend of creativity and technique to every dish. Known for transforming simple ingredients into show-stopping meals, Cynthia believes that cooking is an art form anyone can master. Dedicated to inspiring home cooks, Cynthia shares approachable recipes, pro tips, and culinary wisdom to make every meal memorable.