There’s something about pulling a pan of golden, spiraled sourdough sticky buns from the oven—the caramel bubbling at the edges, the scent of warm cinnamon and butter wrapping around your whole kitchen.
These are the definition of a cozy dessert (or decadent breakfast), with a tender, tangy crumb and a glossy, nutty topping. They take time to rise, but most of it’s hands-off, making them perfect for slow weekends and make-ahead baking.
They’re ideal for comfort seekers, sourdough enthusiasts, and anyone who loves sharing a special treat with family or friends.
I still remember a gray Sunday when these buns turned a gloomy afternoon into an impromptu gathering—neighbors followed the smell, kids crowded around the table, and the whole pan disappeared in minutes.
These sticky buns shine at holiday brunches, lazy Sunday suppers, and any time you’re craving something extra special. Ready to bring this dish to life?
Why You’ll Love It
- Delivers deep, complex flavor from a long, slow sourdough rise
- Bakes into ultra-soft, fluffy layers with gooey caramel pecan topping
- Makes an overnight-friendly dough for relaxed, low-stress morning baking
- Uses simple pantry ingredients plus your active sourdough starter
- Impresses for brunch, holidays, or gifting with bakery-quality results
Ingredients
- 150 g active sourdough starter — 100% hydration and recently fed
- 250 g whole milk — warmed to just above room temp for easier mixing
- 75 g granulated sugar — fine white sugar dissolves best
- 2 large eggs — at room temperature for better dough texture
- 100 g unsalted butter, melted and cooled — avoid adding while hot
- 500 g all-purpose flour — standard protein (about 10–11%) works well
- 8 g fine sea salt — distributes more evenly than coarse salt
- 5 g ground cinnamon — fresh, fragrant spice for the dough
- 1 tsp vanilla extract — real vanilla adds deeper flavor
For the filling:
- 120 g unsalted butter, softened — easily spreadable, not melted
- 150 g light brown sugar, packed — adds moisture and caramel notes
- 10 g ground cinnamon — main flavor for the swirl
- 2 g fine sea salt — balances sweetness in the filling
- 80 g chopped pecans, toasted (optional) — toast to enhance nuttiness
For the sticky topping:
- 120 g unsalted butter — forms the base of the caramel sauce
- 160 g light brown sugar, packed — melts into a rich, sticky glaze
- 120 g heavy cream — creates a smooth, pourable caramel
- 60 g honey or maple syrup — adds depth and shine to the topping
- 3 g fine sea salt — keeps the topping from tasting flat
- 120 g pecan halves (optional) — for a decorative, crunchy top
Step-by-Step Method
Mix the Wet Ingredients
Whisk the active sourdough starter, warm milk, granulated sugar, eggs, melted butter, and vanilla in a large bowl. Blend until smooth and cohesive.
Make sure the milk is warm, not hot, so it doesn’t harm the starter. Set aside briefly while you prepare the dry ingredients, keeping this mixture at room temperature.
Bring the Dough Together
Add flour, cinnamon, and salt to the wet mixture. Stir with a sturdy spoon or mix on low speed in a stand mixer. Combine just until the dough looks rough and shaggy.
Scrape down the sides and bottom so no dry patches remain. Avoid adding extra flour at this stage.
Knead Until Smooth
Knead by hand for 8–10 minutes or in the stand mixer for 5–7 minutes on medium-low speed. Work until the dough becomes smooth, elastic, and slightly tacky but not sticky.
If necessary, dust lightly with flour. Form the dough into a ball, smoothing the surface as you go.
Ferment the Dough
Lightly grease a clean bowl and place the dough inside. Cover tightly. Let it ferment at room temperature for 3–4 hours.
Watch for a 50% increase in volume and a puffy, airy feel. Adjust timing based on your kitchen temperature, allowing the dough enough time to become lively.
Chill for Cold Proof
Transfer the covered bowl to the refrigerator. Cold-proof the dough for at least 6 hours and up to 12.
Let it rest undisturbed. This slow chill develops deeper flavor and strengthens the dough. Keep the surface covered so it doesn’t dry out. Plan ahead for rolling after chilling.
Cook the Sticky Topping
Combine butter, brown sugar, heavy cream, honey or maple syrup, and salt in a small saucepan. Set over medium heat.
Stir continuously until the butter melts and the sugar dissolves. Cook just until smooth and glossy. Avoid boiling vigorously to prevent graininess in the sauce.
Prepare the Baking Pan
Grease a 9×13-inch pan thoroughly. Pour in the warm sticky topping and tilt the pan to coat the bottom evenly.
Scatter pecan halves over the sauce if using, distributing them across the entire surface. Let the topping cool slightly while you prepare and roll the dough.
Mix the Cinnamon Filling
Stir softened butter, brown sugar, cinnamon, and salt together in a medium bowl. Blend until a smooth, spreadable paste forms.
Make sure the butter is soft enough to mix easily. Taste and adjust cinnamon if desired. Keep the filling at room temperature so it spreads cleanly.
Roll Out the Dough
Turn the chilled dough onto a lightly floured surface. Dust the top lightly and pat into a rectangle.
Use a rolling pin to roll it into a 12×18-inch rectangle, long side facing you. Keep the thickness even. Lift and rotate the dough occasionally to prevent sticking.
Spread the Filling
Dollop the cinnamon filling over the rolled dough. Spread it evenly with an offset spatula or the back of a spoon.
Leave a 1/2-inch clean border along the top long edge. Make certain the layer is uniform so the buns bake evenly and spiral beautifully when sliced.
Add Pecans and Roll
Sprinkle chopped pecans over the filling, if using, distributing them from edge to edge. Gently press them into the filling so they adhere.
Starting from the long edge closest to you, roll the dough into a tight log. Keep the roll snug to create defined spirals and avoid gaps.
Seal, Slice, and Arrange
Pinch the seam along the log to seal it well. Trim the ends if uneven.
Use a sharp knife or bench scraper to slice the log into 12 even pieces. Place each slice cut side up in the prepared pan over the sticky topping, leaving a little space between buns for rising.
Proof the Shaped Buns
Cover the pan tightly with plastic wrap or a reusable cover. Proof at warm room temperature for 1.5–3 hours.
Watch for the buns to become noticeably puffy and nearly touching. Avoid overproofing. Press gently with a fingertip: the dough should spring back slowly, leaving a slight indentation.
Bake Until Golden
Preheat the oven to 350°F (175°C) with a rack in the center. Uncover the buns and place the pan in the oven.
Bake 25–30 minutes, until golden brown and set. Check the center with an instant-read thermometer; it should read about 190°F (88°C). Tent with foil if browning too quickly.
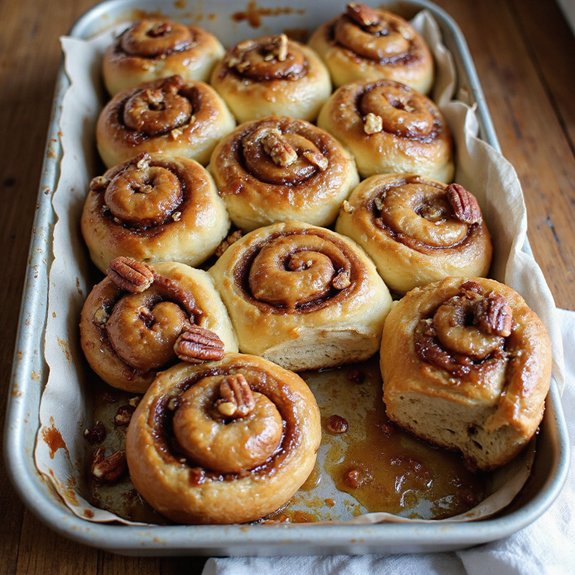
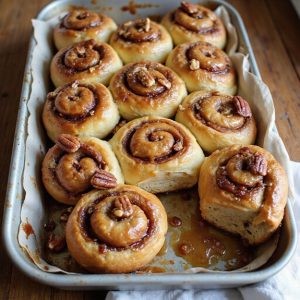
Invert and Serve Warm
Cool the pan on a rack for 5–10 minutes. Run a knife around the edges if needed.
Carefully invert onto a serving platter so the sticky topping coats the buns. Spoon any remaining sauce from the pan over the tops. Let cool briefly, then serve warm for the best texture.
Ingredient Swaps
- Use any milk you have (2%, whole, or a rich plant milk like oat or soy); swap butter for plant-based butter to make the dough and topping dairy-free.
- Substitute chopped walnuts, almonds, or sunflower seeds for pecans, or omit nuts entirely.
- Replace honey/maple syrup with corn syrup or extra brown sugar for budget-friendly versions, and use coconut sugar or partially brown sugar in the dough/filling if that’s what you have.
You Must Know
– Doneness • If the buns look done but the centers seem doughy
Insert an instant-read thermometer into the middle of a center bun; aim for 190–195°F (88–90°C).
If it’s low or if the dough clings wetly to a toothpick, cover loosely with foil and give them 5–10 more minutes so the centers set without over-browning.
– Troubleshoot • If your dough barely rises overnight
Warm it up: set the covered bowl or pan somewhere slightly warm (around 75–80°F / 24–27°C) for 1–3 hours until it looks at least 50% puffier.
Cold, sluggish starter or a cool kitchen just slows fermentation; extra time at a cozy temperature usually fixes it.
– Avoid • If the rolls uncoil or gap apart while cutting or proofing
Roll more snugly and seal harder: tension the log as you roll, pinch the seam firmly, and chill the log 10–15 minutes before slicing.
This tight structure helps the spirals stay intact as they expand and keeps the sticky topping from leaking through gaps.
– Flavor Boost • For deeper caramel and tangy sourdough flavor
Extend the cold proof to 18–24 hours and cook the sticky topping until it darkens one shade beyond starting color.
The longer chill gives more lactic tang; the slightly deeper amber (without burning) adds a toasted toffee note.
– Scale • When doubling or halving the recipe
Keep pan depth and dough thickness similar: two 9×13-inch pans for a double batch, or an 8×8 or 9×9-inch pan (9–10 buns) for half.
Start with the same 350°F (175°C) but expect ±5–10 minutes difference; rely on color (even golden brown) and the 190°F center temp rather than just the clock.
Serving Tips
- Serve warm on a platter, spooning extra caramel sauce over each bun.
- Pair with hot coffee, chai, or a lightly sweet latte to balance richness.
- Add a dollop of whipped cream or vanilla ice cream for a dessert-style presentation.
- Garnish with extra toasted pecans and a pinch of flaky sea salt before serving.
- Serve alongside fresh berries or a simple fruit salad to cut the sweetness.
Storage & Make-Ahead
Sourdough sticky buns keep in the fridge for 3–4 days; rewarm gently in a low oven before serving.
For make-ahead, assemble, cover, and refrigerate shaped buns up to 24 hours, then proof longer before baking.
Baked buns also freeze well, tightly wrapped, for up to 2 months.
Reheating
Reheat buns gently: in a 300°F (150°C) oven, covered, 8–10 minutes.
Or briefly microwave with a damp towel.
For stovetop, warm covered in a skillet over low heat until soft.
Sticky Buns in American Holidays
Often, sticky buns feel like the quiet heart of an American holiday morning—the kind of pastry that fills the house with butter, cinnamon, and caramel before the coffee’s even brewed.
I think of Thanksgiving, when the kitchen already smells like sage and roasting turkey, and these sourdough spirals add a slow, sweet warmth before the rush of the day.
At Christmas, I love pulling the pan from the oven while it’s still barely light outside.
The windows fog, the caramel bubbles at the edges, and the pecans toast to a deep, nutty fragrance.
We stand around the table in sweaters and thick socks, tearing off pieces with our fingers, letting the sauce drip and pool on our plates.
Final Thoughts
Give these sourdough sticky buns a try and enjoy the rich, caramel-y topping and soft, tangy crumb fresh from your own oven.
Once you’ve made them once, have fun tweaking the spices, nuts, or level of sweetness to make them your own signature treat.
Frequently Asked Questions
Can I Make These Sourdough Sticky Buns Without a Stand Mixer?
Yes, you can. I’d mix with a wooden spoon, then knead by hand until satiny and springy. The dough will warm under your palms, smelling of butter and cinnamon, like dawn in a quiet kitchen.
How Do I Troubleshoot Sticky Buns That Don’T Rise Enough?
I’d first check your starter’s strength, then lengthen proofing until the dough feels marshmallow-soft. Warm your kitchen, avoid cold milk or eggs, and next time, let the shaped rolls rise until voluptuously puffy before baking.
Can I Convert This Recipe to Gluten-Free Flour Successfully?
You can, but I’d treat it as a new recipe: use a 1:1 gluten‑free blend with xanthan, add an egg or psyllium for structure, expect softer dough, shorter rise, and a tender, cakier, still-buttery swirl.
What Adjustments Are Needed for Baking at High Altitude?
You’ll reduce yeast activity by shortening proofing, bake a bit hotter, and add slightly more liquid. I’d watch the dough like rising mountain clouds, adjusting until it feels soft, supple, and delicately puffy under your fingertips.
How Can Kids Safely Help With Making Sourdough Sticky Buns?
Kids can safely help by stirring, sprinkling cinnamon sugar, and gently rolling dough while I handle knives, hot pans, and caramel. I keep sleeves snug, hair tied, stools steady, and we savor the warm, buttery aroma together.
Sourdough Sticky Buns
Equipment
- 1 stand mixer with dough hook (optional but recommended)
- 2 large mixing bowls
- 1 medium mixing bowl
- 1 Small saucepan
- 1 9×13 inch baking pan
- 1 Rolling Pin
- 1 Rubber spatula
- 1 sharp knife or bench scraper
- 1 pastry brush
- 1 Plastic wrap or 1 reusable cover for pan
- 1 Measuring cups and spoons
Ingredients
- 150 gram active sourdough starter 100% hydration
- 250 gram whole milk warm
- 75 gram granulated sugar
- 2 large eggs room temperature
- 100 gram unsalted butter melted and cooled
- 500 gram all-purpose flour
- 8 gram fine sea salt
- 5 gram ground cinnamon
- 1 teaspoon vanilla extract
- 120 gram unsalted butter softened
- 150 gram light brown sugar packed
- 10 gram ground cinnamon
- 2 gram fine sea salt
- 80 gram chopped pecans optional; toasted
- 120 gram unsalted butter
- 160 gram light brown sugar packed
- 120 gram heavy cream
- 60 gram honey or maple syrup
- 3 gram fine sea salt
- 120 gram pecan halves optional
Instructions
- In a large mixing bowl, whisk together active sourdough starter, warm milk, granulated sugar, eggs, melted butter, and vanilla until smooth.
- Add flour, cinnamon, and salt to the wet mixture and stir with a spoon or use a stand mixer on low until a rough dough forms.
- Knead by hand for 8–10 minutes or in the mixer for about 5–7 minutes until the dough is smooth, elastic, and slightly tacky.
- Place the dough in a lightly greased bowl, cover, and let it ferment at room temperature for 3–4 hours until puffy and increased in volume by about 50%.
- Transfer the covered bowl to the refrigerator and cold-proof for at least 6 hours or up to 12 hours to develop flavor and make rolling easier.
- For the sticky topping, combine butter, brown sugar, cream, honey or maple syrup, and salt in a small saucepan over medium heat and cook, stirring, until the sugar is dissolved and the mixture is smooth.
- Pour the warm sticky topping into a greased 9×13-inch pan and tilt the pan to coat the bottom evenly, then sprinkle pecan halves over the sauce if using.
- For the filling, mix softened butter, brown sugar, cinnamon, and salt in a medium bowl to form a spreadable paste, then set aside.
- Turn the chilled dough onto a lightly floured surface and roll it into a rectangle about 12×18 inches, with the long side facing you.
- Spread the cinnamon-sugar filling evenly over the dough, leaving a 1/2-inch border along the top long edge.
- Sprinkle chopped pecans evenly over the filling if using and gently press them into the dough.
- Starting from the long edge closest to you, roll the dough tightly into a log, sealing the seam by pinching it closed.
- Trim the ends if needed, then slice the log into 12 even pieces using a sharp knife or bench scraper.
- Arrange the slices cut side up in the prepared pan on top of the sticky topping, leaving a little space between each bun.
- Cover the pan tightly with plastic wrap or a reusable cover and let the buns proof at warm room temperature for 1.5–3 hours, or until noticeably puffy and almost touching.
- When the buns are nearly ready, preheat the oven to 350°F (175°C) with a rack in the center.
- Bake the sticky buns for 25–30 minutes, or until golden brown on top and an instant-read thermometer in the center reads about 190°F (88°C).
- Let the pan cool on a rack for 5–10 minutes, then carefully invert the buns onto a serving platter so the sticky topping runs over them.
- Spoon any remaining sauce from the pan over the buns, then let them cool slightly before serving warm.
Notes

Cynthia Weatherford is a seasoned chef and culinary enthusiast who serves as the Recipe creator of Somonday. With decades of experience in the kitchen and a passion for exploring diverse cuisines, Cynthia brings a blend of creativity and technique to every dish. Known for transforming simple ingredients into show-stopping meals, Cynthia believes that cooking is an art form anyone can master. Dedicated to inspiring home cooks, Cynthia shares approachable recipes, pro tips, and culinary wisdom to make every meal memorable.