There’s something about setting a chilled dish of taco dip with sour cream in the center of the table and watching everyone lean in at once.
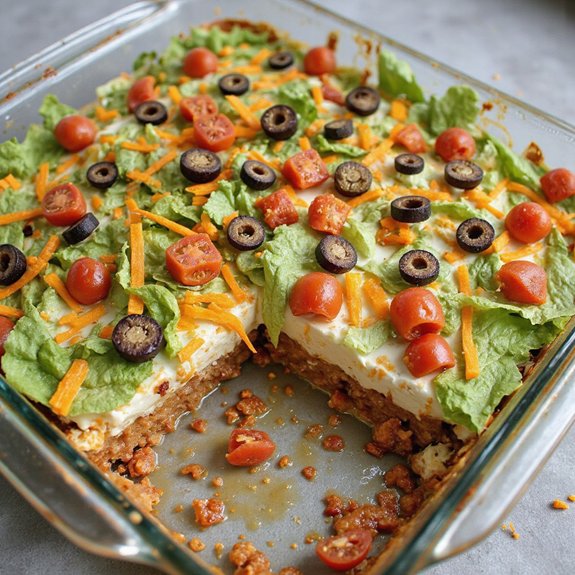
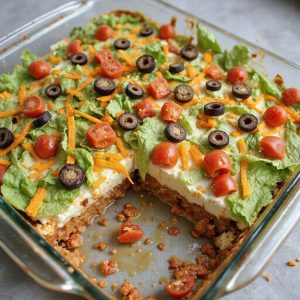
You see layers of creamy white sour cream, bright green lettuce, ruby-red tomatoes, and golden cheese, all waiting under a sprinkle of taco seasoning.
The first scoop releases cool, tangy aromas mixed with the warm scent of spices—a invigorating, crowd-pleasing appetizer that’s ready in about 20 minutes, no oven required.
This dip is made for busy weeknights, game days, and anyone who wants big flavor with very little effort—beginners included.
I still remember a hectic Friday when friends dropped by unannounced; I raided the fridge, layered this dip together, and in minutes the living room felt like a planned party.
It shines at last-minute gatherings, movie nights, and easy entertaining of all kinds.
Ready to bring this dish to life?
Why You’ll Love It
- Delivers bold, zesty taco flavors in every creamy layered bite
- Comes together in minutes with simple, affordable grocery-store ingredients
- Serves a crowd easily, perfect for parties, potlucks, and game days
- Stays sturdy and scoopable thanks to full-fat sour cream and cheese
- Easily customized with toppings, spice level, and favorite salsas
Ingredients
- 1 cup sour cream — use full‑fat for the creamiest texture
- 1 cup cream cheese, softened — bring to room temperature so it mixes smoothly
- 2 tablespoons taco seasoning mix — choose your preferred brand or homemade blend
- 1 cup refried beans — traditional or vegetarian both work well
- 1 cup salsa, medium — drain slightly if very watery to keep layers firm
- 1 cup shredded cheddar cheese — sharp cheddar adds the best flavor
- 1 cup shredded lettuce, finely chopped — iceberg or romaine for extra crunch
- 1/2 cup tomato, diced — use ripe but firm tomatoes so they don’t get mushy
- 1/4 cup black olives, sliced — canned, well-drained to avoid excess brine
- 2 tablespoons green onions, sliced — include some green tops for color
- 1/4 teaspoon salt, optional — add only after tasting the seasoned cream layer
- 1/4 teaspoon black pepper, optional — freshly ground if possible
- 1 bag tortilla chips — pick sturdy chips so they hold up to the thick dip
Step-by-Step Method
Mix the Creamy Base
Combine sour cream, softened cream cheese, and taco seasoning in a medium mixing bowl. Whisk until completely smooth and uniform, with no visible lumps.
Scrape down the sides with a spatula as you go. Taste and adjust seasoning with salt and pepper if desired. Set this creamy mixture aside while you prepare the remaining layers.
Build the Bean Foundation
Spread refried beans evenly over the bottom of a 9×9-inch serving dish. Use a spatula to press and smooth the beans into a level, compact layer.
Make sure there are no gaps so the upper layers sit neatly on top. This bean base supports the dip and keeps the creamy mixture from sinking.
Layer the Cream Mixture
Gently dollop the sour cream and cream cheese mixture over the bean layer. Use a spatula to spread it evenly from edge to edge, taking care not to disturb the beans underneath.
Smooth the surface so the next layers go on neatly. Work slowly to keep the layers distinct and visually appealing.
Add Salsa and Cheese
Spoon salsa over the creamy layer in small portions, then gently spread it into an even layer. Avoid pressing too hard so the layers don’t mix.
Sprinkle shredded cheddar cheese evenly over the salsa, covering it completely. Make certain the cheese forms a consistent blanket that helps hold toppings in place.
Top with Fresh Vegetables
Scatter shredded lettuce evenly over the cheese to form a light, fluffy layer. Add diced tomatoes, sliced black olives, and green onions across the top.
Distribute the vegetables so each scoop includes a bit of everything. Aim for bright, colorful coverage to make the dip look fresh and inviting.
Chill, Rest, and Serve
Cover the dish tightly with plastic wrap to protect the layers. Refrigerate for at least 30 minutes so the dip chills and firms slightly.
Keep it cold until serving time. Remove the plastic wrap just before serving. Set out tortilla chips alongside the dish so guests can scoop generous portions.
Ingredient Swaps
- Use Greek yogurt in place of sour cream for extra protein, and Neufchâtel or light cream cheese instead of full-fat to reduce calories.
- Swap refried beans for black beans or a bean-free base (guacamole) if you prefer; use homemade taco seasoning to avoid added sugar or gluten.
- For vegetarian, keep as is but choose vegetarian refried beans; for vegan, use dairy-free sour cream, vegan cream cheese, and plant-based shredded cheese.
- On a budget, stick with basic cheddar, canned olives, and iceberg lettuce; regionally, you can substitute queso fresco, cotija, or a local melting cheese and use pico de gallo instead of jarred salsa.
You Must Know
- Troubleshoot • If the cream layer looks lumpy or too stiff, beat the sour cream and cream cheese together until completely smooth before assembling; softened cream cheese at cool room temp (about 68–72°F) should give you a silky, spreadable texture that won’t tear the bean layer.
- Avoid • To keep layers from bleeding together, add salsa that’s not watery; if it looks runny, drain in a fine-mesh sieve for 5–10 minutes so it spreads in a thin, even layer without making the cheese and bean layers soggy.
- Make-Ahead • For parties, assemble only the beans, cream layer, salsa, and cheese up to 8–12 hours in advance, then add lettuce, tomatoes, olives, and green onions within 30–60 minutes of serving so the top stays crisp and the lettuce edges don’t brown.
- Flavor Boost • For extra taco flavor without more salt, swap 2–3 tablespoons of the salsa with chunky pico de gallo or add 1–2 extra teaspoons of taco seasoning to the cream layer, tasting after each addition so it’s boldly seasoned when cold (flavors mute slightly after chilling 30+ minutes).
- Scale • For a crowd, double everything and use a 9×13-inch dish; for a smaller group (4 servings), halve the ingredients and use something close to an 8×8 or 8-inch round so the layers stay about 1/2–3/4 inch thick and easy to scoop.
Serving Tips
- Serve in a clear glass dish so guests can see the colorful layers.
- Offer with tortilla chips, sturdy crackers, and fresh veggie sticks for dipping variety.
- Add small bowls of jalapeños, hot sauce, and extra salsa on the side.
- Portion into individual cups for easy, mess-free party servings.
- Garnish with extra green onions and cilantro just before serving for fresh color.
Storage & Make-Ahead
Taco dip keeps well in the fridge for up to 2–3 days.
For best texture, prep beans, cream layer, salsa, and cheese up to a day ahead; add lettuce and fresh toppings just before serving.
This dip doesn’t freeze well—the dairy and fresh vegetables become watery and grainy.
Reheating
Reheat small portions in the microwave at 50% power, stirring often.
For larger amounts, gently warm in an oven-safe dish at low temperature or on the stovetop over low heat.
Game‑Day Party Favorite
When game day rolls around, I want a snack that people swarm to, not just pick at, and this taco dip with sour cream never lets me down.
I set it out in a wide, shallow dish so every scoop hits all the layers—cool cream, hearty beans, bright salsa, and sharp cheddar.
I make it earlier in the day, let it chill, then crown it with crisp lettuce, juicy tomatoes, briny olives, and green onions right before kickoff.
The colors alone pull people in. I surround the dish with sturdy tortilla chips and step back; it disappears play by play.
If you’re feeding a crowd, double the recipe and set out two pans—trust me, one will vanish before halftime.
Final Thoughts
Give this taco dip with sour cream a try the next time you need an easy, crowd-pleasing appetizer—it comes together quickly and disappears just as fast.
Don’t be afraid to tweak the toppings or spice level to make it your own!
Frequently Asked Questions
Can I Make This Taco Dip Vegetarian or Vegan-Friendly?
Yes, you can. I’d swap refried beans for vegetarian ones, use dairy-free sour cream, cream cheese, and cheese, then keep the veggies. You’ll still get that layered, cozy richness without any animal products.
Is This Taco Dip Safe for Gluten-Free Guests?
Yes, it can be safe if you’re careful. I’d use certified gluten-free taco seasoning, salsa, and refried beans, then serve it with clearly labeled gluten-free tortilla chips so your guests can relax and indulge.
How Long Can the Dip Safely Sit Out at a Party?
You can safely leave this creamy dip out for about 2 hours at room temperature. After that, I’d tuck it back into the fridge, letting it chill again like a cozy little midnight snack.
Can I Prepare Individual Taco Dip Cups for Serving?
Yes, you can, and I strongly recommend it. I’d layer beans, cream mixture, salsa, cheese, then crisp toppings in clear cups—so tidy, inviting, and perfect for guests who don’t want double-dipping.
What Are Some Kid-Friendly Variations of This Taco Dip?
You can sweeten it for kids: I’d swap medium salsa for mild, skip olives, use extra cheese, add corn, diced avocado, and crushed Doritos on top. Let them layer their own mini cups.
Taco Dip with Sour Cream
Equipment
- 1 medium mixing bowl
- 1 whisk or spoon
- 1 Rubber spatula
- 1 9×9-inch serving dish or similar size
- 1 Cutting board
- 1 Chef's knife
- 1 plastic wrap
Ingredients
- 1 cup sour cream
- 1 cup cream cheese softened
- 2 tablespoon taco seasoning mix
- 1 cup refried beans
- 1 cup salsa medium
- 1 cup shredded cheddar cheese
- 1 cup shredded lettuce finely chopped
- 1/2 cup tomato diced
- 1/4 cup black olives sliced
- 2 tablespoon green onions sliced
- 1/4 teaspoon salt optional
- 1/4 teaspoon black pepper optional
- 1 bag tortilla chips for serving
Instructions
- In a medium mixing bowl, combine the sour cream, softened cream cheese, and taco seasoning mix, whisking until smooth and well blended.
- Taste the mixture and season with salt and black pepper if needed.
- Spread the refried beans evenly on the bottom of the serving dish to form the first layer.
- Gently spread the sour cream and cream cheese mixture over the bean layer using a spatula.
- Spoon the salsa evenly over the creamy layer, spreading carefully to avoid mixing the layers too much.
- Sprinkle the shredded cheddar cheese evenly over the salsa layer.
- Top with shredded lettuce, making an even layer across the surface.
- Scatter the diced tomato, sliced black olives, and sliced green onions evenly over the top.
- Cover the dish tightly with plastic wrap and refrigerate for at least 30 minutes to chill and set.
- Remove from the refrigerator, uncover, and serve the taco dip chilled with tortilla chips.
Notes

Cynthia Weatherford is a seasoned chef and culinary enthusiast who serves as the Recipe creator of Somonday. With decades of experience in the kitchen and a passion for exploring diverse cuisines, Cynthia brings a blend of creativity and technique to every dish. Known for transforming simple ingredients into show-stopping meals, Cynthia believes that cooking is an art form anyone can master. Dedicated to inspiring home cooks, Cynthia shares approachable recipes, pro tips, and culinary wisdom to make every meal memorable.